


CARVIN
®
GOLD SERIES OVAL POOL | USER MANUAL
9
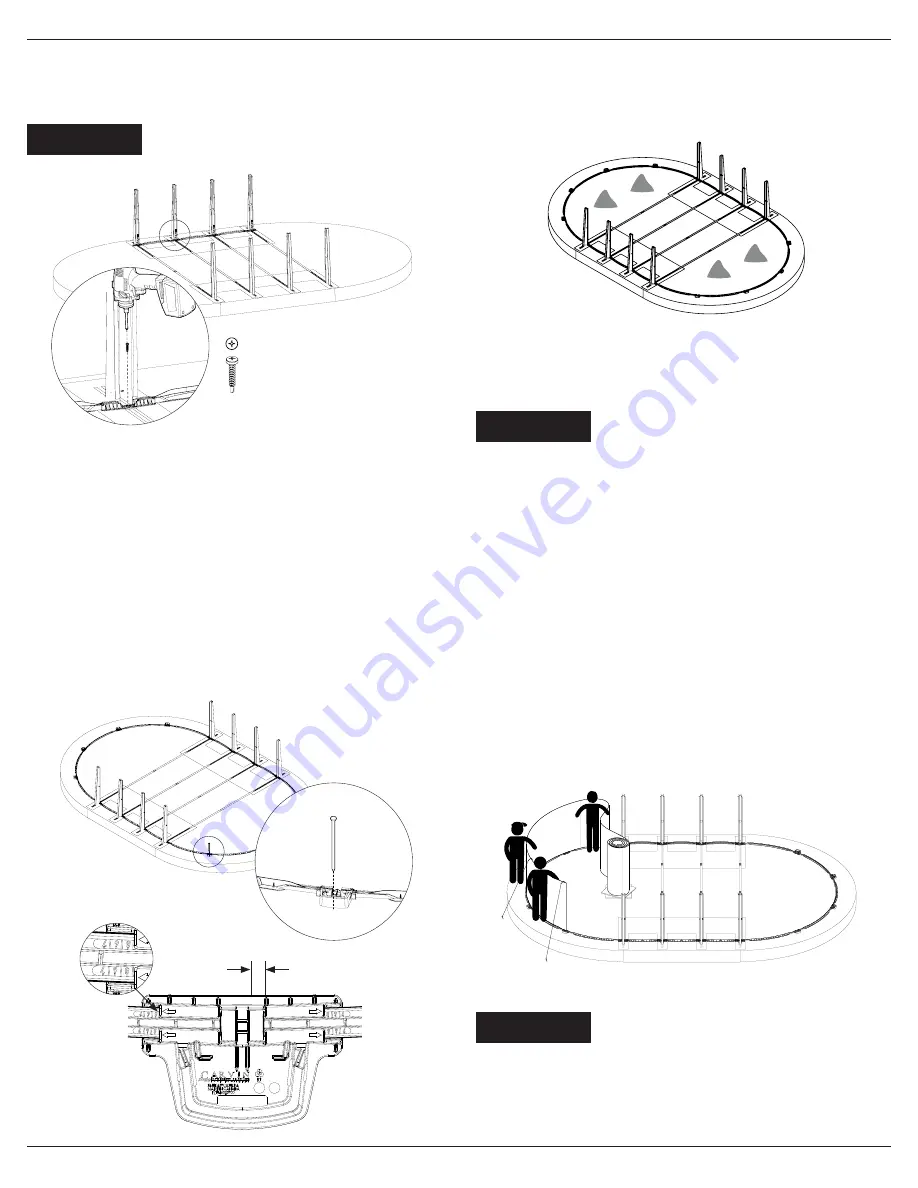
STEP 2
When assembled, screw in all foots in foot beam hole with screw.
DETAIL A
SCALE 1 : 6
ADD DRILL
REVISIONS
REV.
DESCRIPTION
DATE
APPROVED
DETAIL A
SCALE 1 : 6
ADD DRILL
REVISIONS
REV.
DESCRIPTION
DATE
APPROVED
REVISIONS
REV.
DESCRIPTION
DATE
APPROVED
REVISIONS
REV.
DESCRIPTION
DATE
APPROVED
REVISIONS
REV.
DESCRIPTION
DATE
APPROVED
Approx. 1/2’’ to 5/8’’
(Equal on both sides)
WALL INSTALLATION
Do not install the wall on a windy day. Wait for a calm
windless day. You must be at least 3 people to install
the wall.
WARNING
STEP 1
Before starting the installation of the pool wall, make sure the following items are
inside the pool: enough sand or rock dust to have a 2’’ bed over the entire inside
surface of the pool and for the cove (or a prefabricated cove), two sheet of plywood
and a stepladder to be able to exit the pool when the all is closed
STEP 2
Note that the skimmer hole and return are located at the starting end of the rolled
metal wall, therefore position the roll to begin the unfolding of the wall of your pool
where you want to position these items.
STEP 3
Place the two plywood sheets inside the circle of the pool close to where you intend
to put the filter and pump. Take out the wall from the box and place it on a plywood
sheet.
STEP 4
Start unrolling the wall by guiding the bottom of the wall into the lower slot of the
rail (already positioned). The first end of the wall must be in the center of a
bottom plate to allow the installation of the screws so that they are hidden behind
an upright.
Be careful not to push any sand on or inside the rails
which would make it difficult to insert the wall into it.
ATTENTION
1/2'' (13mm) HEX SOCKET
P/N 14072620
Max torque 8.5 N*M (6.3 ft-lbs)
P3 - PHILLIPS DRIVE
P/N 14172209
Max torque 6.3 N*M (6.3 ft-lbs)
7/16'' (11mm) HEX SOCKET
P/N 14455075
Max torque 7.5 N*M (5.5 ft-lbs)
7/16'' (11mm) HEX SOCKET
P/N 14455085
Max torque 7.5 N*M (5.5 ft-lbs)
P3 - PHILLIPS DRIVE
P/N 14455025
Max torque 4 N*M (3 ft-lbs)
Drill at low speed
P3 - PHILLIPS DRIVE
P/N 14455032
Max torque 4 N*M (3 ft-lbs)
Drill at low speed
3/4'' (19mm) HEX SOCKET
P/N 94819A149
Max torque 66 N*M (49 ft-lbs)
3/4'' (19mm) HEX SOCKET
P/N 14455035
Max torque 66 N*M (49 ft-lbs)
P/N 91922A308
P3 - PHILLIPS DRIVE
P/N 14433700
Max torque 3 N*M (2 ft-lbs)
Drill at low speed
P/N 14073852
P3 - PHILLIPS DRIVE
P/N 14455032
Max torque 4 N*M (3 ft-lbs)
Screw at low speed
STEP 5
Add dust stone inside the pool before unrolling the wall. Refer to page 2 sand
required. This step is important before unrolling the wall.
ASSEMBLE THE ROUND SECTION RAILS
STEP 1
Make sure that the surface transitioning from straight to round is at the same level.
STEP 2
Assemble the rounds section with bottom plates (46025715) and long rails
(46026335).
STEP 3
Connect half round section rails in straight section foot.
STEP 4
Measure from the center stake to the inside center of the rails (‘’R’’ dimension at
Squaring out the straight section
) and adjust to the radius of your pool. (See table
page 8). drive a 6’’ nail in front middle of each foot to hold the circle position.
Do not use an impact driver.
IMPORTANT


