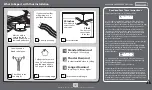
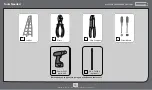
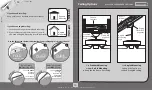
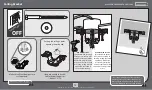
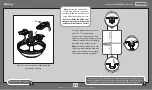
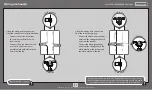
background image

www.CasablancaFanCo.com

1.888.227.2178

3

M8538-01 • 01/12/16 • © 2016 Casablanca Fan Company

Tools Needed

Ladder

Power Drill 

(optional)

9/64” Drill Bit 

(optional)

Screwdrivers

Pliers

Wire Strippers

If mounting to a support structure, you will also need these tools.

Summary of Contents for 51149

Page 1: ...ou with the best ceiling fan available anywhere in the world To register your fan please visit www CasablancaFanCo com register Save your receipt for proof of purchase PA G E 7 PA G E 5 PA G E 20 PA G E 6 30 inches 7 feet PA G E 2 What to Expect with Your Installation Ceiling Bracket Ladder PA G E 3 Tools Needed PA G E 10 Wiring Operation Maintenance Cleaning Troubleshooting Downrod Preparation Ca...

Page 2: ...by turning off the circuit breakers to the outlet box and associated wall switch location If you cannot lock the circuit breakers in the off position securely fasten a prominent warning device such as a tag to the service panel w 3 To reduce the risk of fire electrical shock or motor damage use only Casablanca Solid State Speed Controls w 4 To reduce the risk of personal injury do not bend the bla...

Page 3: ... 888 227 2178 3 M8538 01 01 12 16 2016 Casablanca Fan Company Tools Needed Ladder Power Drill optional 9 64 Drill Bit optional Screwdrivers Pliers Wire Strippers If mounting to a support structure you will also need these tools ...

Page 4: ...u have a flat ceiling Hang your fan by a standard downrod included Ceiling Options Support Structure Ceiling Outlet Box required Angled Mounting Style Standard Mounting Style Support Structure Ceiling Outlet Box required Use Standard Mounting or Low Profile Mounting to hang the fan from a flat ceiling Use Angled Mounting to hang the fan from a vaulted or angled ceiling 4 34O CEILING WALL OPTION 1 ...

Page 5: ...ical Support at 1 888 227 2178 Make sure all four bumpers are still attached Use wood screws included when securing to support structure with approved electrical outlet box Drill 9 64 pilot holes in support structure to aid in securing ceiling bracket with hardware found in the hardware bag Use machine screws provided with outlet box when securing to existing ceiling fan rated outlet box Make sure...

Page 6: ... DISC A R D KEEP Remove the shipping blocks from the motor Save the screws You will need them to install the fan blades DO NOT install the blades before mounting the motor and making the wire connections 6 M8538 01 01 12 16 2016 Casablanca Fan Company ...

Page 7: ...her Shorter Downrod for fans installed close to ceiling Standard Downrod for ceilings 8 10 high For Standard Mount For Low Profile For Standard Mount skip to next page If you need a different downrod length follow these steps Steps 1 5 to remove standard downrod pipe Steps 6 10 to reassemble with new pipe Included pre assembled 7 M8538 01 01 12 16 2016 Casablanca Fan Company ...

Page 8: ...nrod for standard mount only then hand tighten the downrod at least 4 5 full turns until it stops The wires can be cut but leave at least 8 extending from the top of the downrod Downrod continued 8 3 8 Raise the adapter cover Tighten the setscrew with pliers DO NOT HAND TIGHTEN If the setscrew is not tightened securely the fan may fall KEEP M8538 01 01 12 16 2016 Casablanca Fan Company ...

Page 9: ...through the canopy Let the canopy sit loosely on top of the fan DO NOT PICK THE FAN UP BY THE CANOPY OR WIRES Place the downrod ball into the slot in the ceiling bracket Lower the adapter cover until it rests flush against the motor housing M8538 01 01 12 16 2016 Casablanca Fan Company ...

Page 10: ...re connector from the hardware bag Connect the 3 grounding wires green green yellow stripe or bare copper coming from the ceiling downrod and ceiling bracket Note To connect the wires hold the bare metal leads together and place a wire connector over them then twist clockwise until tight FROM FAN Note If using the optional Low Profile canopy you may need to carefully tilt the fan assembly at an an...

Page 11: ...wire from the ceiling to the black wire from the receiver Connect the white grounded wire from the ceiling to both the white wire from the receiver and the white wire from the fan FROM RECEIVER black blue yellow blue Using the orange wire connectors from the remote control hardware bag Connect the yellow wire from the receiver to the black wire from the fan Connect the blue wire from the receiver ...

Page 12: ...ile canopy into place so that the screw holes are aligned Position the canopy so that when lifted into place the canopy fits into the hanging bracket as shown Insert the two canopy screws found in the hardware bag Screw Holes 12 M8538 01 01 12 16 2016 Casablanca Fan Company ...

Page 13: ...to the motor with washers found in the hardware bag and the screws you saved from page 6 Then securely tighten after all three screws are attached Note Guide posts are present on the blade to help align the blade with the motor 13 M8538 01 01 12 16 2016 Casablanca Fan Company ...

Page 14: ...alfway into the mounting plate on the bottom of the motor housing It does not matter which two screw holes you choose Make sure the upper switch housing is securely attached to the mounting plate Failure to properly secure all 3 assembly screws could result in the switch housing fixture falling Insert the third machine screw found in the hardware bag into place and then tighten all three screws 14...

Page 15: ...t kit assembly fixture falling Connect the 9 pin plugs from the upper switch housing and light kit assembly Make sure to line up the colored markings on the connectors Wrap the keyhole slots around the screws and twist the light kit assembly clockwise Screw two machine screws from the hardware bag halfway into the upper switch housing It does not matter which two screw holes you choose M8538 01 01...

Page 16: ...o they line up with the tabs on the inside rim of the upper switch housing Carefully lift the globe then rotate clockwise until it is held tightly in place by the tabs Notch Tab Insert the third machine screw found in the hardware bag into place and then tighten all three screws 16 M8538 01 01 12 16 2016 Casablanca Fan Company ...

Page 17: ... side up Replace with a CR2032 battery when necessary See next page for fan operation instructions CONGRATULATIONS YOU RE DONE The remote transmitter is already paired to the receiver and ready to use Note If you would like to operate multiple fans or multiple remotes or if your remote is not working please see the Troubleshooting section at the end of this manual Phillips Head Screw Battery Door ...

Page 18: ... You must remove the globe or no light cap in order to access the reverse switch Reverse Switch The up arrow and down arrow buttons control the lights on the fan Quickly press and release the up or down arrow to turn the lights off and on Hold the up or down arrow to raise or dim the light level Dimming Mode To enable dimming you must first set your remote to Dimming Mode To toggle Dimming Mode on...

Page 19: ...ts will flash for visual confirmation The lights will stay on 50 brightness for 15 seconds and then begin to dim After a total of 30 seconds the lights will be completely off The Safe Exit Program gives you about thirty seconds of light when you turn the lights off to exit the room before the lights go out To use Safe Exit Your Universal Remote comes with a wall plate that has two posts on which t...

Page 20: ... are cracked If so replace all of the blades Remote does not work Make sure the battery is installed correctly Install a new battery If the remote still does not work you may need to pair your remote To prevent faulty operation please disconnect power at the wall switch breaker or fan from all other ceiling fans within range while pairing To pair cycle power to the fan by turning power off and bac...

Page 21: ...le fans operated by a single remote control you must pair the transmitter to each additional receiver The receiver that shipped with your fan is already paired to the transmitter Note To prevent faulty operation you MUST disconnect power at the wall switch breaker or fan from all other ceiling fans within range while pairing each fan For each additional fan ensure that a compatible receiver is ins...

Reviews: