background image

8

HANGING

SLOT

Figure 6

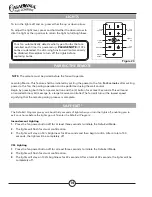
Step 2h.

 Using both hands, lift the fan body from the 

hook and position the hanging slots on both sides 

of the fan body, using the two fan mounting screws 

located on the ceiling mounting plate. Slide the two 

slots on both sides of the fan body between the head 

of the screws and rotate the fan body clockwise into 

the elongated slots as shown in Figure 6.

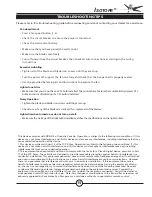
Step 2i.

 Install the other two canopy screws by 

holding the fan body cover to the ceiling mounting 

plate as shown in Figure 7 Tighten all four screws 

until hand tight.

CANOPY RING

TABS 

CANOPY

SCREWS

CANOPY

RING

Figure 7

Figure 8

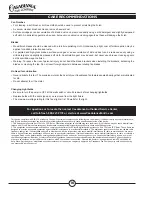
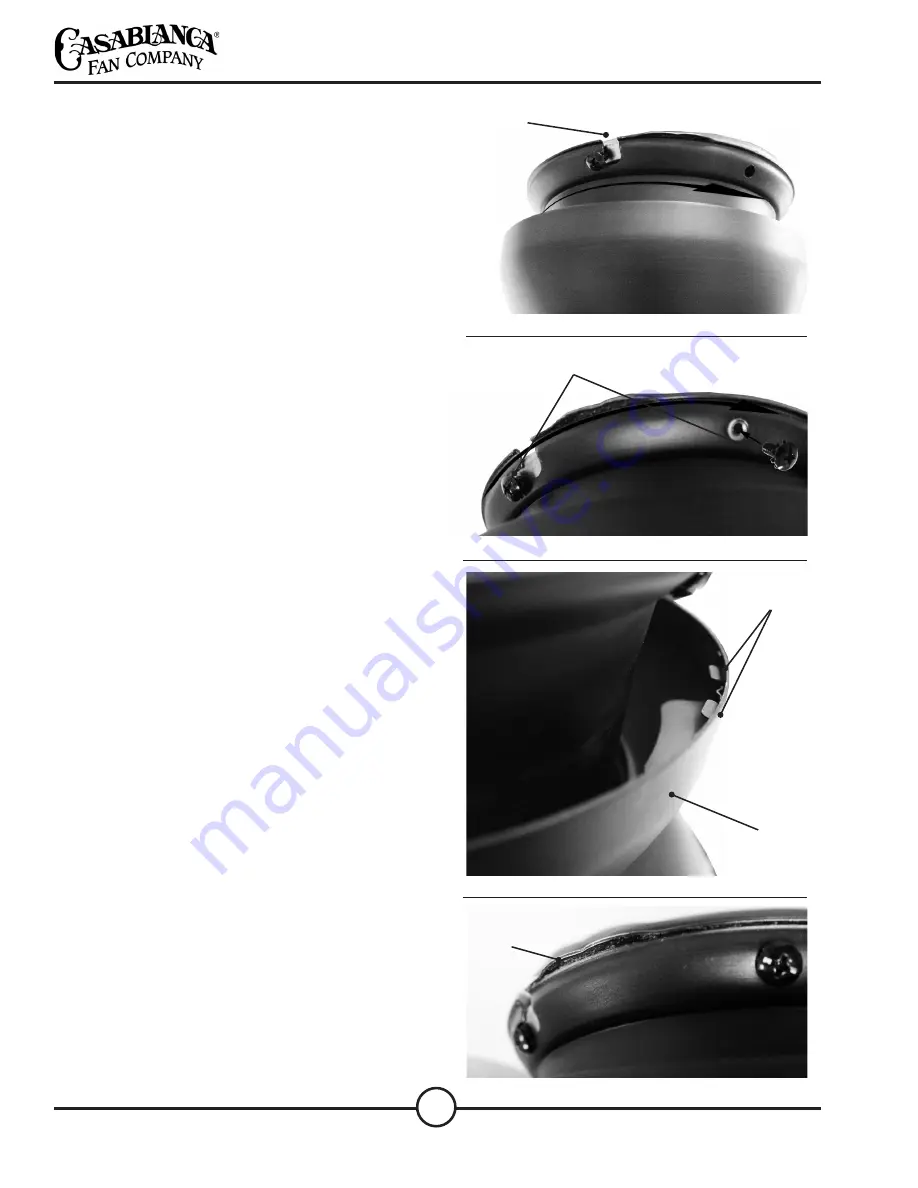
Step 2j.

 Before going to the next step, locate the two 

sets of canopy ring tabs that are on the top edge of 

the canopy as shown in Figure 8. Now locate the two 

sets of canopy tab holders found at the top of the fan 

body near the ceiling as shown in Figure 9.

CANOPY

TAB HOLDER

Figure 9

Summary of Contents for Isotope

Page 1: ...ion for future reference CAUTION To avoid possible electrical shock make certain that electricity is turned off at the circuit breaker or fuse box before attempting any installation procedure Isotope Owner s Manual READ AND SAVE THESE INSTRUCTIONS CONTENTS INTRODUCTION 3 MOUNTING RECOMMENDATIONS 4 FAN INSTALLATION 5 MOTOR HOUSING INSTALLATION 6 BLADE INSTALLATION 10 LIGHT BULB AND GLASS INSTALLATI...

Page 2: ...eces that may remain after unpacking Do not brush Styrofoam into wiring cavities The blades in each pack are matched for equal weight to assure smooth fan operation If more than one fan is being installed do not mix blades from different cartons When cleaning painting or working near your fan be cautious of the fan and blades Always turn power to the ceiling fan OFF before replacing light bulbs or...

Page 3: ...ll wires are within the canopy and that no wires are being pinched WARNING Do not bend the blade brackets when installing the brackets balancing the blades or cleaning the fan Do not insert foreign objects in between the rotating fan blades Unpacking Before assembling and installing your ceiling fan remove all parts from the shipping cartons and check them against the parts listed in the Parts Gui...

Page 4: ...pen cupboard doors to clear the fan blades Do not install a fan close to or over a pool or spa High humidity combined with corrosive gases will destroy the finish and warp the blades Fan Size Variable fan speed capability permits the use of a full size 52 fan even in smaller rooms For very large rooms two fans may be needed GENERAL GUIDELINES GETTING STARTED Note The weight of this fan is 28 pound...

Page 5: ...e If not a 2 x 4 stud must be installed Step 1a Carefully feed the ceiling wires through the center hole of the ceiling mounting plate Attach the plate as shown with ground wire down to the ceiling fixture outlet box with the screws provided Ensure that the outlet box wires are not pinched by the washers or between the mounting plate and the ceiling JOIST CEILING WIRING CEILING MOUNTING PLATE GREE...

Page 6: ...own in Figure 3 and Figure 4 Step 2a Unlock the canopy cover from the canopy ring tabs to loosen and bring down to fan body as shown in Figure 1 Step 2b Remove the fan mounting screws from the fan body and set aside You will use these later Step 2c Remove the shipping plate from the top of the canopy Figure 2 CEILING HARDWARE not to scale Wire Nuts 3 Canopy Screws 4 Figure 1 CANOPY RING Fan Body F...

Page 7: ...e Secure with wire nut as shown in Figure 4 BLACK wire from receiver to the BLACK conductor wire from the power source Secure with wire nut as shown in Figure 4 GREEN GROUND WIRES WHITE WIRES BLACK WIRES Figure 4 Figure 5 Step 2f After making the wire connections the wires should be tucked into the outlet box The wires should be spread apart with the three grounded conductor wires being placed on ...

Page 8: ...ngated slots as shown in Figure 6 Step 2i Install the other two canopy screws by holding the fan body cover to the ceiling mounting plate as shown in Figure 7 Tighten all four screws until hand tight CANOPY RING TABS CANOPY SCREWS CANOPY RING Figure 7 Figure 8 Step 2j Before going to the next step locate the two sets of canopy ring tabs that are on the top edge of the canopy as shown in Figure 8 N...

Page 9: ...e canopy ring Lock the CANOPY RING TABS and the CANOPY TAB HOLDERS by rotating the canopy cover clockwise as shown in Figure 10 locking the canopy ring in to place CANOPY RING Step 2l Check your work by making sure the canopy cover has an even gap between the ceiling and canopy ring as shown in Figure 11 ...

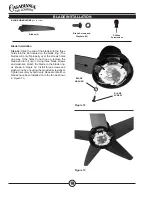
Page 10: ...over the screws holes one way If the holes do not line up remove the blade and turn it over Using three blade screws and washers attach the blade to the blade ring as shown in Figure 12 Install three screws and washer one by one using the provided screwdriver Tighten securely by hand only Repeat until all five blades have been installed on to the fan as shown in Figure 13 Phillips Screwdriver BLAD...

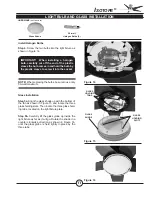
Page 11: ...he bulb by the plastic sleeve to screw it into the socket GLASS SHADE Figure 14 Figure 15 Glass Installation Step 5a Align the glass shade up with the bottom of the fan as shown in Figure 15 and locate the three glass holding slots Then locate the three glass hold ing tabs located on the light fixture plate Step 5b Carefully lift the glass globe up inside the light fixture as far as it will go Rot...

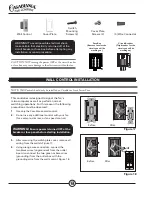
Page 12: ...you will be working on Cover Plate WALL CONTROL INSTALLATION This controller is designed to signal the fan s microcomputer as well as perform normal switching operations For this reason the following precautions must be observed NOTE Wall Control should only be installed on Casablanca 5xxxx Series Fans 1 Use only the Casablanca wall control 2 Do not use any additional control with your fan for exa...

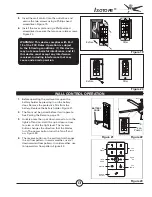
Page 13: ...he battery holder Figure 21 2 The fan must be paired before it will operate See Pairing the Remote page 14 3 Quickly press the up or down arrow to turn the lights off and on Hold the up or down arrow to raise or dim the light level The reverse button changes the direction that the blades turn The power button turns the fan off and on Figure 23 4 The reverse button on the wall control changes the a...

Page 14: ...w to dim the light or the up arrow to return the light to full brightness LIGHTS PAIRING THE REMOTE NOTE The remote must be paired before the fan will operate SAFE EXIT The Safe Exit Program gives you about thirty seconds of light when you turn the lights off enabling you to exit your home before the lights go out To enter the Safe Exit Program Incandescent Lighting 1 Press the fan power button of...

Page 15: ...to try to correct the interference by one or more of the following measures Reorient or relocate the receiving antenna Increase the separation between the equipment and receiver Connect the equipment into an outlet on a circuit different from that to which the receiver is connected Consult the dealer or an experienced radio TV technician for help Note Any changes or modifications to the transmitte...

Page 16: ...e 1 888 227 2178 or visit us at www CasablancaFanCo com This device complies with RSS 210 of Industry Canada Operation is subject to the following two conditions 1 this device may not cause interference and 2 this device must accept any interference including interference that may cause undesired operation of the device 1 This device complies with part 15 of the FCC Rules Operation is subject to t...

Reviews: