5
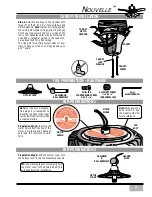
FAN PREPARATION - HARDWARE
TIP:
Use masking tape to temporarily hold
the motor cover to the downrod ball; this
will ease downrod installation.
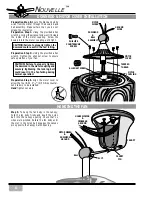
FAN PREPARATION 2
Note:
For the next 5 prepara-
tion steps it is convenient to
leave the fan body in the lower
carton styrofoam as it provides
a stable work-top.
DOWNROD &
BALL ASSEMBLY
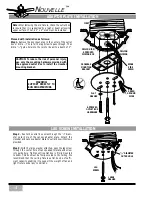
Preparation Step B.
Slide the motor cover onto
the Perma•Lock™ downrod assembly as shown.
MOTOR
COVER
DOWNROD
&
BALL ASSEMBLY
GROUND
WIRE
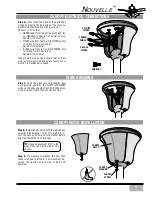
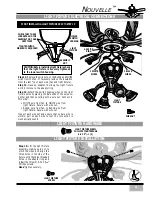
Step 4.
Attach the canopy to the cross bar with
three (3) of the 8-32 X 4
1
/
8
″
canopy screws and
#8 lock washers,
hand
tighten until snug against
the ceiling. On sloped ceilings, align the canopy
hatch opening toward the top or peak of the
room. Your Casablanca fan may be installed on
a vaulted or cathedral ceiling in the same man-
ner as described for a flat ceiling.
The Hang-Tru
®
mounting system makes it pos-
sible to hang your fan on ceilings sloped up to
a 32
°
angle.
CANOPY INSTALLATION
CANOPY
SCREW
CANOPY
LOCK
WASHER
CANOPY
FAN PREPARATION 1
FAN
BODY
M
O
TO
R
SH
IEL
D
LEA
VE I
N PLAC
E UNTIL INSTA
LLATI
ON
AN
D
W
IR
IN
G
CO
M
PL
ET
E
RE
M
O
VE
THIS
SHIELD
WHEN INSTALLAT
ION
IS
CO
M
PL
ET
E
CAUTION
DAMP LOCATION RATED FANS
REQUIRE A GROUND FAULT INTERRUPTER (GFI)
USE A WEATHER PROOF OUTLET BOX
PROPERLY CONNECT GROUND WIRES
USE ONLY UNDER A WEATHER
PROOF STRUCTURE
DANGER
IT IS IMPERITIVE THAT THE LOCKSCREW
BE SET TIGHTLY AGAINST THE DOWNROD
THREADS AFTER FAN IS ASSEMBLED
FAILURE TO DO SO WILL CAUSE FAN TO FALL
TIGHTEN
LOCKSCREW
TIGHTEN
LOCKSCREW
INSTALLER
GIVE THIS TAG TO THE
CONSUMER AFTER
INSTALLATION COMPLETE
INSTALLER
CONFIRM LOCKSCREW
IS PROPERLY TIGHTENED
DO NOT OIL SEALED BEARINGS!
P/N 1942640 SRB4/96
MOTOR
SHIELD
MOTOR
WIRES
Preparation Step A.
Remove the
motor shield from the top of the
motor, note the caution message
and read the instructions care-
fully.
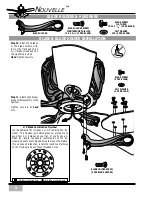
CANOPY
HATCH
OPENING
PHILLIPS
COUNTERSUNK SCREW
8-32 X
9
/
16
″
MOTOR COVER
N
OUVELLE
™
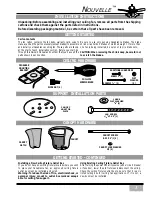
Note:
Write down the
Serial Number and
the model number for
future reference.
ALLEN SET SCREW
1
⁄
4
-20 x
1
⁄
4
"
(PRE-INSTALLED)
3mm
ALLEN WRENCH
Summary of Contents for Nouvelle
Page 1: ...NOUVELLE OWNER S MANUAL...

