4
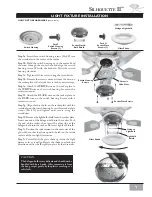
CEILING MEDALLION BRACKET INSTALLATION
Step 1a:
Lay ceiling medallion bracket on flat surface, flat
side down. Insert four adjuster screws (Pack A) in outer
screwholes as shown and hand-twist two full full turns.
Step 1b.
Insert motor housing screws (Pack B) into three
screwholes as shown in picture and hand-twist two full turns.
Step 1c.
Turn ceiling medallion bracket over and raise flat
side to ceiling.
Step 2a.
Remove the knockout plug in the center of the out-
let box.
Step 2b.
Route the outlet box wires through the center hole
of the ceiling medallion bracket. Attach the ceiling medal-
lion bracket to the outlet box with the screws provided (Pack
C), ensuring that the outlet box wires are not pinched by the
washer.
Ceiling Medallion Bracket
Motor Assembly
Motor Housing
Medallion Plate
CEILING MEDALLION PREPARATION AND INSTALLATION
Screw Pack A:
Adjuster Screws (4)
Screw Pack B:
Motor Housing Screws (3)
Screw Pack C:
3" x 10-32"
roundhead screws (2)
1
1
/
2
" x 8-32"
roundhead screws (2),
washers (4),
nuts (4)
CEILING MEDALLION HARDWARE
(not to scale)
A
B
WARNING!
Support directly to building structure only.
CAUTION:
To reduce the risk of personal injury, use only the
mounting hardware provided with the approved
outlet box to install the ceiling medallion bracket.
A
B
B
A
A
Summary of Contents for Silhouette II
Page 15: ...15 SILHOUETTE II NOTES...
Page 16: ...16 NOTES...

