6
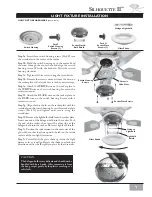
Step 5.
Raise the medallion plate to the ceiling medallion
bracket and fit the four keyholes into the adjuster (A) screws.
To align, insert an alignment tab onto each of the four
adjustment screws with the printed side facing up. Align
the raised dots with the alignment tabs. Twist the medallion
plate clockwise until locked into place. Pull out the four tabs.
MEDALLION PLATE INSTALLATION
BLADE PREPARATION AND INSTALLATION
Medallion Plate
Ceiling Medallion
Bracket
Blade Irons (5)
Blade Medallions (5)
Blades (5)
Screw Pack D
Blade Screws (21)
Screw Pack E
Blade Iron Screws (11)
Step 6a.
Sandwich a blade between a blade medallion and
blade iron. Thread four blade screws (Pack D) through the
screwholes and tighten using the provided screwdriver.
Repeat for each blade.
Step 6b.
Attach each blade/blade iron assembly to the motor
by threading two blade iron screws (Pack E) through the
matching holes in the blade iron and the motor. Using the
Phillips screwdriver, tighten the screws loosely. After all five
blade assemblies have been installed, tighten the screws
securing with the screwdriver.
Blade Iron Screws
Blade Screws
BLADE HARDWARE
(not to scale)
Alignment
Tabs
Raised
Dots
Summary of Contents for Silhouette II
Page 15: ...15 SILHOUETTE II NOTES...
Page 16: ...16 NOTES...

