29
28
IN
ST
A
LL
A
TI
O
N
IN
ST
A
LL
A
TI
O
N
Installation
Installation
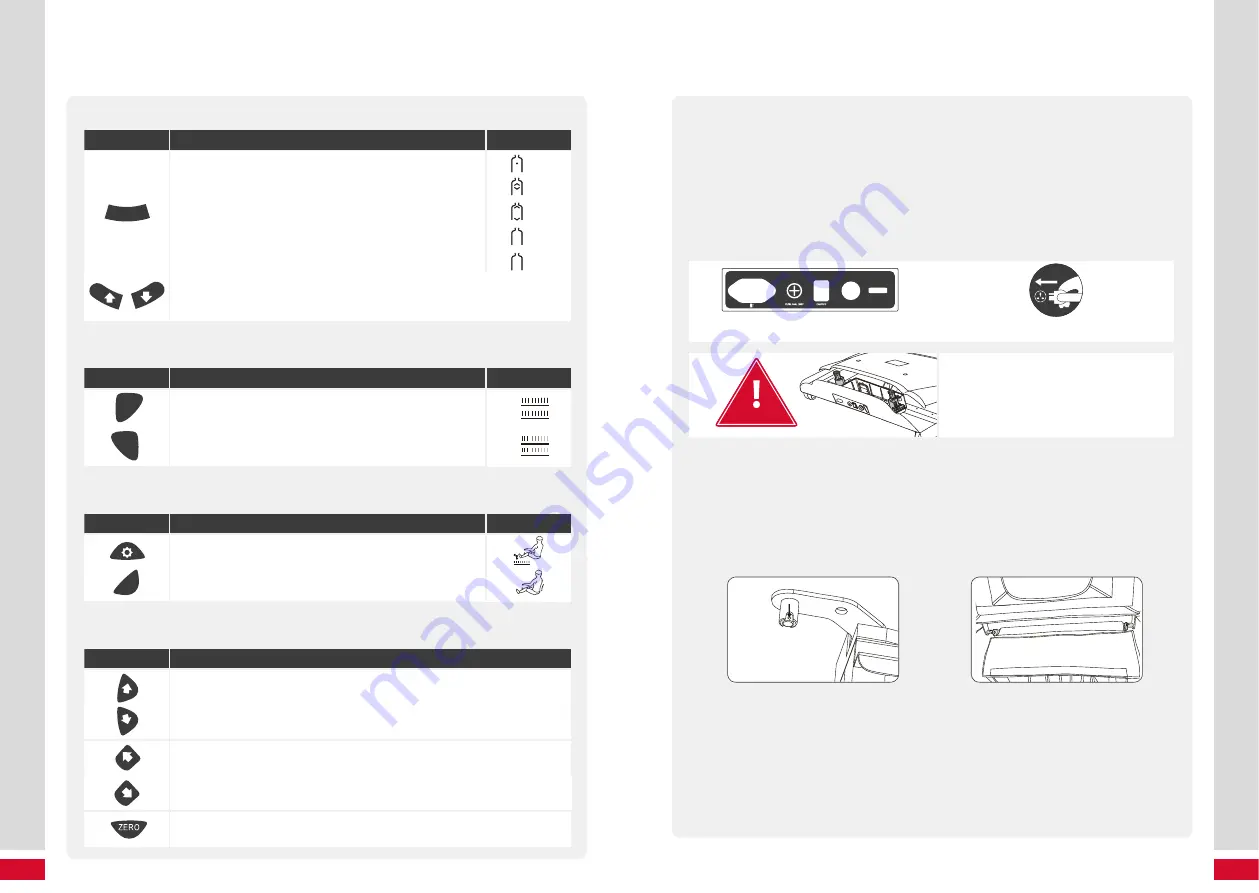
BACK STRETCH
BUTTON
DESCRIPTION
DISPLAY
Bac k St retc h
H0
H1
H2
H3
H4
Back stretch
Fixed position (fixed point) massage back and forth
Bac k St retc h
H0
H1
H2
H3
H4
Small area (partial area) massage back and forth
Bac k St retc h
H0
H1
H2
H3
H4
Overall massage back and forth
Bac k St retc h
H0
H1
H2
H3
H4
Upper body massage back and forth
Bac k St retc h
H0
H1
H2
H3
H4
Lower body massage back and forth
Bac k St retc h
H0
H1
H2
H3
H4
Bac k St retc h
H0
H1
H2
H3
H4
Bac k St retc h
H0
H1
H2
H3
H4
Massage hand move up / Massage hand move down
Massage point adjust (in fixed point, partial modes you can adjust the massage
position)
AIRBAG-MASSAGE
BUTTON
DESCRIPTION
DISPLAY
Bac k St retc h
H0
H1
H2
H3
H4
Air
pressure
Three air pressure modes(full body, arm and leg )
for lower body
Bac k St retc h
H0
H1
H2
H3
H4
Arm
Feet
Back St
retch
H0
H1
H2
H3
H4
Air
intensity
With three grades adjustable
Bac k St retc h
H0
H1
H2
H3
H4
Arm
Feet
SOLE ROLLER / HEATING
BUTTON
DESCRIPTION
DISPLAY
Back St
retch
H0
H1
H2
H3
H4
Sole roller: sole roller switch, with 3 speed levels available
Bac k St retc h
H0
H1
H2
H3
H4
Bac k St retc h
H0
H1
H2
H3
H4
Heater
Infrared back heating needs about 3 minutes to thoroughly
heat up
Bac k St retc h
H0
H1
H2
H3
H4
FOOT REST / BACK REST / ZERO GRAVITY
BUTTON
DESCRIPTION
Bac k St retc h
H0
H1
H2
H3
H4
Foot rest UP: With activating this button, the foot rest will lift slowly. It will stop,
when you let go of the button.
Bac k St retc h
H0
H1
H2
H3
H4
Foot rest DOWN: With activating this button, the foot rest will lower slowly. It
will stop, when you let go of the button.
Bac k St retc h
H0
H1
H2
H3
H4
Back rest UP: With activating this button, the back rest will lift slowly. It will
stop, when you let go of the button.
Bac k St retc h
H0
H1
H2
H3
H4
Back rest DOWN: With activating this button, the back rest will lower slowly. It
will stop, when you let go of the button.
Bac k St retc h
H0
H1
H2
H3
H4
Zero Gravity: Everytime you press this button, the chair will go to the next of
two different reclining position.
4 – STOP MASSAGE / MEMORY FUNCTION
a) With activating the Power-Key during the massage all massagefunctions stop, the back rest
as well as the foot rest go back to their starting position. Within this time you can set the
memory function. After the regular operating time the memory function can also be set,
althoughthe back and foot rest won‘t go back to their starting positions.
b) Press M1 or M2 within 10 seconds to save the adjustments of the last massage.
c) After using your massage chair please disconnect it from the power supply.
Diagram of the switch position of power supply
Bac k St retc h
H0
H1
H2
H3
H4
Power switch method map
Bac k St retc h
H0
H1
H2
H3
H4
WARNING
Thanks to the safety switch in the power
supply vox, the chair automatically stops all
functions, when there is too much pressure
on that part of the chair. this way, it prevents
people from getting injured.
5 – CALF INSTALLATION
a) Install the rotating shaft into the fixed axle. Please pay attention to the correct alignment of
the R-pin. (Chart 1)
b) After the fixed axle is aligned and connected correctly, put everything together as shown in
the second picture. (Chart 2)
Bac k St retc h
H0
H1
H2
H3
H4
Chart 1
Bac k St retc h
H0
H1
H2
H3
H4
Chart 2
Summary of Contents for ALPHASONIC
Page 1: ... timetorelax ALPHASONIC brainwave stimulation system Body Mind syncSystem ...
Page 56: ...111 110 ...
Page 57: ......


