background image

26

27

INSTALLATION

INSTALLATION

INST

ALLA

TION

INST

ALLA

TION

[3]

[3]

[10]

[9]

[41]

[29]

[39]

[29]
[39]

Hold here.

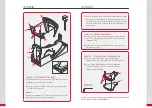
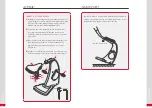
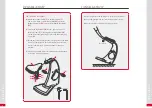
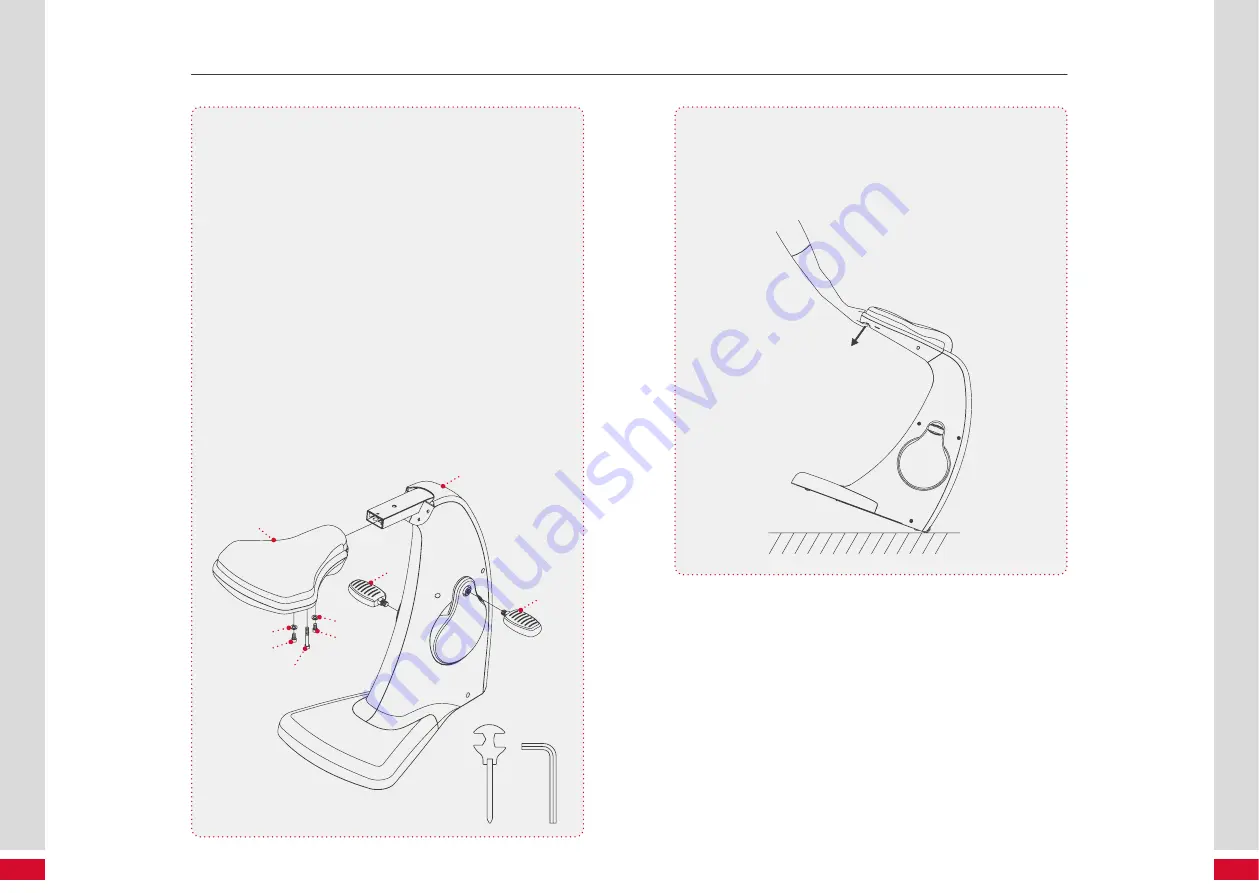
SEAT & PEDAL ASSEMBLY


[a]

  Attach the Seat Assembly 

[3]

 to the Main Frame 

[1]


and secure with two Lock Washers (M8)

[29]

, two Bolts 

(M8xp1.25x16mm) 

[39]

 and one Bolt (M8xp1.25x50mm)

[41]

.

[b]

  Thread the Right Pedal 

[10]

 into the right crank area of 

the Main Frame 

[1]

. Firmly tighten the Right Pedal 

[10]


clockwise into the right crank. Tighten the Pedal as firmly 
as possible.

[c]

  Thread the Left Pedal 

[9]

 into the left crank area of the Main 

Frame 

[1]

. Firmly tighten the Left Pedal 

[9]

 counter-clock-

wise into the left crank. Tighten the Pedal as firmly as 
possible.

[d]

  Finish the assembly, make sure that all parts are tightened 

before you use the equipment.

Put your fingers into the holding hole located on the back of 
the Seat and gently move the item to the desired location.

Make sure the floor is level while towing the item.

Summary of Contents for Movello

Page 1: ...MOVELLO BEDIENUNGSANLEITUNG MANUAL relaxmyway...

Page 2: ...te Ausrichtung auf eineVerbesserung der Lebensqualit t zeichnen die CASADA Produkte ebenso aus wie die zuverl ssige und hervorra gende Qualit t WIR GRATULIEREN Mit dem Kauf dieses aktiven Sitzm bels h...

Page 3: ...Aktivit tsger t Aktivit t auf berlastungsfreiem Niveau zu jeder Zeit und zu nahezu jeder T tigkeit integrierbar Ohne Anstrengung und gelenkschonend ganz nebenbei bewegen DAS Einsatzgebiet des Movello...

Page 4: ...Das Ger t sollte nicht von Personen mit einem Gewicht von mehr als 120kg verwendet werden Das Ger t sollte nur von einer Person zu dem jeweilgen Zeitpunkt verwendet werden Das Ger t ist f r den Hausge...

Page 5: ...es bereits vormon tiert wurde Folgende Werkzeuge sind f r die Montage beigelegt Multi Schraubenschl ssel mit Kreuzschlitzschraubendreher Imbu schl ssel 6 mm ERSTE SCHRITTE Packen Sie den Karton auf e...

Page 6: ...tzrahmen 2 damit an dem Hauptrahmen 1 zu befestigen SCHRITT 2 HINTERE ABDECKUNG a Bringen Sie die hintere Abdeckung 13 an dem Hauptrah men 1 an und befestigen Sie diesen mit vier Schrauben M4x12mm 33...

Page 7: ...al 10 im Uhrzeigersinn und ziehen Sie es so fest wie m glich an c F hren Sie das linke Pedal 9 in den linken Kurbelbereich des Hauptrahmens 1 Drehen Sie das linke Pedal 9 gegen den Uhrzeigersinn und z...

Page 8: ...inwirkung oder als Folge von Repara tur oder nderung die nicht vom Hersteller oder einem autorisierten Vertragsh ndler vorgenommen wurde aufgetreten ist Die Gew hrleistung vom H ndler beschr nkt sich...

Page 9: ...ent an unmistakeable design and a focused orientationtowardsabetterqualityoflifearewhatcharacterizeCASADA products as much as their unbeatable and reliable quality CONGRATULATIONS With the purchase of...

Page 10: ...ivity equip ment at the same time Activity on congestion free level at any time and to integrate virtually any activity Without effort and incidentally moving along the way THE main advantage of the M...

Page 11: ...persons weighing over 265 pounds 120 kgs The equipment should be used by only one person at a time The equipment is for home usage Maintenance Replace the defective components immediately and or keep...

Page 12: ...ar area Follow the List of Assembly Parts below to check and make sure all assembly parts are present and in good condition Do not dispose of the packing material until the assembly process is complet...

Page 13: ...e drawing shown above unscrew them 43 from the rear side of the Main Frame Assembly 1 to attach the Rear Support Frame 2 to the Main Frame As sembly 1 and secure with the removed washers and nuts REAR...

Page 14: ...ighten the Right Pedal 10 clockwise into the right crank Tighten the Pedal as firmly as possible c Thread the Left Pedal 9 into the left crank area of the Main Frame 1 Firmly tighten the Left Pedal 9...

Page 15: ...re the end of the warranty period The warranty claim does not apply if it is established that a defect has occurred e g through external influence or as a result of repair or al teration not carried o...

Page 16: ...30 31 NOTES NOTES...

Page 17: ......

Reviews: