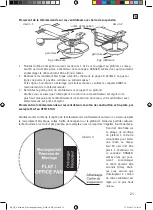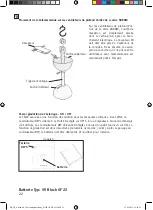
background image


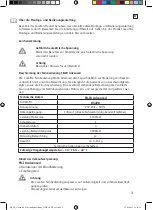
GRUNDSÄTZLICHES

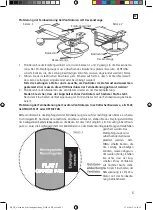
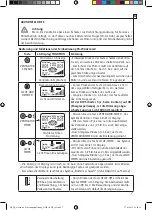
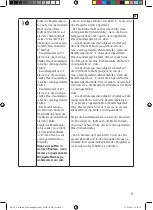
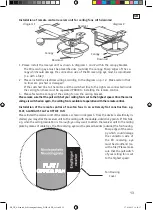
 Achtung


Wenn Ihr Ventilator über einen Schalter zur Drehrichtungsänderung für Sommer- / 

Winterbetrieb verfügt, so darf dieser nur bei Stillstand der Flügel (Motor AUS) umgeschaltet 
werden! Bei Nichtbeachtung unterliegen Schäden am Motor und/oder der Fernbedienung nicht 
der Gewährleistung.

7

D

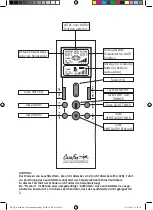
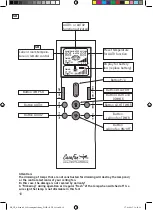
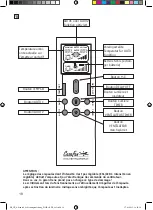
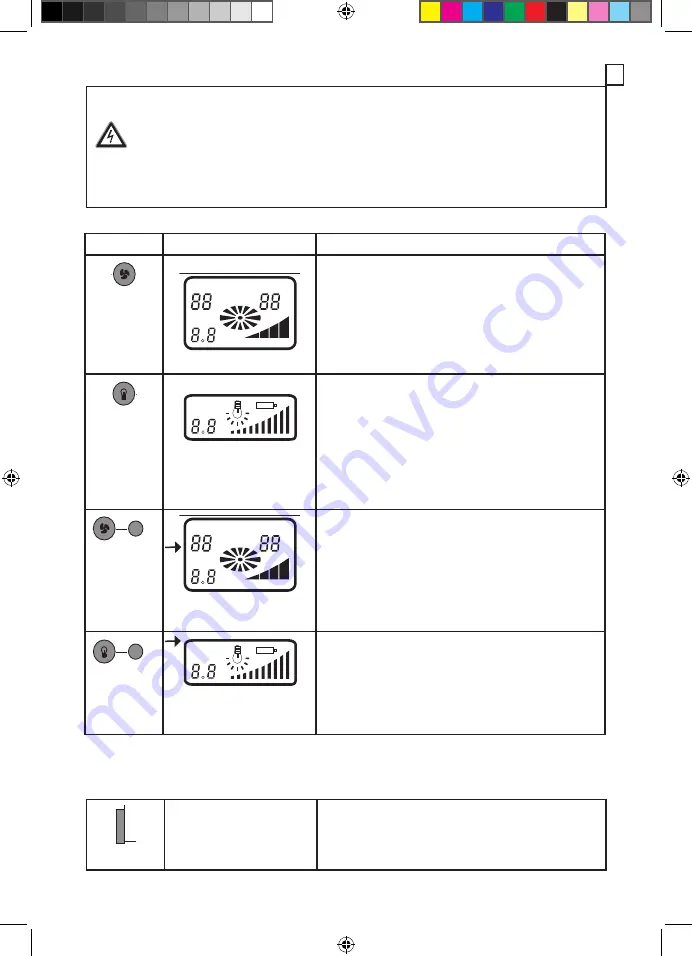
Taste

LC-Display/FUNKTION

Erklärung

ROOM TEMP

AUTO

AUTO

1

2

SET TEMP

TIMER

1 2 3 4

°F

°C

°F

°C

H

TIMER

H

TEMP

 SET

DELA

Y OFF

>

>

AUT

O2

AUT

O1

TIMER

TIMER

VENTILATOR 

EIN/AUS

Ventilator-LC-Anzeige

ROOM TEMP

AUTO

AUTO

1

2

SET TEMP

TIMER

1 2 3 4

°F

°C

°F

°C

H

TIMER

H

TEMP

 SET

DELA

Y OFF

>

>

AUT

O2

AUT

O1

TIMER

TIMER

Ventilator AN (Stufe 4)

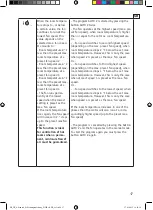
- Einmaliges Drücken der Taste schaltet den Ventila-
tor ein, ein weiteres Drücken schaltet den Vent. aus.
- Zum Schutz des Motors läuft der Ventilator auf 
der höchsten Stufe an. Nach 5 Sek. wird auf die 
gewählte Stufe umgeschaltet.
- Zum Umschalten der Geschwindigkeit zwischen den 
Stufen 1 und 4 werden die Tasten 

“

/

”

 gedrückt.  

ROOM TEMP

AUTO

AUTO

1

2

SET TEMP

TIMER

1 2 3 4

°F

°C

°F

°C

H

TIMER

H

TEMP

 SET

DELA

Y OFF

>

>

AUT

O2

AUT

O1

TIMER

TIMER

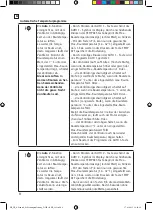
LICHT UND 

DIMMER

Beleuchtungs-Anzeige

ROOM TEMP

AUTO

AUTO

1

2

SET TEMP

TIMER

1 2 3 4

°F

°C

°F

°C

H

TIMER

H

TEMP

 SET

DELA

Y OFF

>

>

AUT

O2

AUT

O1

TIMER

TIMER

Licht und Dimmer an

- Kurzes Drücken der Taste schaltet das Licht in 
der vorgewählten Helligkeit ein, ein weiteres 
kurzes Drücken schaltet das Licht aus.
- Längeres Drücken (> 0,6 Sek.) der Taste dimmt 
das Licht langsam ab.

Ist der DIP-Schalter 5 (s. Seite 6 unten) auf ON 

(Energiesparlampe), ist die Dimmung abge-

schaltet und nur Licht EIN/AUS möglich!

ROOM TEMP

AUTO

AUTO

1

2

SET TEMP

TIMER

1 2 3 4

°F

°C

°F

°C

H

TIMER

H

TEMP

 SET

DELA

Y OFF

>

>

AUT

O2

AUT

O1

TIMER

TIMER

VENTILATOR 

TIMER

ROOM TEMP

AUTO

AUTO

1

2

SET TEMP

TIMER

1 2 3 4

°F

°C

°F

°C

H

TIMER

H

TEMP

 SET

DELA

Y OFF

>

>

AUT

O2

AUT

O1

TIMER

TIMER

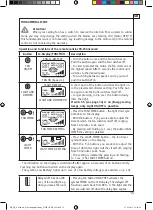
Ventilator Timer-

Einstellung

- Drücken Sie die Taste VENTILATOR-TIMER - das 
Symbol Ventilator Timer blinkt im Display.
- Mit den Tasten 

“

/

”

 kann nun die Ausschaltzeit 

des Ventilators von 1/2 Std. bis zu 24 Std. einge-
stellt werden.
- Durch längeres Drücken (> 1 Sek.) der Taste 
VENTILATOR-TIMER wird die Einstellung gelöscht.

ROOM TEMP

AUTO

AUTO

1

2

SET TEMP

TIMER

1 2 3 4

°F

°C

°F

°C

H

TIMER

H

TEMP

 SET

DELA

Y OFF

>

>

AUT

O2

AUT

O1

TIMER

TIMER

LICHT 

TIMER

ROOM TEMP

AUTO

AUTO

1

2

SET TEMP

TIMER

1 2 3 4

°F

°C

°F

°C

H

TIMER

H

TEMP

 SET

DELA

Y OFF

>

>

AUT

O2

AUT

O1

TIMER

TIMER

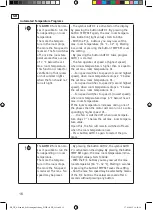
Licht Timer-Einstellungen

- Drücken Sie die Taste LICHT-TIMER - das Symbol 
Licht Timer blinkt im Display.
- Mit den Tasten 

“

/

”

 kann nun die Abschaltzeit der 

Leuchte von 1/2 Std. bis zu 24 Std. eingestellt werden.
- Durch längeres Drücken (> 1 Sek.) der Taste LICHT-
TIMER wird die Einstellung gelöscht.

- Die Anzeige im Display wird nach ca. 40 Sek. ohne Tastendruck abgeschaltet. Zum Wieder-
einschalten des Displays kann jede beliebigige Taste kurz gedrückt werden.
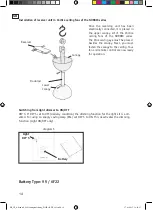
- Bei schwacher Batterie leuchtet das Symbol „Batterie schwach“ (siehe Übersicht auf Seite 2).

Bedienung und Funktionen der Fernbedienung FB-IR Advanced

ROOM TEMP

AUTO

AUTO

1

2

SET TEMP

TIMER

1 2 3 4

°F

°C

°F

°C

H

TIMER

H

TEMP

 SET

DELA

Y OFF

>

>

AUT

O2

AUT

O1

TIMER

TIMER

Verzögerte Abschaltung 
(99 Sek.) des Ventilators 
und Beleuchtung, z.B. beim 
Verlassen des Raumes.

- Durch Drücken der Taste DELAY OFF erscheint das 
Symbol TIMER im LC-Display. Die Abschaltzeit läuft 
nun von 99 bis 0. Die Beleuchtung und der Ventila-
tor schalten nach Ablauf der Verzögerung aus. 

FB_IR_Advanced_bedienungsanleitung_D-GB+I+FR_v62.indd   7

17.01.2015   19:26:16

Summary of Contents for FB-IR Advanced

Page 1: ...or a soffito FB IR Advanced ROOM TEMP AUTO AUTO 1 2 SET TEMP TIMER 1 2 3 4 F C F C H TIMER H TEMP SET DELAY OFF AUTO2 AUTO1 TIMER TIMER D Montage und Bedienungs anleitung 2 GB Mounting and operating manual 10 F Instructions de montage et de service 18 I Istruzioni per il montaggio e l uso 26 170115v62 FB_IR_Advanced_bedienungsanleitung_D GB I FR_v62 indd 1 17 01 2015 19 26 14 ...

Page 2: ...OR TIMER Taste VENTILATOR EIN AUS Taste TEMP SET Taste AUTO 1 Taste AUTO 2 2 ACHTUNG Das Dimmen von Leuchtmitteln die nicht dimmbar sind nicht dimmbare ESL LED führt zur Zerstörung des Leuchtmittels und oder der Steuerelektronik Ihres Ventilators In diesem Fall fällt der Schaden nicht unter die Gewährleistung Ein Flackern im Betrieb oder unregelmäßiges Aufblitzen des Leuchtmittels im ausge schalte...

Page 3: ...eschwindigkeits stufen sowie die Ein Ausschaltung Eine eventuell vorhandene Beleuchtung am Ventilator kann unabhängig vom Betriebszustand des Motors ein und ausgeschaltet und gedimmt wer den 3 Technische Daten FB IR Advanced Artikel Nr 85228 Nennspannung 230 Volt 50 Hz Datenübertragung Infrarot direkte Sichtverbindung Sender Empfäner Leistung Motor max 115 Watt Schutzklasse I Drehzahlstufen 4 Leis...

Page 4: ...tilators auf höchster Stufe steht Dadurch entstehende Beschädigungen an der Elektronik des Empfangsteils der Fernbedienung werden nicht von der Gewährleistung abgedeckt Das Gerät darf nur vollständig montiert betrieben werden Elektrisches Schaltschema braun blau blau braun schwarz Infrarot Empfangsauge L Licht L Motor N N L Montage Achtung Vor Beginn der Installation ist unbedingt die Netzspannung...

Page 5: ...bedienung betriebs bereit Baldachin Baldachin Deckenstange Deckenstange Empfangseinheit Skizze 2 Skizze 1 5 Bitte montieren Sie das Empfangsteil der Fernbedienung wie auf der nachfolgenden Skizze 3 schema tisch dargestellt Nachdem der elektrische Anschluss erfolgt ist kleben Sie das Empfangsteil mittels der beiliegenden Selbstklebepunkte an die Decke Ist dies nicht möglich z B bei sehr grobem Rauh...

Page 6: ...nbedie nung ist nun betriebsbereit 6 Batterie Typ 9V Block 6F 22 D Umschaltung Dimmung der Beleuchtung AN AUS Die FB IR Advanced verfügt über eine Dimmfunktion für Standard Leuchtmittel Hierzu muss der DIP Schalter 5 s Skizze 5 auf OFF gesetzt sein Soll ein Energiesparleuchtmittel verwen det werden muss dieser DIP Schalter mit Hilfe eines kleinen Schraubendrehers auf ON gesetzt werden Die Dimmfunk...

Page 7: ... C F C H TIMER H TEMP SET DELAY OFF AUTO2 AUTO1 TIMER TIMER VENTILATOR TIMER ROOM TEMP AUTO AUTO 1 2 SET TEMP TIMER 1 2 3 4 F C F C H TIMER H TEMP SET DELAY OFF AUTO2 AUTO1 TIMER TIMER Ventilator Timer Einstellung Drücken Sie die Taste VENTILATOR TIMER das Symbol Ventilator Timer blinkt im Display Mit den Tasten kann nun die Ausschaltzeit des Ventilators von 1 2 Std bis zu 24 Std einge stellt werd...

Page 8: ...Raumtemperatur 4 C unter die eingestellte Max Raumtemperatur fällt Oder die Ventilatorgeschwindigkeit schaltet auf Stufe 1 langsamste Stufe wenn die Raumtem peratur 6 C unter die eingestellte Max Raum temperatur fällt Steigt die Raumtemperatur in einer der Zwischen stufen wieder an läuft auch der Motor entspre chend auf höherer Stufe Oder der Ventilator wird abgeschaltet wenn die Raumtemperatur 7 ...

Page 9: ...ingestellten Max Raumtemperatur ist Oder die Ventilatorgeschwindigkeit schaltet auf die zweithöchste Stufe ausgehend von der max voreingestellten Drehzahlstufe wenn die Raumtemperatur 2 C unter der eingestellten Max Raumtemperatur fällt Dies ist jedoch nur der Fall wenn als max Drehzahlstufe die Stufe 2 voreingestellt ist Oder die Ventilatorgeschwindigkeit schaltet auf die dritthöchste Stufe ausge...

Page 10: ...n LICHT TIMER Button ceiling fan TIMER Button ceiling fan ON OFF Button TEMP SET Button AUTO 1 Button AUTO 2 10 GB GB Attention The dimming of lamps that are not constructed for dimming will destroy the lamp and or the control electronics of your ceiling fan In this case the damage is not covered by warranty A flickering during operation or irregular flash of the lamp when switched off is a sure s...

Page 11: ... with lights these may be switched on or off or dimmed irrespec tive of the fan motor function 11 Technical data Type FB IR Advanced Code Nbr 85228 Mains voltage 230 Volt 50 Hz Data transmission Infrared Power motor max 115 Watt Protection clas I No of speeds 4 Power light max 300 Watt Dimming Tungsten bulb ON OFF ESL bulb yes Weight kg ca 0 15 kg CasaFan reserves the right to make improving chang...

Page 12: ...he installation please make sure that the pull switch on the fan is set to the highest speed Any damage caused to the circuitry of the remote control s receiver due to faulty installation is not covered by the remote control s warranty Only operate the unit when completely assembled Electrical diagram brown blue blue brown black infrared receiving eye L light L motor N N L Installation ATTENTION B...

Page 13: ... the mains voltage is switched on again the ceiling fan is available to operation with the remote control Canopy Canopy Downrod Downrod Receiver diagram 2 diagram 1 13 Please install the receiver unit of the remote as shown in diagram 3 Once the device is electrically in stalled you may stick the receiver unit to the ceiling with the double sided sticky points If this fails e g when the ceiling de...

Page 14: ...he canopy Next you must fasten the canopy to the ceiling Your fan and remote control are now ready for operation 14 Battery Type 9V 6F22 GB diagram 5 Battery Light DIP 5 1 2 3 4 5 Switching from light dimmer to ON OFF DIP 5 If DIP 5 set to OFF delivery condition the dimming function for the light kit is acti vated For using an enegry saving lamp ESL set DIP 5 to ON This deactivates the dimming fun...

Page 15: ... H TEMP SET DELAY OFF AUTO2 AUTO1 TIMER TIMER FAN TIMER ROOM TEMP AUTO AUTO 1 2 SET TEMP TIMER 1 2 3 4 F C F C H TIMER H TEMP SET DELAY OFF AUTO2 AUTO1 TIMER TIMER FAN TIMER SETTING Press the FAN TIMER button the light timer sym bol blinks on the display With the buttons you are able to adjust the time at which the fan switches itself off ranging from 30 minutes to 24 hours By pressing and holding...

Page 16: ...room temperature drops 4 C below the set max room temperature Or fan speed switches to speed 1 lowest speed when room temperature drops 6 C below the set max room temperature If the room temperature increases during one of the phases then the motor will also run at a corre spondingly higher speed Or the fan is switched off when room tempera ture drops 7 C below the set max room tempera ture value ...

Page 17: ...eed when room temperature is higher than or equal to the set max room temperature Or fan speed switches to second highest speed depending on the max preset fan speed when room temperature drops 2 C below the set max room temperature However this is only the case when speed 2 is preset as the max fan speed Or fan speed switches to third highest speed depending on the max preset fan speed when room ...

Page 18: ...TEUR TIMER Bouton VENTILATEUR marche arrêt Bouton TEMP SET Bouton AUTO 1 Bouton AUTO 2 18 FR ATTENTION Le réglage des ampoules dont l intensité n est pas réglable ESL LED à intensité non réglable détruit l ampoule et ou l électronique de commande du ventilateur Dans ce cas la garantie ne prend pas en charge ce type de dommage Le scintillement lors du fonctionnement ou l étincellement irrégulier de...

Page 19: ...permet aussi de gérer la fonction de marche d arrêt et de réglage d intensité d un système d éclairage dont l appareil serait éventuellement équipé 19 Caractéristiques techniques FB IR Advanced Code 85228 Tension nominale 230 Volt 50 Hz Infrarouge Puissance moteur max 115 Watt Classe de protection I Vitesses 4 Puissance max de l éclairage 300 Watt Variateur d éclairage Oui ajustable DIP 5 dans l é...

Page 20: ...ventilateur de plafond est réglé sur le plus haut niveau Dans le cas contraire l endommagement du système électronique de l unité de réception de la télécommande n est pas couvert par la garantie L appareil ne doit être utilisé qu entièrement assemblé Schéma de montage électrique marron bleu bleu marron noir recevoir oeil infrarouge L Lumière L Moteur N N L Attention L électricité doit être coupée...

Page 21: ...ateur avec télécommande est prêt à l emploi garniture garniture tige inférieure tige inférieure unité de réception dessin 2 dessin 1 21 Veuillez monter l unité de réception de la télécommande conformément au dessin 3 ci dessous Après le raccordement électrique collez l unité de réception sur le plafond à l aide des pastilles autocol lantes fournies Si ceci n est pas possible par exemple en cas de ...

Page 22: ...i 22 Batterie Typ 9V Block 6F 22 Cache supérieur Cache inférieur FR Passer gradation de l éclairage ON OFF Le FB IR avancée a une fonction de variation pour les ampoules ordinaires A cet effet le commutateur DIP schéma 5 s Doit être réglé sur OFF 5 Si un ampoules à économie d énergie sont utilisés ces commutateurs DIP doivent être réglés à l aide d un petit tournevis sur ON La fonction de gradatio...

Page 23: ...MP SET DELAY OFF AUTO2 AUTO1 TIMER TIMER VENTILATEUR TIMER ROOM TEMP AUTO AUTO 1 2 SET TEMP TIMER 1 2 3 4 F C F C H TIMER H TEMP SET DELAY OFF AUTO2 AUTO1 TIMER TIMER Ventilateur Timer paramètage Pressez la touche VENTILATEUR TIMER le sym bole correspondant clignote à l écran Les touches permettent de régler l heure d arrêt du ventilateur de 1 2 h à 24 h Une pression prolongée 1 s de la touche VEN...

Page 24: ...ouche AUTO 1 vous démarrez le programme AUTO 1 Le ventilateur fonctionne sur le niveau 4 le plus haut niveau lorsque la température de la pièce est supérieure ou égale à la température maximale préréglée Ou bien la vitesse du ventilateur passe au niveau 3 le deuxième niveau en intensité lorsque la tempé rature de la pièce descend à 2 C en dessous de la température maximale de la pièce Ou bien la v...

Page 25: ...iveau Si la température remonte le niveau de rotation augmente par étapes de 2 C jusqu à atteindre le niveau de rotati on maximal préréglé Idéal pour la ventilation de pièces chaudes lorsqu un flux d air permanent mini mal est à assurer Deux pressions sur la touche AUTO 2 permettent de démarrer le programme AUTO 2 Le ventilateur marche au plus haut niveau niveau de rotation préréglé maximal lorsqu...

Page 26: ...ER Tasto VENTILATORE TIMER Tasto VENTILATORE ON OFF Tasto TEMP SET Tasto AUTO 1 Tasto AUTO 2 26 I ATTENZIONE La regolazione delle lampadine non regolabili ESL LED non regolabili causa la distruzione della lampadina e o dell elettronica di comando del ventilatore In questo caso il danno non è coperto da garanzia Se la lampadina emette uno sfarfallio quando è accesa o lampeggia in modo irre golare q...

Page 27: ...e la scelta di 4 livelli di velocità e l accensione spegnimento L eventuale illuminazione presente sul ventilatore può essere accesa spenta e regolata indipendentemente dalla modalità di funzionamento del motore 27 Dati tecnici FB IR Advanced Codice 85228 Tensione di rete 230 V 50 Hz Transmettere informatione infrarossi Potenza motore max 115 W Classe di protezione I Regolazioni velocità 4 Potenza...

Page 28: ... provocati in questo modo all impianto elettronico dell elemento di ricezione del telecomando non sono coperti da garanzia L apparecchio può essere utilizzato solo a montaggio completato Schema di collegamento elettrico bruno blu blu bruno nero Ricevitore infrarossi occhio ATTENZIONE Attenersi assolutamente alla descrizione riportata sull elemento di ricezione L Illumin L Motore N N L Installazion...

Page 29: ...izzato con il telecomando Baldacchino Asta Asta ricevitore telecomando schizzi 2 schizzi 1 29 Montare l elemento di ricezione del telecomando come illustrato schematicamente dal seguente schi zzo 2 Dopo aver eseguito il collegamento elettrico attaccare l elemento di ricezione al soffitto con i punti autoadesivi forniti in dotazione Se ciò non è possibile per esempio in caso di intonaco molto ruvid...

Page 30: ...e lecomando è quindi pronto per l uso schizzo 5 30 Batteria Typo 9V Block 6F 22 I Interruttore regolazione dell illuminazione ON OFF La FB IR avanzato ha una funzione di regolazione per le lampadine standard A tal fine il DIP switch Schema 5 s Deve essere impostato su OFF 5 Se si utilizzano un lampadine a risparmio energetico questi interruttori DIP devono essere impostati con un piccolo cacciavit...

Page 31: ...tasto la luce si abbassa lentamente ROOM TEMP AUTO AUTO 1 2 SET TEMP TIMER 1 2 3 4 F C F C H TIMER H TEMP SET DELAY OFF AUTO2 AUTO1 TIMER TIMER VENTILATORE TIMER ROOM TEMP AUTO AUTO 1 2 SET TEMP TIMER 1 2 3 4 F C F C H TIMER H TEMP SET DELAY OFF AUTO2 AUTO1 TIMER TIMER Ventilatore Timer Regolazione Premere il tasto VENTILATOR TIMER il simbolo Ventilator Timer lampeggia sul display Con i tasti è po...

Page 32: ... viene avviato il programma AUTO 1 Il ventilatore funziona al livello 4 livello mas simo se la temperatura ambiente è superiore o uguale alla temperatura ambiente massima imposta ta Oppure la velocità del ventilatore si accende al livello 3 secondo livello più alto se la temperatura ambiente scende di 2 K al di sotto della temperatura ambien te massima Oppure la velocità del ventilatore si accende...

Page 33: ...basso Se la temperatura dell ambi ente risale il livello di numero di giri aumenta ad intervalli di 2 fino al numero di giri max preimpostato Ideale per la ventilazione in ambienti caldi dove è necessario garantire sempre una corrente d aria minima permanente Premendo 2 volte il tasto AUTO 2 viene avviato il programma AUTO 2 Il ventilatore funziona al livello massimo livello di giri preimpostato m...

Page 34: ...à la directive EU 2002 96 EC Le symbole représentant une poubelle barrée présent sur l appareil indique qu à la fin de son cycle de vie il devra être traité séparémentdes déchets domestiques Il devra donc être confié à un centre de collecte sélective pour appareils électriques et électroniques ou rapporté au revendeur lors de l achat d un nouvel appareil L utilisateur est responsable de la remise ...

Page 35: ...35 FB_IR_Advanced_bedienungsanleitung_D GB I FR_v62 indd 35 17 01 2015 19 26 22 ...

Page 36: ... mehr als 0 004 Masseprozent Blei enthalten befindet sich unter dem Mülltonnen Symbol die chemische Bezeichnung des jeweils eingesetzten Schadstoffes dabei steht Cd für Cadmium Pb steht für Blei und Hg für Quecksilber Batterien dürfen nicht über den Hausmüll entsorgt werden Sie sind zur Rückgabe von Altbatterien gesetzlich verpflichtet damit eine fachgerechte Entsorgung gewährleistet werden kann S...

Reviews: