EN
21
button, the figure increase by 1; each time you press
and release the [DEC-] button, the figure decrease
by 1. Press the [FUN] button to store the data when
the open interval time chosen, then the open interval
time setting finished. (factory set 0s)
5b.
When digital display indicate P8, the gate opener
is on close interval time setting. There is 0-10s for
optional. 0s mean double gates close simultaneously.
“1” means the Motor 2 start to close 1 second before
Motor 1 start to close. Max close interval time 10s.
Each time you press and release the [INC+] button,
the figure increase by 1; each time you press and
release the [DEC-] button, the figure decrease by 1.
Press the [FUN] button to store the data when the
close interval time chosen, then the close interval
time setting finished. (factory set 0s)
6. To set auto close time:
When digital display indicate P9, the gate opener is
on auto close time setting. There is 0-99s for optio-
nal. 0s mean the gate opener would not auto close.
Max auto close time is 99s. Each time you press and
release the [INC+] button, the figure increase by 1;
each time you press and release the [DEC-] button,
the figure decrease by 1. Press the [FUN] button to
store the data when the auto close time chosen, then
the auto close time setting finished. (factory set 0)
7. To set lamp/alarm output control:
When digital display indicate PA, the gate opener is
on lamp/alarm output control setting. There is 0-3
for optional. “0” means the alarm on monostabillity
model and the lamp without voltage output after
the gate total close 30s, other time with voltage 12
output. “1” means the alarm on monostabillity mo-
del and the lamp would only flash when gate run-
ning. “2” means the alarm on bistabillity model and
the lamp without voltage output after the gate total
close 30s, other time with voltage output. “3” means
the alarm on bistabillity model and the lamp would
only flash when gate running. Each time you press
and release the [INC+] button, the figure increase by
1; each time you press and release the [DEC-] button,
the figure decrease by 1. Press the [FUN] button to
store the data when the auto close time chosen, then
the lamp/alarm output control setting finished. (fac-
tory set 0)
8. To set lock time:
When digital display indicate Pb, the gate opener is
on lock time control setting. The lock control time
means the time we could control the lock. There is
0-1 for optional. “0” means the lock control time is
0.5s, “1” means the lock control time is 5s. Each time
you press and release the [INC+] button, the figure
increase by 1; each time you press and release the
[DEC-] button, the figure decrease by 1. Press the
[FUN] button to store the data when the lock control
time chosen, then the lock time setting finished. (fac-
tory set 0)
9. To choose single/double gate open:
When digital display indicate PC, the gate opener is
on single/double gate open setting. There is 0-3 for
optional. “0” means the gate could not open by re-
mote, “1” means just can open one single gate, “2”
means can just open two leaf gate, “3” means can
open one single gate as well as two leaf gate. Each
time you press and release the [INC+] button, the fi-
gure increase by 1; each time you press and release
the [DEC-] button, the figure decrease by 1. Press
the [FUN] button to store the data when the single/
double gate open chosen, then the remote button
setting finished. (factory set 3)
10. To choose photocell work in NC or NO
When digital display indicate Pd, you could choose
the photocell work in NO or NC.
Value 00 means work in NO, value 01 means work in
NC.
11. To reset:
When digital display indicate Po, the gate opener is
on rest setting. After enter Po setting, press the [
FUN] to store and then now the reset successfully.
Summary of Contents for HICKER B200
Page 5: ...EN 5 Serial Number ...
Page 10: ...EN 10 Installation of Extended End Motor Arms to Gates USE BUBBLE LEVEL K D mm ...
Page 17: ...EN 17 IR OUT COM COM 12V 05 COM 06 IR 07 12V 19 20 21 22 BLUE BROWN BROWN BLUE 19 20 21 22 ...
Page 27: ...FR 27 Numéro de série ...
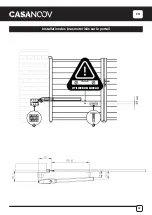
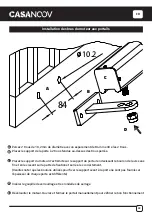
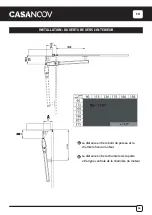
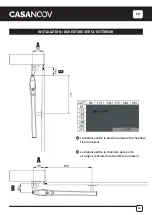
Page 32: ...FR 32 Installation des bras motorisés sur le portail K D UTILISER UN NIVEAU mm ...
Page 39: ...FR 39 IR OUT COM COM 12V 05 COM 06 IR 07 12V 19 20 21 22 19 20 21 22 BLEU MARRON BLEU MARRON ...
Page 49: ...DE 49 Seriennummer ...
Page 61: ...DE 61 IR OUT COM COM 12V 05 COM 06 IR 07 12V 19 20 21 22 BLAU BRAUN BRAUN BLAU 19 20 21 22 ...
Page 71: ...ES 71 Número de serie ...
Page 83: ...ES 83 IR OUT COM COM 12V 05 COM 06 IR 07 12V 19 20 21 22 AZUL MARRÓN MARRÓN AZUL 19 20 21 22 ...
Page 93: ...PT 93 Número de série ...
Page 115: ...IT 115 Numéro de série ...
Page 127: ...IT 127 IR OUT COM COM 12V 05 COM 06 IR 07 12V 19 20 21 22 BLU MARRONE MARRONE BLU 19 20 21 22 ...
Page 137: ...NL 137 Serienummer ...
Page 149: ...NL 149 IR OUT COM COM 12V 05 COM 06 IR 07 12V 19 20 21 22 BLAUW BRUIN BRUIN BLAUW 19 20 21 22 ...
Page 159: ...PL 159 Numer seryjny ...
Page 164: ...PL 164 Instalacja ramion silnika z przedłużonym końcem do bramek D UŻYWAĆ POZIOM BĄBELKÓW mm ...

