background image

130


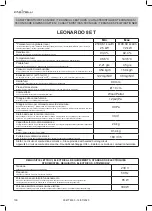
LEONARDO 8ET

Min

Max

*Potenza termica globale (resa)

*Total Thermal power (yield) / *Puissance thermique globale (rendement) - *Gesamtwärmeleistung (resa) / *Potencia 

calorífica total (cedida) / *Global varmeeffekt (ydelse)

2149,61 kcal/h

2,5 kW

6190,89 kcal/h

7,2 kW

Rendimento

Efficiency / Rendement / Wirkungsgrad / Rendimiento / Ydelse

93,3 %

92,4 %

Temperatura fumi

Smoke temperature, Tempèrature fumèes, Rauchtemperature, Temperatura humos, Røgtemperatur

96,6°C

143,5°C

Portata fumi

Smoke flow rate, Débit de fumée, Rauchmenge, Volumen de humos, Røgkapacitet

2,21 g/s

4,5 g/s

Consumo orario di combustibile

Hourly consumptiono / Consommation horaire / Bränsleförbrukning per timma / Poraba goriva / Brændselsforbrug i timen

0,54 kg/h

1,59 kg/h

Emissioni di CO (al 13% di O

2

)

CO emission (at 13% O

2

) / CO Emissionen (13% O

2

) / CO-utsläpp (13% O

2

) / CO-emissioner (ved 13% O2)

122 mg/Nm

3

38 mg/Nm

3

Uscita fumi

Smoke outlet / Évacuation fumées / Rauchaustritt / Salida humo / Røgudgang

80 mm

Presa d’aria esterna

External Air inlet / Prise d’air externe/ Außenlufteinlasskammer / Toma de aire externa / Luftindtag

Ø 10 cm

Combustibile

Fuel / Combustible / Brennstoff / Combustible / Brændsel

Wood Pellet

Tiraggio della canna fumaria

Draft / Zug / Tirage / Tiro / Aftræk for skorstensrøret

12(±2) Pa

Tiraggio minimo per dimensionamento del camino:

Minimum draft for flue sizing -  Minimale trek voor dimensionering schoorsteen

Tirage minimum pour le dimensionnement du conduit de fumée - Tiro mínimo para el dimensionamiento de la chimenea:
Minimumsaftræk for størrelsen af skorstenen:

0.0 Pa

Stufa adatta per locali non inferiori a

Stove suitable for rooms of no less than / Heizofen für Räume mit mindestens / Foyer indiqué pour del volumes non 

inférieurs à / Chimenea adecuada para cuartos no inferiors a / Pilleovn, der er egnet til lokaler på under

30 m

3

Capacità serbatoio di alimentazione

Feeding container capacity / Capacité réservoir d’alimentation / Fassungsvermögen Beschickungsbehälter / Capacidad 
depósito de alimentación / Forsyningsbeholderens kapacitet

24 kg

Peso

Weight / Poids / Gewicht / Peso / Vægt

91,4 kg

Portata dei ventilatori posteriori

Flow of rear fans / Portée des ventilateurs arrière/Fan Flussrate/ Caudal de los ventiladores traseros/ 

180 m

3

/h

Stufa con circuito di combustione ermetico - Stove provided with sealed burning circuit

Appareils à circuit de combustion étanche - Raumluftunabhängiger Ofen - Estufa con circuito de combustión hermética

CARATTERISTICHE TECNICHE / TECHNICAL FEATURES / CARACTÉRISTIQUES TECHNIQUES / 

TECHNISCHE EIGENSCHAFTEN / CARACTERÍSTICAS TÉCNICAS / TEKNISKE SPECIFIKATIONER

REQUISITI ELETTRICI, ELECTRICAL REQUIREMENTS, STANDARDS ÉLECTRIQUES 

STROMDATEN, REQUISITOS ELÉCTRICOS, STRØMKRAV

Tensione

Voltage, Tension, Spannung, Tensión, Spænding

230 V

Frequenza

Frequency, Fréquence, Frequenz, Frecuencia, Frekvens

50 Hz

Potenza max assorbita in funzionamento

Max. power absorbed when working / Puissance maximum absorbée en fonctionnement /max. aufgenommene
Leistung (Betrieb) / Potencia máx. absorbida en funcionamiento / Maksimalt strømforbrug under drift

85 W

Potenza assorbita all’accensione elettrica

Electric ignition / Allumage électrique / Elektrische Zündung/ Encendido eléctrico / Strømforbrug ved elektrisk tænding

330 W

004778330 - 16/07/2020

Summary of Contents for LEONARDO 8ET

Page 1: ...ichnend Le présent manuel fait partie intégrante du produit Il est conseillé de lire attentivement les consignes avant l installation l entretien ou l utilisation du produit Les images du produit sont simplement indicatives Este manual es parte integrante del producto Se recomienda leer detenidamente las instrucciones antes de la instalación el mantenimiento y el uso del producto Las imágenes del ...

Page 2: ...s avez accordée en achetant notre produit et vous félicitions pour votre choix Afin de vous permettre de profiter au mieux de votre nouveau poêle nous vous invitons à suivre attentivement les instructions reportées dans cette notice Estimado Cliente Deseamos agradecerle por la preferencia que nos ha otorgado adquiriendo nuestro producto y lo felicitamos por su elección Para el mejor uso de su nuev...

Page 3: ...NI PER LA SICUREZZA 5 3 LUOGO DI INSTALLAZIONE DELLA STUFA 5 4 ARIA COMBURENTE 5 5 SCARICO FUMI 5 6 LIVELLAMENTO DELLA STUFA 5 7 ALLACCIAMENTO AGLI IMPIANTI 5 8 OTTIMIZZAZIONE DELLA COMBUSTIONE 6 MANUTENZIONE 6 1 MANUTENZIONE 7 DEMOLIZIONE E SMALTIMENTO 8 CONFIGURAZIONE INIZIALE 8 1 ALLACCIAMENTO AD UN TERMOSTATO ESTERNO 9 PANNELLO COMANDI 9 1 DESCRIZIONE 9 2 USO DEL PANNELLO COMANDI 9 3 PARAMETRI...

Page 4: ...l presente manuale è costruito e collaudato seguendo le prescrizioni di sicurezza indicate nelle direttive europee di riferimento Questo manuale è indirizzato ai proprietari della stufa agli installatori utilizzatori e manutentori delle stufe ed è parte integrante del prodotto In caso di dubbi sul contenuto e per ogni chiarimento contattare il costruttore o il servizio di assistenza tecnica autori...

Page 5: ...che penale diretta o indiretta dovuta a installazione non conforme alle normative vigenti nel paese ed alle direttive di sicurezza inosservanza parziale o totale delle istruzioni contenute nel manuale installazione da parte di personale non qualificato e non addestrato uso non conforme alle direttive di sicurezza modifiche e riparazioni non autorizzate dal Costruttore effettuate sulla stufa utiliz...

Page 6: ...ZE PER L UTILIZZATORE Non toccare e non avvicinarsi al vetro della porta potrebbe causare ustioni non guardare la fiamma per lungo tempo non toccare lo scarico dei fumi non eseguire pulizie di qualunque tipo non scaricare le ceneri non aprire la porta a vetro non aprire il cassetto cenere ove previsto L apparecchio può essere utilizzato da bambini di età non inferiore a 8 anni e da persone con rid...

Page 7: ...uata distanza dalla stufa in un ambiente asciutto e non troppo freddo Si consiglia di conservare alcuni sacchi di pellet nel locale di utilizzo della stufa o in un locale attiguo purché sia a temperatura e umidità accettabili Il pellet umido e o freddo 5 C riduce la potenzialità termica del combustibile ed obbliga ad effettuare maggiore manutenzione di pulizia del braciere materiale incombusto e d...

Page 8: ...carpe antinfortunistiche E deve usufruire di utensili muniti di isolamento elettrico F deve accertarsi che l area interessata alle fasi di montaggio e di smontaggio sia libera da ostacoli 5 3 LUOGO DI INSTALLAZIONE DELLA STUFA Non installare l apparecchio in in camere da letto stanze con una metratura inferiore a quella riporta nella scheda tecnica del paragrafo 14 stanze caratterizzate da presenz...

Page 9: ...le in zone particolarmente ventose ed esposte alle intemperie prevedere una protezione antipioggia ed antivento Accertarsi che la presa d aria sia posizionata in modo da non essere ostruita accidentalmente Nel caso fosse impossibile realizzare la presa d aria esterna nella parete posteriore alla stufa parete non perimetrale deve essere realizzato un foro in una parete esterna del locale dove viene...

Page 10: ...visti di marcatura CE È obbligatorio realizzare un primo tratto verticale di 1 5 metri minimi per garantire la corretta espulsione dei fumi Si consiglia di effettuare un massimo di 3 variazioni di direzione oltre a quello derivante dal collegamento posteriore della stufa al camino utilizzando delle curve a 45 90 o dei raccordi a Tee Fig 5 7 Utilizzare sempre un raccordo a Tee con tappo di ispezion...

Page 11: ...o tradizionale Fig 5 8 può essere fatto purché ci si assicuri sullo stato di manutenzione del camino In caso di camino di sezione maggiore è necessario intubare il camino con una tubazione in acciaio con diametro in funzione del percorso opportunamente isolato Fig 5 9 Assicurarsi che il collegamento al camino in muratura sia opportunamente sigillato In caso di passaggio dei tubi attraverso tetti o...

Page 12: ... pellet ecc All atto della prima accensione è possibile ottimizzare la combustione della stufa In linea di massima se a fine combustione nel braciere restano molti residui è consigliabile modificare le configurazioni di combustione aumentandone il valore fino a trovare la soluzione più soddisfacente Far riferimento al paragrafo 10 3 5 Ottimizzazione della combustione 6 MANUTENZIONE a cura di un ce...

Page 13: ...care lo stato e la pulizia di tutti i componenti interni verificare la tenuta e la pulizia dell innesto dell uscita fumi asportare eventuale deposito di residui di pellet nel serbatoio verificare il corretto funzionamento della stufa resettare eventuali avvisi o allarmi i termostati a riarmo manuale si trovano sul lato posteriore della stufa in prossimità dell uscita del cavo di alimentazione per ...

Page 14: ...dell energia elettrica di alimentazione asportare tutto l apparato elettrico separare gli accumulatori presenti nelle schede elettroniche rottamare la struttura della stufa tramite le ditte autorizzate ATTENZIONE L abbandono della stufa in aree accessibili costituisce un grave pericolo per persone ed animali La responsabilità per eventuali danni a persone ed animali ricade sempre sul proprietario ...

Page 15: ...funzione Eco mode per far sì che la stufa si spenga o si riaccenda in base alla temperatura ambiente impostata In questa configurazione è possibile impostare anche la funzione antigelo CONFIGURAZIONE 2 Impostare tale configurazione quando la stufa viene comandata da un termostato o cronotermostato esterno In questa configurazione la stufa si spegne quando ilw termostato esterno è soddisfatto In qu...

Page 16: ...G un tasto di invio per la conferma del parametro o della selezione Tutti i tasti sono di tipo capacitivo pertanto non necessitano di una pressione per essere attivati ma è sufficiente sfiorarne la superficie 9 1 1 Led di stato ICONA AVVISO DESCRIZIONE Pellet in esaurimento Indica che è necessario ricaricare il serbatoio di pellet Manutenzione Indica la necessità di effettuare una manutenzione Ass...

Page 17: ...olo in configurazione 1 0 5 5 0 C 9 Temperatura antigelo Temperatura minima al di sotto della quale la stufa si accende solo in configurazione 1 OFF 3 20 C 10 Blocco tastiera Imposta la modalità di blocco dei tasti OFF Lo Hi 11 Luminosità display Imposta il grado di luminosità del display OFF 1 5 12 Modalità display Imposta la modalità di visualizzazione dei dati OFF 1 4 13 Volume cicalino Imposta...

Page 18: ...Lampeggerà il valore di ventilazione modificarne il valore con i tasti OFF esclude completamente la ventilazione e la stufa funzionerà solo a convezione naturale solo nei modelli dove previsto 1 minimo 5 massimo Auto funzionamento automatico la stufa imposterà la velocità in funzione della temperatura ambiente Hi funzionamento ultraveloce da utilizzare solo se c è la necessità di riscaldare veloce...

Page 19: ...rmittenti si accende il display Per lunghi periodi di inutilizzo si consiglia di posizionare l interruttore sul retro della macchina in posizione di OFF O Assicurarsidinontoccareilpannellodicomandonel momento in cui viene data alimentazione alla stufa 10 3 IMPOSTAZIONI INIZIALI Prima di utilizzare la stufa è necessario impostare la data e l ora corrente 10 3 1 Impostazione orario e data Per modifi...

Page 20: ...e visualizzata l autonomia in ore prima di dover ricaricare il serbatoio se la funzione rifornimento è stata abilitata e Premere il tasto per confermare i dati impostati 10 3 4 Impostazione volume E possibile impostare il livello di volume del cicalino in base alle proprie necessità a Agendo sui tasti freccia portarsi sul menu setup e premere il tasto b Selezionare la password 7 con il tasto e con...

Page 21: ... Per spegnere la stufa tenere premuto il tasto per qualche secondo l icona a forma di fiamma si spegnerà Per effettuare una nuova accensione si consiglia di attendere che la stufa si sia completamente raffreddata Si raccomanda di spegnere la stufa seguendo scrupolosamente quanto sopra riportato ed evitare assolutamente di farlo togliendo l alimentazione elettrica 11 4 FUNZIONAMENTO CON TERMOSTATO ...

Page 22: ...o i Lampeggerà il valore della temperatura desiderata modificarne il valore con i tasti e j Premere il tasto per confermare i dati impostati 12 1 2 Assegnare i programmi ai giorni Con questa funzione è possibile assegnare fino a tre programmi diversi ad un determinato giorno a Agendo sui tasti freccia portarsi sul menu setup e premere il tasto b Selezionare la password 7 con il tasto e confermare ...

Page 23: ...asto c Selezionare il sottomenu 8 e confermare con il tasto d Lampeggerà il valore modificarlo con i tasti e 0 5 5 0 C e Premere il tasto per confermare il dato impostato 12 4 RIACCENSIONE DOPO IL BLACK OUT In caso di interruzione di corrente elettrica la stufa si riaccenderà automaticamente verificando le condizioni di sicurezza al ritorno dell alimentazione 12 5 FUNZIONE BLOCCO TASTIERA Con ques...

Page 24: ...nare la password 7 con il tasto e confermare con il tasto c Scorrere con il tasto e selezionare il sottomenu 31 d Selezionare la password 54 con il tasto e confermare con il tasto e Tenendo premuto il tasto il sistema di carica si attiverà e sul display verranno visualizzate delle barre incrementali f Rilasciando il tasto si porrà fine all operazione di carica Attenzione Questa funzione è attiva s...

Page 25: ...so di manutenzione programmata icone lampeggianti Periodicamente la stufa richiede che venga effettuata una manutenzione da parte di un tecnico specializzato A004 Batteria scarica La batteria tampone mod CR2032 a bordo della scheda elettronica è scarica A005 Malfunzionamento sensore di Hall Sensore di Hall del ventilatore fumi scollegato o difettoso Pulizia stufa Camera di combustione braciere o s...

Page 26: ......

Page 27: ...S 5 3 STOVE INSTALLATION SITE 5 4 COMBUSTION AIR 5 5 FUME EXHAUST 5 6 LEVELLING THE STOVE 5 7 CONNECTION TO SYSTEMS 5 8 FUEL OPTIMISATION 6 MAINTENANCE 6 1 MAINTENANCE 7 DEMOLITION AND DISPOSAL 8 HOME PAGE CONFIGURATION 8 1 CONNECTION TO AN EXTERNAL THERMOSTAT 9 CONTROL PANEL 9 1 DESCRIPTION 9 2 USING THE CONTROL PANEL 9 3 OPERATING PARAMETERS 10 PRELIMINARY OPERATIONS 10 1 LOADING PELLETS 10 2 EL...

Page 28: ...ION The product subject of this manual was manufactured and tested according to the safety requirements stated in the reference European directives This manual is intended for stove owners installers users and maintenance personnel of the stove and is an integral part of the product In case of uncertainty about the content and for any clarification contact the manufacturer or the authorised techni...

Page 29: ...all responsibility both civil and criminal direct or indirect due to installation not complying with the existing regulations in the country and with the safety directives partial or total non compliance with the instructions contained in this manual installation by unqualified and untrained personnel use not in compliance with the safety directives modifications and repairs not authorised by the ...

Page 30: ... not touch or approach the door glass it could cause burns do not look at the flame for a long time do not touch the smoke outlet do not perform any type of cleaning do not remove the ash do not open the glass door do not open the ash drawer where provided The appliance can be used by children from 8 years old and by persons with reduced physical sensory or mental capacity or without experience or...

Page 31: ...table distance from the stove in a dry place that is not too cold We recommend preserving several bags of pellets in the room in which the stove is used or in an adjacent room provided that the temperature and humidity are acceptable Wet and or cold pellets 5 C reduce the thermal potential of the fuel resulting in the need for more cleaning maintenance of the burn pot unburned material and of the ...

Page 32: ...y C must wear safety gloves D must wear safety shoes E must use electrical insulated tools F must ensure that the area affected by the phases of assembly and disassembly is free from obstacles 5 3 STOVE INSTALLATION SITE Do not install the device in bedrooms rooms with a surface area that is less than the one indicated in the technical data sheet in paragraph 14 rooms that contain potentially expl...

Page 33: ...rly windy and exposed to weathering provide rain and wind protection Make sure the air intake is positioned so that it is not accidentally obstructed If it is impossible to create the external air intake in the rear wall of the stove non perimeter wall a hole must be created in an external wall of the room where the stove is positioned If the air inlet cannot be created outside the room you can ma...

Page 34: ...tions and provided with CE marking It is mandatory to create a first vertical section of a minimum 1 5 meters to guarantee correct expulsion of the fumes It is advisable to make a maximum of 3 changes of direction in addition to that resulting from the rear connection of the stove to the fireplace using 45 90 bends or T fittings Fig 5 7 Always use a T fitting with an inspection cap at each horizon...

Page 35: ... correctly The discharge of fumes through a traditional fireplace Fig 5 8 can be done provided that the chimney is maintained If the chimney has a bigger section it must be intubated with a suitably insulated steel pipe with diameter in line with the route Fig 5 9 Make sure that the connection to the brickwork chimney is properly sealed If the pipes pass through roofs or wooden walls you should us...

Page 36: ...first switched on the stove combustion can be optimised Generally speaking if at the end of combustion there is a lot of residue in the burn pot you should change the combustion configuration by increasing the value until you find the best solution Refer to paragraph 10 3 5 Fuel optimisation 6 MAINTENANCE To be performed by a qualified technical support centre 6 1 MAINTENANCE Maintenance operation...

Page 37: ...eals check the condition of all internal components and make sure they are clean make sure the smoke outlet connection is sealed and clean remove any deposits of pellet residues in the tank make sure that the stove is working properly Reset any warnings or alarms the manually rearmed thermostats are on the rear of the stove near the power cable For easy access to the fan A just remove the cap B an...

Page 38: ...t take place when the fireplace is off and the power supply disconnected remove the entire electric system separate the accumulators in the electronic cards the demolition of the stove s structure should be carried out by authorised companies ATTENTION Dumping the stove in accessible areas poses a serious risk for people and animals Any liability for damage to people and animals always falls on th...

Page 39: ...set the Eco mode function so that the stove switches off or on again according to the set room temperature The antifreeze function can also be set in this configuration CONFIGURATION 2 Set this configuration when the stove is controlled by an external thermostat or chronothermostat In this configuration the stove switches off when the external thermostat is reached The antifreeze function cannot b...

Page 40: ...nfirm the parameter or selection All the keys are capacitive therefore they do not need to be pressed to be activated instead it is sufficient to touch the surface 9 1 1 Status LEDs ICON NOTICE DESCRIPTION Pellets depleted Indicates that it is necessary to refill the pellet tank Maintenance It indicates the need to perform maintenance Assistance It indicates the presence of an error Remote control...

Page 41: ...ich the stove re ignites except in configuration 1 0 5 5 0 C 9 Anti freeze temperature Minimum temperature below which the stove ignites only in configuration 1 OFF 3 20 C 10 Keypad lock It sets the key lock mode OFF Lo Hi 11 Display brightness It sets the degree of display brightness OFF 1 5 12 Display mode It sets the data display mode OFF 1 4 13 Buzzer volume It sets the acoustic warning volume...

Page 42: ...y b The ventilation value will flash change the value with the keys OFF completely excludes the ventilation and the stove will only operate with natural convection only on models where this is included 1 minimum 5 maximum Auto automatic operation the stove will set the speed according to the room temperature Hi ultra fast operation to be used only if there is a need to quickly heat an environment ...

Page 43: ... stove is not used for long periods we recommend turning the switch on the back of the machine to the OFF O position Do not touch the control panel when the stove is powered on 10 3 INITIAL SETTINGS Before using the stove it is necessary to set the current date and time 10 3 1 Setting time and date To change the date a Use the keys on the set up menu and press the key b Select the password 7 with ...

Page 44: ...s displayed 4 The autonomy is displayed in hours before having to refill the tank if the refuelling function has been enabled e Press the key to confirm the set data 10 3 4 Volume setting Set the volume level of the buzzer according to your requirements a Use the arrow keys to go to the set up menu and press the key b Select the password 7 with the key and confirm with the key c scroll with the ke...

Page 45: ... power supply 11 3 SWITCHING OFF To switch off the stove keep the key pressed for a few seconds the flame icon will go out To switch it on again it is advisable to wait for the stove to cool completely It is advisable to turn off the stove strictly following the above and always avoid doing so by unplugging it from the power supply 11 4 OPERATION WITH ROOM THERMOSTAT When the stove is controlled b...

Page 46: ... i The desired temperature value will flash change the value with the and keys j Press the key to confirm the data entered 12 1 2 Assigning program to days With this function it is possible to assign up to three different programs to a specific day a Use the arrow keys to go to the set up menu and press the key b Select the password 7 with the key and confirm with the key c Select the submenu 1 an...

Page 47: ...ith the key and confirm with the key c Select the submenu 8 and confirm with the key d The value will flash modify it with the and keys 0 5 5 0 C e Press the key to confirm the set data 12 4 SWITCHING ON AGAIN AFTER A BLACK OUT In the event of a power failure the stove will automatically switch back on verifying the safety conditions when the power supply returns 12 5 KEYPAD LOCK FUNCTION With thi...

Page 48: ... and confirm with the key c Scroll with the key and select the submenu 31 d select the password 54 with the key and confirm with the key e When the key is pressed and held down the loading system is activated and the increment bars are shown on the display f When the key is released the loading operation is halted Attention This function is only available when the stove is switched off and cold Be...

Page 49: ...obe malfunction Defective fume temperature probe A002 Scheduled maintenance warning flashing icon Periodically the stove requires maintenance by a specialist technician A004 Low battery The back up battery mod CR2032 on the electronic board is low A005 Hall sensor malfunction Hall sensor on fumes fan disconnected or faulty Stove cleaning Combustion chamber burn pot or dirty fume evacuation Detache...

Page 50: ......

Page 51: ...SSNAHMEN 5 3 AUFSTELLUNGSORT DES OFENS 5 4 VERBRENNUNGSLUFT 5 5 ABGASFÜHRUNG 5 6 NIVELLIEREN DES OFENS 5 7 ANSCHLUSS AN DIE ANLAGEN 5 8 OPTIMIERUNG DER VERBRENNUNG 6 WARTUNG 6 1 WARTUNG 7 VERSCHROTTUNG UND ENTSORGUNG 8 ANFÄNGLICHE KONFIGURATION DES DISPLAYS 8 1 ANSCHLUSS AN EIN EXTERNES THERMOSTAT 9 BEDIENTAFEL 9 1 BESCHREIBUNG 9 2 VERWENDUNG DER BEDIENTAFEL 9 3 BETRIEBSPARAMETER 10 VORBEREITENDE ...

Page 52: ...hriften gebaut und getestet Dieses Handbuch richtet sich an die Eigentümer des Heizofens sowie an die Installateure Bediener und das Wartungspersonal des Heizofens Es ist integraler Bestandteil des Produktes Im Zweifelsfall bzw für jede weitere Erklärung zum Inhalt des Handbuchs ist mit dem Hersteller oder dem befugten Kundendienst Kontakt aufzunehmen Im Zuge dessen muss das entsprechende Kapitel ...

Page 53: ...oder indirekt bei Installation die nicht gemäß den geltenden Vorschriften im Land und den Sicherheits richtlinien ausgeführt wurde teilweise oder vollständige Nichteinhaltung der im Handbuch enthaltenen Anweisungen Installation von Seiten nicht qualifizierten und nicht geschulten Personals nicht mit den Sicherheitsrichtlinien konformer Gebrauch Nicht vom Hersteller genehmigte Änderungen und Repara...

Page 54: ...en führen kann Nicht für längere Zeit in die Flamme schauen den Rauchabzug nicht anfassen keinerlei Reinigungen ausführen die Asche nicht entleeren die Glastüre nicht öffnen dieAschenlade nicht öffnen wo vorgesehen Dieses Gerät kann von Kindern ab dem Alter von 8 Jahren sowie von Personen mit beeinträchtigten körperlichen geistigen Fähigkeiten bzw eingeschränkter Wahrnehmung oder mit unzureichende...

Page 55: ...einen angemessenen Abstand zum Ofen gelagert werden Es empfiehlt sich einige paar Säcke Pellets im Aufstellungsraum des Ofens oder in einem benachbarten Raum zu lagern damit sie eine akzeptable Temperatur und Feuchtigkeit haben Feuchte und oder kalte Pellets 5 C haben eine geringere Heizleistung und bewirken dass das Kohlenbecken unverbranntes Material und der Brennraum häufiger gereinigt werden m...

Page 56: ...en E WerkzeugemitelektrischerIsolierungverwenden F sicherstellen dass der die Phasen von Montage und Demontage betreffende Bereich frei von Hindernissen ist 5 3 AUFSTELLUNGSORT DES OFENS In folgenden Räumen darf der Ofen nicht installiert werden Schlafzimmer Räume mit einer geringeren Quadratmetergröße als jene die im technischen Datenblatt im Abschnitt 14 angegeben ist Räume in denen explosionsge...

Page 57: ... vorzusehen Sicherstellen dass der Lufteinlass so positioniert ist dass er nicht versehentlich blockiert wird Wenn es nicht möglich ist die Außenluftzufuhr in der Rückwand des Ofens nicht umlaufende Wand vorzusehen muss ein Loch in die Außenwand des Raums realisiert werden in dem der Ofen aufgestellt ist Sollte es nicht möglich sein für eine Außenluftzuführung im Raum zu sorgen kann die Luftzuführ...

Page 58: ...ikalenAbschnitt von mindestens 1 5 Metern auszuführen um den korrekten Ausstoß des Rauchs zu gewährleisten Eswirdempfohlen maximal3Richtungsänderungen vorzunehmen zusätzlich zu denen die sich aus dem rückseitigen Anschluss des Ofens an den Kamin ergeben und zwar unter Verwendung von 45 90 Kurven oder T Anschlussteilen Abb 5 7 ImmereinT AnschlussteilmiteinerInspektionskappe bei jeder horizontalen u...

Page 59: ...chabzug über einen traditionellen Schornstein Abb 5 8 ist möglich wenn der Wartungszustand des Schornsteins kontrolliert wird Wenn der Schornstein einen größeren Querschnitt hat muss er mit einem angemessen isolierten Stahlrohr verrohrt werden Durchmesser je nach Leitungsverlauf Abb 5 9 Sicherstellen dass der Anschluss an den gemauerten Schornstein gut abgedichtet ist Wenn Rohre durch Holzdächer o...

Page 60: ...en Art der Pellets usw Im Zuge der ersten Zündung kann die Verbrennung des Ofens optimiert werden Wenn am Ende der Verbrennung viele Rückstände im Kohlenbecken verbleiben ist es imAllgemeinen ratsam die Verbrennungskonfigurationen zu ändern den Wert zu erhöhen bis Sie die zufriedenstellendste Lösung gefunden haben Siehe Abschnitt 10 3 5 Verbrennungsoptimierung 6 WARTUNG von einem qualifizierten te...

Page 61: ...ren Komponenten kontrollieren Die Dichtung und die Reinigung der Befestigung des Rauchabzugs kontrollieren Eventuelle Pelletrückstände im Tank entfernen Die Funktionstüchtigkeit des Heizofens kontrollieren Alle Warnungen oder Alarme zurücksetzen die manuell zurückzusetzenden Thermostate befinden sich auf der Rückseite des Ofens in der Nähe der Steckdose des Netzkabels Für einen einfachen Zugang zu...

Page 62: ...ng müssen mit stillstehendem Ofen mit abgetrennter Stromversorgung erfolgen den gesamten elektrischen Apparat entfernen die Akkumulatoren in den Platinen trennen Verschrotten Sie die Struktur des Ofens mit Hilfe von autorisierten Unternehmen ACHTUNG Die Platzierung des abgebauten Ofens in zugänglichen Bereichen stellt eine ernsthafte Gefahr für Mensch und Tier dar Für eventuelle Schäden an Persone...

Page 63: ...emessen wird Es ist möglich die Öko Modus Funktion so einzustellen dass der Ofen je nach eingestellter Raumtemperatur aus oder wieder eingeschaltet wird Die Frostschutzfunktion kann auch in dieser Konfiguration aktiviert werden KONFIGURATION 2 Diese Konfiguration einstellen wenn der Heizofen von einem externen Thermostat oder einem Zeitthermostat gesteuert wird Diese Konfiguration einstellen wenn ...

Page 64: ...des Parameters oder der Auswahl Alle Tasten sind berührungsempfindlich weswegen kein Druck nötig ist um sie zu aktiveren Es reicht sie zu leicht anzutippen 9 1 1 Statuskontrollanzeigen IKONE MELDUNG BESCHREIBUNG Pellets gehen aus Zeigt an dass der Pelletstank augefüllt werden muss Wartung Zeigt an dass eine Wartung durchgeführt werden muss Kundendienst Zeigt das Vorhandensein eines Fehlers an Empf...

Page 65: ...figuration 1 0 5 5 0 C 9 Frostschutz temperatur Mindesttemperatur unterhalb der sich der Heizofen einschaltet nur in Konfiguration 1 AUS 3 20 C 10 Tastensperre Einstellung der Tastensperre AUS Lo Hi 11 Helligkeit des Displays Einstellung der Helligkeit des Displays AUS 1 5 12 Display Modus Einstellung des Anzeigemodus der Daten AUS 1 4 13 Summerlautstärke Einstellung der Lautstärke des akustischen...

Page 66: ...b Der Belüftungswert blinkt den Wert mit den Tasten ändern AUS schließt die Belüftung vollständig aus und der Heizofen arbeitet nur mit natürlicher Konvektion nur bei Modellen die über diese Funktion verfügen 1 kleine Stufe 5 Höchststufe Auto automatischer Betrieb der Ofen stellt die Geschwindigkeit entsprechend der Raumtemperatur ein Hi ultraschneller Betrieb nur zu verwenden wenn der Raum schnel...

Page 67: ...alen ab und die Anzeige leuchtet auf Bei längerer Nichtbenutzung wird empfohlen den Schalter auf der Rückseite der Maschine auf OFF O zu stellen Das Bedienfeld nicht in jenem Moment berühren wenn der Heizofen mit Strom versorgt wird 10 3 ANFÄNGLICHE EINSTELLUNGEN Bevor der Ofen benutzt wird müssen das aktuelle Datum und die Uhrzeit eingestellt werden 10 3 1 Uhrzeit und Datumeinstellung Um das Datu...

Page 68: ...en angezeigt bevor der Tank nachgefüllt werden muss wenn die Beschickungsfunktion aktiviert wurde e Die eingegebenen Daten mit der Taste bestätigen 10 3 4 Einstellung der Lautstärke Es kann die Lautstärke des Summers gemäß den jeweiligen Bedürfnissen eingestellt werden a Mithilfe der Pfeiltasten zum Einstellungsmenü gehen und die Taste drücken b Das Passwort 7 mit der Taste wählen und mit der Tast...

Page 69: ... wird 11 3 ABSCHALTEN Zum Ausschalten des Ofens die Taste einige Sekunden gedrückt halten Das Flammensymbol erlischt Zum Wiedereinschalten ist es ratsam zu warten bis der Ofen vollständig abgekühlt ist Es wird empfohlen den Heizofen genau nach den obigenAnweisungen auszuschalten Er sollte keinesfalls durch trennen der Stromversorgung abgeschaltet werden 11 4 BETRIEB MIT RAUMTHERMOSTAT Wenn der Hei...

Page 70: ... Der Wert der gewünschten Temperatur blinkt den Wert mit den Tasten und ändern j Die eingegebenen Daten mit der Taste bestätigen 12 1 2 Zuweisung der Programme den Tagen Mit dieser Funktion ist es möglich einem bestimmten Tag bis zu drei verschiedene Programme zuzuweisen a Mithilfe der Pfeiltasten zum Einstellungsmenü gehen und die Taste drücken b Das Passwort 7 mit der Taste wählen und mit der Ta...

Page 71: ...wir ein Neuzündungsdelta von 4 C eingestellt schaltet sich der Heizofen wieder ein wenn er eine Temperatur von 16 C oder weniger erkennt Zur Änderung des Wertes des Neuzündungsdeltas a Mithilfe der Pfeiltasten zum Einstellungsmenü gehen und die Taste drücken b Das Passwort 7 mit der Taste wählen und mit der Taste bestätigen c Das Untermenü 8 auswählen und mit der Taste bestätigen d Der Wert blinkt...

Page 72: ...erwendung Pellettank zunächst leer oder zum Testen der Funktion des Beschickungssystems ist es möglich die Besckickung manuell zu bedienen Auf der Bedientafel des Heizofens a Mithilfe der Pfeiltasten zum Einstellungsmenü gehen und die Taste drücken b Das Passwort 7 mit der Taste wählen und mit der Taste bestätigen c Mit der Taste scrollen und das Untermenü 31 auswählen d Das Passwort 54 mit der Ta...

Page 73: ...inken In bestimmtenAbständen muss der Heizofen von einem spezialisierten Techniker gewartet werden A004 Batterie leer Die Pufferbatterie Mod CR2032 auf der Elektronikkarte ist leer A005 Funktionsstörung des Hall Sensors Hall Sensor des Rauchventilators ist nicht angeschlossen oder defekt Reinigung des Heizofens Brennkammer Kohlenbecken oder Rauchabzug Druckerfassungsrohre getrennt oder verstopft Z...

Page 74: ......

Page 75: ...ALLATION DU POÊLE 5 4 AIR DE COMBUSTION 5 5 ÉVACUATION FUMÉES 5 6 MISE À NIVEAU DU POÊLE 5 7 RACCORDEMENT AUX INSTALLATIONS 5 8 OPTIMISATION DE LA COMBUSTION 6 ENTRETIEN 6 1 MAINTENANCE 7 DÉMOLITION ET ÉLIMINATION 8 CONFIGURATION INITIALE DISPLAY 8 1 BRANCHEMENT À UN THERMOSTAT EXTERNE 9 PANNEAU DE COMMANDES 9 1 DESCRIPTION 9 2 UTILISATIONDUPANNEAUDECOMMANDES 9 3 PARAMÈTRES DE FONCTIONNEMENT 10 OP...

Page 76: ...iqué et testé conformément aux exigences de sécurité définies dans les directives européennes de référence Ce manuel est destiné aux propriétaires du poêle aux installateurs aux utilisateurs et aux responsables de l entretien et fait partie intégrante du produit En cas de doute sur le contenu et pour toute clarification veuillez contacter le fabricant ou le service d assistance technique agréé en ...

Page 77: ...pénale directe ou indirecte due à installation non conforme aux réglementations en vigueur dans le pays et aux directives de sécurité non respect partiel ou total des instructions contenues dans le manuel installation de la part de personnel non qualifié et non formé utilisation non conforme aux directives de sécurité modifications et réparations non autorisées par le fabricant sur le poêle utilis...

Page 78: ... pourrait provoquer des brûlures ne pas regarder la flamme pendant longtemps ne pas toucher l évacuation des fumées ne pas effectuer de nettoyage de tout type ne pas vider les cendres ne pas ouvrir la porte en verre ne pas ouvrir le bac des cendres le cas échéant L appareil peut être utilisé par des enfants d au moins 8 ans et par des personnes ayant des capacités physiques sensorielles ou mentale...

Page 79: ...doit être stocké à une distance adéquate du poêle dans un environnement sec et pas trop froid Nous recommandons de stocker quelques sacs de pellets dans la pièce où le poêle est utilisé ou dans une pièce voisine à condition que la température et l humidité soient acceptables Les granulés humides et ou froids 5 C réduisent la puissance thermique du combustible et oblige à effectuer plus fréquemment...

Page 80: ...r des outils munis d une isolation électrique F il doit s assurer que la zone concernée par les phases de montage et de démontage est exempte de tout obstacle 5 3 LIEU D INSTALLATION DU POÊLE Ne pasinstaller l appareil dans chambres locaux de taille inférieure à celle indiquée dans la fiche technique du paragraphe 14 pièces caractérisées par la présence de poussières potentiellement explosives Le ...

Page 81: ...ntempéries et au vent elle assure une protection contre la pluie et le vent Veiller à ce que l entrée d air soit positionnée de manière à ne pas être obstruée accidentellement S il n est pas possible de créer une prise d air extérieure dans la paroi arrière du poêle mur non périphérique un trou doit être fait dans un mur extérieur de la pièce où le poêle est placé S il n était pas possible de fair...

Page 82: ...igatoire de créer une première section verticale d au moins 1 5 mètre pour assurer une évacuation correcte des fumées Il est recommandé d effectuer un maximum de 3 changements de direction en plus de celui découlant du raccordement arrière du poêle à la cheminée en utilisant des courbes de 45 à 90 ou des raccords en T Fig 5 7 Utiliser toujours un raccord en T avec un capuchon d inspection à chaque...

Page 83: ...minée traditionnelle Fig 5 8 peut se faire tant que l on assure l état d entretien de la cheminée Dans le cas d une cheminée de plus grande section il est nécessaire d intuber la cheminée avec un tuyau en acier adéquatement isolé avec un diamètre en fonction du parcours Fig 5 9 S assurer que le raccordement à la cheminée de maçonnerie est correctement scellé En cas de passage de tuyaux à travers l...

Page 84: ...anulés etc Au premier allumage la combustion du poêle peut être optimisée En général si à la fin de la combustion dans le brasier il reste de nombreux résidus il est conseillé de modifier les configurations de combustion augmenter la valeur jusqu à trouver la solution la plus satisfaisante Se référer au paragraphe 10 3 5 Optimisation de la combustion 6 ENTRETIEN par un centre d assistance techniqu...

Page 85: ...anchéité de tous les joints vérifier l état et la propreté de tous les composants internes vérifier l étanchéité et la propreté du raccord de sortie de fumée éliminer tout dépôt de résidus de granulés dans le réservoir vérifier le bon fonctionnement du poêle réinitialiser tous les avertissements ou alarmes les thermostats à réinitialisation manuelle sont situés à l arrière du poêle près de la sort...

Page 86: ...e faire quand l insert est éteint et hors tension retirer la totalité de l équipement électrique séparer les accumulateurs présents dans les cartes électriques éliminer la structure du poêle par le biais d entreprises agréées ATTENTION Laisser le poêle dans des zones accessibles est un grave danger pour les personnes et les animaux Le propriétaire est le seul responsable en cas d éventuels dommage...

Page 87: ...ction de la température ambiante lue par la sonde Il est possible de régler la fonction Eco mode pour éteindre ou rallumer le poêle en fonction de la température ambiante réglée Dans cette configuration il est possible de programmer aussi la fonction anti gel CONFIGURATION 2 Programmer cette configuration lorsque le poêle est commandé par un thermostat ou chronothermostat externe Dans cette config...

Page 88: ...our confirmation du paramètre ou de la sélection Toutes les touches sont de type capacitif donc elles ne nécessitent pas de pression pour être activées mais il suffit de toucher la surface 9 1 1 LED d état ICÔNE AVERTISSEMENT DESCRIPTION Granulés de bois en épuisement Indique que la trémie à granulés doit être remplie Entretien Indique la nécessité d effectuer un entretien Assistance Indique la pr...

Page 89: ... Température antigel Température minimale en dessous de laquelle le poêle s allume uniquement dans la configuration 1 OFF 3 20 C 10 Blocage clavier Règle la modalité de blocage des touches OFF Lo Hi 11 Luminosité de l affichage Règle le degré de luminosité de l affichage OFF 1 5 12 Modalité affichage Règle la modalité d affichage des données OFF 1 4 13 Volume sonnerie Règle le volume du signal son...

Page 90: ...La valeur de ventilation se met à clignoter modifier la valeur avec les touches OFF exclut complètement la ventilation et le poêle ne fonctionnera qu avec une convection naturelle uniquement dans les modèles où il est fourni 1 minimum 5 maximum Auto fonctionnement automatique le poêle définira la vitesse en fonction de la température ambiante Hi fonctionnement ultra rapide à utiliser uniquement en...

Page 91: ...riodes de non utilisation il est recommandé de mettre l interrupteur à l arrière de la machine en position OFF O S assurer de ne pas toucher le panneau de commande au moment où le poêle est raccordé 10 3 RÉGLAGES INITIAUX Avant d utiliser le poêle il est nécessaire de programmer la date et l heure courant 10 3 1 Programmation heure et date Pour modifier la date a Se déplacer avec les touches sur l...

Page 92: ...t affichée en heures avant d avoir à remplir le réservoir si la fonction de ravitaillement a été activée e Frapper la touche pour confirmer les données programmées 10 3 4 Réglage du volume Il est possible de régler le volume du buzzer selon vos besoins a En agissant sur les touches fléchées se positionner sur le menu setup puis frapper la touche b Sélectionner le mot de passe 7 à l aide de la touc...

Page 93: ... 11 3 COUPURE Pour éteindre le poêle maintenir le bouton enfoncé pendant quelques secondes l icône de flamme s éteint Pour effectuer un nouvel allumage il est conseillé d attendre que le poêle soit complètement refroidi Il est recommandé d éteindre le poêle en suivant scrupuleusement ce qui précède et d éviter absolument de le faire en débranchant l alimentation 11 4 FONCTIONNEMENT AVEC THERMOSTAT...

Page 94: ...i La valeur de la température souhaitée clignotera en modifier la valeur avec les touche et j Frapper la touche pour confirmer les données programmées 12 1 2 Attribuer les programmes aux jours Cette fonction permet d attribuer jusqu à 3 programmes différents à un jour de la semaine a En agissant sur les touches fléchées se positionner sur le menu setup et frapper la touche b Sélectionner le mot de...

Page 95: ...onfirmer avec la touche d La valeur clignotera la modifier à l aide des touches et 0 5 5 0 C e Appuyer sur la touche pour confirmer les données saisies 12 4 RÉALLUMAGE APRÈS UN BLACK OUT En cas d interruption du courant électrique le poêle se rallume automatiquement en vérifiant les conditions de sécurité au moment du rétablissement du courant 12 5 FONCTION BLOCAGE CLAVIER Cette fonction permet de...

Page 96: ...r le mot de passe 7 avec la touche et confirmer avec la touche c Faire défiler avec la touche et sélectionner le sous menu 31 d Sélectionner le mot de passe 54 avec la touche et confirmer avec la touche e En maintenant la touche enfoncée le système de chargement s activera et des barres incrémentielles apparaîtront sur l affichage f Relâcher le bouton mettra fin à l opération de chargement Attenti...

Page 97: ...rature fumées défectueuse A002 Avis d entretien programmé icônes clignotantes Périodiquement le poêle nécessite que soit effectué un entretien par un technicien spécialisé A004 Batterie déchargée La batterie tampon mod CR2032 à bord de la fiche électronique est déchargée A005 Mauvais fonctionnement détecteur de Hall Détecteur de Hall du ventilateur fumées débranché ou défectueux Nettoyage poêle Ch...

Page 98: ......

Page 99: ... 3 LUGAR DE INSTALACIÓN DE LA ESTUFA 5 4 AIRE COMBURENTE 5 5 DESCARGA DE HUMOS 5 6 NIVELACIÓN DE LA ESTUFA 5 7 CONEXIÓN A LAS INSTALACIONES 5 8 OPTIMIZACIÓN DE LA COMBUSTIÓN 6 MANTENIMIENTO 6 1 MANTENIMIENTO 7 DEMOLICIÓN Y ELIMINACIÓN 8 CONFIGURACIÓN INICIAL DEL DISPLAY 8 1 CONEXIÓN A UN TERMOSTATO EXTERNO 9 PANEL DE MANDOS 9 1 DESCRIPCIÓN 9 2 USO DEL PANEL DE MANDOS 9 3 PARÁMETROS DE FUNCIONAMIEN...

Page 100: ...iguiendo las prescripciones de seguridad indicada en las directivas europeas de referencia Este manual está dirigido a los propietarios de la estufa a los instaladores usuarios y encargados del mantenimiento de las estufas y es parte integrante del producto En caso de dudas sobre el contenido y para cualquier aclaración contactar al fabricante o al servicio de asistencia técnica autorizado citando...

Page 101: ...nsabilidad tanto civil como penal directa o indirecta debida a instalación no conforme con las normativas en vigor en el país y con las directivas de seguridad inobservancia parcial o total de las instrucciones contenidas en el manual instalación por parte de personal no cualificado y o no formado uso no conforme con las directivas de seguridad modificaciones y reparaciones no autorizadas por el F...

Page 102: ...sobre las partes eléctricas electrónicas o conectores 2 3 ADVERTENCIAS PARA EL USUARIO No tocar y no acercarse al vidrio de la puerta podría causar quemaduras no mirar la llama por mucho tiempo no tocar la salida de humos no realizar ningún tipo de limpieza no descargar las cenizas no abrir la puerta de vidrio no abrir el cajón de cenizas donde esté previsto El aparato no puede ser usado por niños...

Page 103: ...l pellet debe ser conservado a una distancia adecuada de la estufa en un ambiente seco y no demasiado frío Se recomienda conservar algunas bolsas de pellet en el local de uso de la estufa o en un local contiguo siempre que esté a temperatura y humedad aceptables Elpellethúmedoy ofrío 5 C reducelapotencialidad térmica del combustible y obliga la realización de un mayor mantenimiento de limpieza del...

Page 104: ...tes E utilizar equipos con aislamiento eléctrico F comprobar que la zona donde se van a realizar las operaciones de montaje y desmontaje esté libre de obstáculos 5 3 LUGAR DE INSTALACIÓN DE LA ESTUFA No instalar el aparato en en dormitorios habitaciones con una superficie inferior a la que figura en la ficha técnica del párrafo 14 habitaciones caracterizadas por la presencia de polvos potencialmen...

Page 105: ...rie prever una protección contra la lluvia y el viento Asegurarse que la toma de aire esté colocada de modo que no se obstruya accidentalmente En el caso en que fuera imposible realizar la toma de aire externa en la pared trasera a la estufa pared no perimetral debe ser realizado un orificio en una pared externa del local en donde se coloca la estufa Si no es posible realizar la toma de aire exter...

Page 106: ...arca CE Es obligatorio realizar un primer tramo vertical de 1 5 metros mínimos para garantizar la correcta expulsión de los humos Se aconseja realizar un máximo de 3 variaciones de dirección además de la que deriva de la conexión trasera de la estufa a la chimenea utilizando curvas a 45 90 o empalmes con forma de T Fig 5 7 Utilizar siempre un empalme con forma de T con tapón de inspección para cad...

Page 107: ... a través de una chimenea tradicional Fig 5 8 puede ser realizado siempre que se asegure el estado de mantenimiento de la chimenea En caso de chimenea de sección mayor es necesario entubar la chimenea con una tubería de acero con diámetro en función del recorrido adecuadamente aislada Fig 5 9 Asegurarse que la conexión a la chimenea de pared esté correctamente sellada En caso de pasaje de los tubo...

Page 108: ... En el acto del primer encendido es posible optimizar la combustión de la estufa En términos generales si al final de la combustión en el brasero quedan muchos residuos se recomienda modificar las configuraciones de combustión aumentando el valor hasta encontrar la solución más satisfactoria Hacer referencia al párrafo 10 3 5 Optimización de la combustión 6 MANTENIMIENTO a cargo de un centro de as...

Page 109: ...o y la limpieza de todos los componentes internos comprobar la estanquidad y la limpieza del empalme de salida humos quitar los residuos eventuales de pellet en el depósito comprobar el funcionamiento correcto de la estufa reiniciar eventuales avisos o alarmas los termostatos con rearme manual se encuentran en el lado trasero de la estufa cerca de la salida del cable de alimentación para un acceso...

Page 110: ...n la estufa parada y sin energía eléctrica de alimentación quitar todo el aparato eléctrico separar los acumuladores presentes en las fichas electrónicas desechar la estructura de la estufa a través de las empresas autorizadas ATENCIÓN El abandono de la estufa en áreas accesibles constituye un gran peligro para personas y animales La responsabilidad ante eventuales daños a personas y animales reca...

Page 111: ...ble configurar la función Eco mode para hacer que la estufa se apague o se encienda nuevamente en base a la temperatura ambiente configurada En esta configuración es posible establecer también la función antihielo CONFIGURACIÓN 2 Establecer esta configuración cuando la estufa es controlada por un termostato o cronotermostato externo En esta configuración la estufa se apaga cuando el termostato ext...

Page 112: ...n del parámetro o de la elección Todas las teclas son de tipo capacitivo por lo tanto no necesitan de una presión para ser activadas sino que es suficiente rozar la superficie 9 1 1 Led de estado ICONO AVISO DESCRIPCIÓN Pellet en agotamiento Indica que es necesario recargar el depósito de pellet Mantenimiento Indica la necesidad de realizar un mantenimiento Asistencia Indica la presencia de un err...

Page 113: ...configuración 1 0 5 5 0 C 9 Temperatura antihielo Temperatura mínima por debajo de la cual la estufa se enciende solo en la configuración 1 OFF 3 20 C 10 Bloqueo teclado Configura la modalidad de bloqueo de la teclas OFF Lo Hi 11 Luminosidad display Configura el grado de luminosidad del display OFF 1 5 12 Modalidad display Configura la modalidad de visualización de los datos OFF 1 4 13 Volumen del...

Page 114: ...ionar la tecla b Parpadeará el valor de ventilación modificar el valor con las teclas OFF excluye completamente la ventilación y la estufa funcionará solo con convección natural solo en los modelos donde esté previsto 1 mínimo 5 máximo Auto funcionamiento automático la estufa configurará la velocidad en función de la temperatura ambiente Hi funcionamiento ultrarápido para utilizar solo si se neces...

Page 115: ...e el display Para largos períodos de inactividad se aconseja colocar el interruptor en la parte de atrás de la máquina en la posición OFF O Asegurarse de no tocar el panel de mando en el momento en que se da la alimentación a la estufa 10 3 CONFIGURACIONES INICIALES Antes de utilizar la estufa es necesario configurar la fecha y la hora actual 10 3 1 Configuración horario y fecha Para modificar la ...

Page 116: ...stra la autonomía en horas antes de tener que recargar el depósito si la función de abastecimiento ha sido habilitada e Presionar la tecla para confirmar los datos configurados 10 3 4 Configuración del volumen Es posible configurar el nivel de volumen del timbre en base a las propias necesidades a Actuando en las teclas de flecha ir al menú setup y presionar la tecla b Seleccionar la contraseña 7 ...

Page 117: ... Para apagar la estufa mantener presionada la tecla por algunos segundos el icono con forma de llama se apagará Para realizar un nuevo encendido se aconseja esperar a que la estufa esté completamente fría Se recomienda apagar la estufa siguiendo escrupulosamente lo antes indicado para evitar completamente de hacerlo quitando la alimentación eléctrica 11 4 FUNCIONAMIENTO CON TERMOSTATO AMBIENTE Cua...

Page 118: ...arpadeará el valor de la temperatura deseada modificar el valor con las teclas y j Presionar la tecla para confirmar los datos configurados 12 1 2 Asignar los programas a los días Con esta función es posible asignar hasta tres programas diferentes a un determinado día a Actuando en las teclas de flecha ir al menú setup y presionar la tecla b Seleccionar la contraseña 7 con la tecla y confirmar con...

Page 119: ... con la tecla c Seleccionar el submenú 8 y confirmar con la tecla d Parpadeará el valor modificarlo con las teclas y 0 5 5 0 C e Presionar la tecla para confirmar el dato configurado 12 4 REENCENDIDO DESPUÉS DE BLACK OUT En caso de interrupción de la corriente eléctrica la estufa se encenderá de nuevo automáticamente comprobando las condiciones de seguridad cuando se retome la alimentación 12 5 FU...

Page 120: ...nar la contraseña 7 con la tecla y confirmar con la tecla c Desplazar con la tecla y seleccionar el submenú 31 d Seleccionar la contraseña 54 con la tecla y confirmar con la tecla e Manteniendo presionada la tecla el sistema se carga se activará y en el display se mostrarán las barras incrementales f Liberando la tecla se pondrá fin a la operación de carga Atención Esta función está activa solo co...

Page 121: ...A002 Aviso de mantenimiento programado icono parpadeante Periódicamente la estufa requiere que se realice un mantenimiento por parte de un técnico especializado A004 Batería descargada La batería tampón mod CR2032 a bordo de la ficha electrónica está descargada A005 Mal funcionamiento del sensor en Hall Sensor de Hall del ventilador de humos desconectado o defectuoso Limpieza de la estufa Cámara d...

Page 122: ...Emissioni di CO alla potenza ridotta 13 O2 CO emmissions at partial heat output 13 O2 Emissionen bei CO Teillast 13 O2 Emissions de CO réf 13 O2 à puissance partielle Emisiones de CO ref 13 O2 a potencia parcial d Distanza minima da materiali infiammabili Distance between sides and combusti ble materials Mindestabstand zu brennbaren Bautei len mind Distance minimum avec matériaux inflammables Dist...

Page 123: ...RNEN PELLET DEPLACEMENT REMOCION PALETA DISTANZA MINIMA DAI MATERIALI COMBUSTIBILI MINIMUM DISTANCE FROM COMBUSTIBLE MATERIALS MINDESTABSTAND ZU BRENNBAREN MATERIALIEN DISTANCE MINIMALE À PARTIR DE MATÉRIAUX COMBUSTIBLES DISTANCIAMÍNIMADE MATERIALES COMBUSTIBLES 004778330 16 07 2020 Z X1 X2 Y1 Y2 ...

Page 124: ... Fireplace Foyer Feuerraum wand Hogar H Serbatoio pellet Fuel hopper Reservoir pellet Behaelter pellet Tanque pellet I Display Display Tableau Bedienung Panel J Tubo di uscita fumi Flue Tuyau d evacuation des fumees Abgasrohr Tubo salida humos K Sonda ambiente Probe Sonde ambiant Sonde Sonda ambiental L Cavo di alimentazione Power cord Cable d alimentation Speisekabel Cable de alimentación M Inter...

Page 125: ...r de hall Hall fuehler Sonda regulad Veloc Turbina humos 8 Sonda pellet Pellet probe Sonde pellet Pelletsonde Sonda pellet 9 Sonda ambiente Room probe Sonde ambiant Raumsonde Sonda ambiente 10 Sonda fumi Flue probe Sonde des fumees Rauchsonde Sonda humos 11 Induttanza Inductance Inductance Induktivität Inductancia UI PC 12 Pannello comandi Display Tableau de commande Steuerpaneel Panel de mando 10...

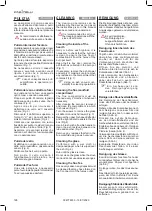
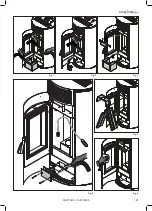
Page 126: ...auchverteilerfachs Die Reinigung der Rauchkammer muss alle 2 Monate oder bei Bedarf erfolgen Nehmen Sie das Kohlenbecken nach dem Reinigen von seinem Sitz und reinigen Sie das Fach in dem es sich befindet Abb 2 Drücken Sie auf die Schrauben um den Glasluftdeflektor und die Ascheschublade zu entfernen Abb 3 Entfernen Sie den oberen C förmigen Deflektor sowie die rechte und linke Platte im Kamin Abb...

Page 127: ...127 ESPAÑOL Fig 1 Fig 2 Fig 3 Fig 4 Fig 5 Fig 6 004778330 16 07 2020 ...

Page 128: ...fois par saison il est nécessaire de nettoyer tous les dépôts formés dans le Tee d évacuation des fumées LIMPIEZA Las operaciones de limpieza pueden ser realizadas por el usuario siempre que haya leído y comprendido bien todas las instrucciones descritas en el presente manual Se recomienda efectuar la limpieza con la estufa apagada y fría Limpieza interna del fogón Cotidianamente o antes de cada e...

Page 129: ...129 ESPAÑOL Fig 1 Fig 2 Fig 3 Fig 4 Fig 5 Fig 6 004778330 16 07 2020 ...

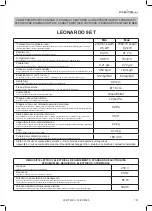
Page 130: ...af skorstenen 0 0 Pa Stufa adatta per locali non inferiori a Stove suitable for rooms of no less than Heizofen für Räume mit mindestens Foyer indiqué pour del volumes non inférieurs à Chimenea adecuada para cuartos no inferiors a Pilleovn der er egnet til lokaler på under 30 m3 Capacità serbatoio di alimentazione Feeding container capacity Capacité réservoir d alimentation Fassungsvermögen Beschic...

Page 131: ...sen af skorstenen 0 0 Pa Stufa adatta per locali non inferiori a Stove suitable for rooms of no less than Heizofen für Räume mit mindestens Foyer indiqué pour del volumes non inférieurs à Chimenea adecuada para cuartos no inferiors a Pilleovn der er egnet til lokaler på under 30 m3 Capacità serbatoio di alimentazione Feeding container capacity Capacité réservoir d alimentation Fassungsvermögen Bes...

Page 132: ...NI DIMENSIONS ABMESSUNGEN DIMENSIONS DIMENSIONES Dimensioni mm Dimensions mm Abmessungen mm Dimensions mm Dimensiones mm 8 1035 26 1042 96 508 245 5 O 130 O 81 546 593 607 103 LEONARDO 8ET 9ET 004778330 16 07 2020 ...

Page 133: ......

Page 134: ......

Page 135: ......

Page 136: ... Palazzetti übernimmt für eventuelle Fehler in diesem Heft keine Verantwortung und behält sich das Recht vor die Eigenschaften ihrer Produkte ohne Vorbescheid zu ändern Palazzetti décline toute responsabilité en cas d erreurs dans la présente documentation et conserve la faculté de modifier sans préavis les caractéristiques de l appareil La empresa Palazzetti no se responsabiliza de los errores ev...

Reviews: