background image


40 | 

P a g e


OPERATION 


Turbomolecular Pump Hazards and Precautions 


Fragmentation Hazards 

Turbopump blades spin at tens of thousands of rotations per minute in a nearly friction-free 

environment with ultra-tight tolerances inside the pump housing. Catastrophic damage may result if 

the oven turbopump suffers a significant impact or is moved while the blades are spinning. A sudden 

and large internal pressure increase while spinning can also induce a catastrophic failure. The pump 

blades may disintegrate under these conditions, causing irreparable internal damage. In the worst 

failure case, blade fragments can exit the front of the pump housing, entering the oven chamber at 

high velocity. 

Les aubes de turbopompe tournent à des dizaines de milliers de tours par minute dans un 

environnement presque sans frottement avec des tolérances ultra-serrées à l'intérieur du corps de 

pompe. Des dommages catastrophiques peuvent survenir si la turbopompe du four subit un impact 

important ou est déplacée pendant que les pales tournent. Une augmentation soudaine et importante 

de la pression interne pendant la rotation peut également provoquer une défaillance catastrophique. 

Les aubes de la pompe peuvent se désintégrer dans ces conditions, provoquant des dommages 

internes irréparables. Dans le pire des cas de défaillance, des fragments d'aubes peuvent sortir par 

l'avant du boîtier de la pompe et pénétrer dans la chambre du four à grande vitesse. 


Possible causes for catastrophic pump failure include: 


Subjecting the oven or pump to severe external impacts or strong periodic vibrations or 

moving the oven while the pump blades are in motion. 


Using the oven for improper applications that generate abrupt gas pressure increases or 

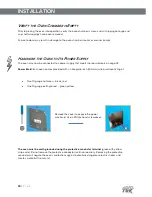
otherwise undermine the integrity of the turbopump. These include: 

o


Pumping dust or liquids through the pump 

o


Pumping corrosive or explosive media through the pump 

o


Attempting to pump vapors that will condense inside the pump 


Operating the pump in an ambient environment with potentially explosive airborne 

particulates, vapors, or gases. 


Introducing free atmosphere into the pump while spun up. 


Using the pump in an area with strong magnetic fields or ionizing radiation. 

o


These may adversely affect the pump drive or directly destabilize the moving blades 

inside the pump housing. 


Modifying the turbopump or its controllers or altering the factory settings for pump or safety 

interlock operations. 


Continued next page 

Summary of Contents for CTVT1022-H

Page 1: ...Turbo Vacuum Ovens SVO 5 T SVO 10 T Installation and Operation Manual...

Page 2: ...Warnings ca gov Advertencia Este producto contiene sustancias qu micas incluido el triglicidil isocianurato que el estado de California sabe que causa c ncer as como defectos de nacimiento u otros da...

Page 3: ...del Name SVO 10 T SVO 5 T Part ID CTVT1022 H CTVT522 H The Part ID denotes the build type of the model Cascade TEK periodically releases new build types of these models incorporating new features and...

Page 4: ...2 Power Source Requirements 23 Lifting and Handling 24 Leveling 24 Install the Oven 24 Disengage the Roughing Pump Locks 25 Installation Cleaning 26 Shelving Installation 27 Connect Gas Supplies 28 Ve...

Page 5: ...g Atmospheric Integrity 58 Gaskets 58 Electrical Components 58 Storage 58 UNIT SPECIFICATIONS 59 Weight 59 Dimensions 59 Capacity 59 Shelf Capacity by Weight 60 Vacuum 60 Temperature 60 Power 61 REPLA...

Page 6: ...6 P a g e TABLE OF CONTENTS...

Page 7: ...re being heated and the unit is being operated under an environmental air pressure range of 22 14 31 3 inHg 75 106 kPa These models have been tested to the following requirements CAN CSA C22 2 No 6101...

Page 8: ...8 P a g e CERTIFICATIONS...

Page 9: ...a site specific standard operating procedure SOP covering each application and associated safety guidelines This SOP must be written and available to all operators in a language they understand Intend...

Page 10: ...TEK Solutions LLC PO Box 625 300 N 26th Ave Cornelius OR 97113 USA MANUFACTURING WARRANTY For information on your warranty and online warranty registration please visit https www cascadetek com warra...

Page 11: ...ing Locks The roughing pump comes with built in shipping locks to prevent damage during transit See page 25 for instructions on disengaging the locks prior to putting the oven into operation COMPRESSE...

Page 12: ...old vacuum The gasket is a low wear long duration component that is rated to 220 C and typically replaced only during scheduled services on the oven However the gasket is attacked by ketones low molec...

Page 13: ...1 Carefully inspect the shipping carton for damage 2 Report any damage to the carrier service that delivered the unit 3 If the carton is not damaged open the carton and remove the contents 4 Inspect t...

Page 14: ...G ORIENTATION IMAGES Oven Chamber Door SVO 10 T Door Hasp Door Latch Control Panel Electronics Cabinet Turbopump Monitor Roughing Pump In the Cabinet Temperature Sensor Probe below shelf Turbopump Por...

Page 15: ...e RECEIVING ORIENTATION IMAGES Oven Chamber Door Door Latch Control Panel Electronics Cabinet Turbopump Monitor Roughing Pump In the Cabinet SVO 5 T Door Hasp Door Gasket Shelf Turbopump Port KF 25 Ac...

Page 16: ...ake Port 3 8 9 5 mm Hardwire Power Feed Shipping Cover Pictured Auxiliary Chamber Port KF 25 Compressed Air Port 6 35 mm Push Fitting Vacuum Exhaust Tubing standard pump units Foreline Roughing Vacuum...

Page 17: ...dth 28 2 inches 718 mm Shelf Depth 25 0 inches 635 mm Width 38 7 inches 983 mm Depth 52 9 inches 1343 mm Chamber Height 24 5 inches 622 mm Chamber Depth 26 0 inches 660 mm Shelf Height 75 8 inches 192...

Page 18: ...inches 444 mm Shelf Depth 25 0 inches 635 mm Width 28 8 inches 732 mm Depth 51 9 inches 1318 mm Chamber Height 18 0 inches 457 mm Chamber Width 18 0 inches 457 mm Chamber Depth 26 0 inches 660 mm Shel...

Page 19: ...del number serial number part number and part ID Customer Support will need this information during any support call Record it below for future reference The data plate is located on the back right si...

Page 20: ...20 P a g e RECEIVING...

Page 21: ...age 22 Unit dimensions may be found on page 59 Check that a suitable permanent connect power supply is present page 23 Install the oven in a suitable location Review the lifting and handling instructi...

Page 22: ...oling vents or other sources of fast moving air currents High traffic areas Direct sunlight REQUIRED CLEARANCES These clearances are required to provide airflows for ventilation and cooling 6 inches 1...

Page 23: ...ommended to prevent possible loss of product due to overloading or failure of other equipment on the same circuit Switch or circuit breaker A wall switch or circuit breaker must be used in the buildin...

Page 24: ...l moving parts such as shelves and trays and lock doors in the closed position during transfers to prevent shifting and damage LEVELING Install the 4 leveling feet in the corner holes in the bottom of...

Page 25: ...and may speed the wear of the turbopump Required Tools A Phillips Screwdriver T Handle Allen Wrench Included in the roughing pump document package 1 Use the Phillips screwdriver to remove the front an...

Page 26: ...chamber The unit was cleaned at the factory but may have been exposed to contaminants during shipping Remove all wrappings and coverings from shelving prior to cleaning and installation See the Cleani...

Page 27: ...Do not place the shelf in direct contact with the probe 1 Install the shelf clips in the slots of the shelf standard mounting rails located on the sides of the chamber interior 6 clips per shelf a Squ...

Page 28: ...r exceed 80 psi Failure to connect a compressed air supply prevents the oven from pumping down or backfilling the oven chamber Optional Connect equipment to the KF 25 auxiliary port Comes with a blank...

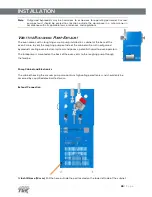
Page 29: ...se of the oven Failure to vent the roughing pump outside of the cabinet will result in outgassed byproducts coating oven electrical systems and poses a potential hazard to oven operators The turbopump...

Page 30: ...he requirements on page 23 Power Braid Each oven comes provided with an integral 6 inch 150 mm wire braid consisting of Two 10 gauge hot wires black red One 10 gauge earth ground green yellow The oven...

Page 31: ...s as well as important notes in the user manual Symbol Definition Consult the user manual Consulter le manuel d utilisation AC Power Rep re le courant alternatif Potential shock hazard Risque de choc...

Page 32: ...32 P a g e SYMBOLS...

Page 33: ...s per second The bottom line shows the amperage the pump is drawing This is an indicator of how much work the pump is performing To change the display parameters see the turbopump monitor user manual...

Page 34: ...ughing pump valve is open This occurs during the initial chamber pump down to below 1 Torr or if the chamber and foreline pressure later rise above 1 Torr Start Vacuum Pushing and releasing the Start...

Page 35: ...ts systems Main and High Limit Controller Homepage Home Returns the display to the homepage Menu Accesses the password for unlocking the heating profile programming menu Return Returns the display to...

Page 36: ...he oven an unheated resting state PWR The power bar indicates the percentage of maximum power the oven controller is calling for to heat the oven chamber Oven Limit OTP Page The Oven Limit OTP system...

Page 37: ...ile Actions This button brings up heating profile menu options These include Running a profile launching Creating a new profile Editing an existing profile Exporting profiles Note You must log in to c...

Page 38: ...38 P a g e CONTROLS...

Page 39: ...le or combustible gases vapors liquids or fuel air mixtures in quantities that can become potentially explosive Outgassed byproducts may be hazardous to or noxious for operating personnel Vacuum pump...

Page 40: ...nt provoquer une d faillance catastrophique Les aubes de la pompe peuvent se d sint grer dans ces conditions provoquant des dommages internes irr parables Dans le pire des cas de d faillance des fragm...

Page 41: ...k of catastrophic internal failure or violent detachment from the oven Pump Safety Interlocks If the oven roughing pump does not successfully pump down the oven chamber to 1 Torr within 30 minutes the...

Page 42: ...nected to the roughing pump The roughing pump vacuums down the foreline to 1 Torr and will continue to run actively holding the foreline at or below this pressure This provides backing an environment...

Page 43: ...ut isolated from both pumps The turbopump will then begin spinning down The roughing pump will continue to pump down the foreline for 5 minutes before closing the foreline valve This cleans the turbop...

Page 44: ...room the unit will gradually use shorter heating pulses If the ambient temperature conditions change significantly there may be minor over or undershoots as the unit adapts The oven chamber is well in...

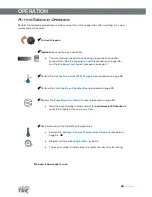
Page 45: ...rt procedure on page 47 Perform the Set the Oven Limit OTP Temperature procedure on page 48 Perform the Latch the Oven Chamber Door procedure on page 49 Perform the Pump Down the Oven Chamber procedur...

Page 46: ...the Login icon 3 Enter the Controller password Type ctek Note Ensure that the password is in all lower case Tap the Enter button You may now return to the Homepage Tap the Home icon Logging Out The m...

Page 47: ...rted using this procedure 1 Access the Main Menu Tap the Menu icon 2 Login See the Logging In and Out procedure on page 46 3 Access the File Transfer Menu Tap the File Transfer menu button 4 Choose Im...

Page 48: ...f the oven chamber Considerations when setting the oven limit cutoff Set the limit prior to activating heating The oven limit cutoff setpoint should be set at least 10 C above the highest temperature...

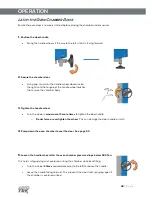
Page 49: ...mber body 3 Tighten the handle wheel Turn the wheel a maximum of 3 more times to tighten the door handle o Do not force or overtighten the wheel This can damage the door handle or latch 4 Pump down th...

Page 50: ...e oven is drawing a vacuum to ensure the system is sealed The oven door must be closed and latched prior to pumping down the chamber 1 Push and release the Vacuum Start button on the unit control pane...

Page 51: ...roughing pump will continue to pump down the foreline for 5 minutes then close the foreline valve BACKFILL THE CHAMBER Restores the oven chamber to room atmosphere The turbopump must be shut down and...

Page 52: ...r The manufacturer recommends fully pumping down the oven chamber before heating 1 Tap the Setpoint button on the Homepage oven temp tab 2 Enter a temperature setpoint To end constant temperature heat...

Page 53: ...ogramming steps You must be logged on to the controller to create or edit profiles See page 46 The manufacturer recommends exporting profiles as a backup using the USB A port on the front of the contr...

Page 54: ...rofile with a temperature setpoint near to or exceeding the current Oven Limit setting An external temperature source or a heat source in the oven chamber is pushing the oven temperature to or above t...

Page 55: ...to bring up the Error screen 2 Tap the Clear button on the Error screen to cancel the Oven Limit temperature cutoff 3 Tap the Up arrow at the bottom of the screen to return to the homepage The red Ala...

Page 56: ...the following Downloading profiles and uploading profiles to the controller Programming heating profiles in a desktop or laptop environment Backing up and loading backed up oven configurations OVEN CO...

Page 57: ...e equipment or with material contained in it Warning Exercise caution if cleaning the unit with alcohol or flammable cleaners Always allow the unit to cool down to room temperature prior to cleaning a...

Page 58: ...ance of contaminating the chamber door interior 1 Remove the old gasket by pulling it out of the gasket well in the door 2 Insert a few centimeters inches of the narrow side of the replacement gasket...

Page 59: ...of the inner chamber All indications are average values typical for units produced in the series We reserve the right to alter technical specifications at all times WEIGHT Model Shipping Weight Unit W...

Page 60: ...amber Exceeding this limit risks damaging the chamber liner VACUUM Operational Vacuum Range Torr mbar 1 x 10 6 1 3 x 10 6 Vacuum Display Range Torr mbar 3 8 x 10 10 5 x 10 10 TEMPERATURE Range Stabili...

Page 61: ...61 P a g e SPECIFICATIONS POWER Model AC Voltage Amperage Frequency SVO 10 T 220 240 30 50 60 Hz SVO 5 T 220 240 20 50 60 Hz...

Page 62: ...62 P a g e SPECIFICATIONS...

Page 63: ...helf SVO 5 T 5221137 Viton Door Gasket SVO 5 T 79 5 2019 mm 3450789 Viton Door Gasket SVO 10 T 110 5 2807 mm 3450755 Ordering Parts and Consumables Parts may be ordered from Cascade TEK by calling 1 8...

Page 64: ...Corporate Headquarters Cascade TEK Solutions LLC 2010 Century Center Blvd Suite 21 Irving Texas 75062 USA support cascadetek com cascadetek com 1 888 835 9250 1 971 371 4096...

Reviews: