background image


Page | 19 


OPERATING INSTRUCTIONS

OPERATING INSTRUCTIONS

OPERATING INSTRUCTIONS

OPERATING INSTRUCTIONS    


Obtain a complete physical examination from your medical 

doctor and enlist a health/fitness professional’s aid in 

developing an exercise program suitable for your current health 

status. 


When working out for the first time, start out slowly for a 

minimum of five minutes. After your muscles are warmed up, 

gradually increase the pedaling rate and/or resistance to a 

speed that allows you to attain your target heart rate zone. 


The speed and duration of your exercise program should 

always be subject to how you feel. Never permit peer pressure 

to exceed your personal judgment while exercising. 


Overweight or severely unconditioned individuals should be 

particularly cautious when using the equipment for the first 

time. Even though such individuals may not have histories of 

serious physical problems, they may perceive the exercise to be 

far less intense than it really is, resulting in the possibility of 

overexertion or injury. 


Although all equipment manufactured by Cascade Health and 

Fitness has been thoroughly inspected by the manufacturing 

facility prior to shipment, proper installation and regular 

maintenance are required to ensure safety. Maintenance is the 

sole responsibility of the owner. 


This unit is NOT equipped with a freewheel system. If the 
flywheel is in motion, the pedals will be in motion.  


WARNING

WARNING

WARNING

WARNING    

THESE  GUIDELINES  ARE  DIRECTED  TO  YOU, 

AS 

THE 

OWNER 

OF 

THIS 

EXERCISE 

EQUIPMENT. YOU SHOULD INSIST THAT ALL 

USERS  FOLLOW  THE  SAME  GUIDELINES.  

YOU 

SHOULD 

MAKE 

THIS 

MANUAL 

AVAILABLE TO ALL USERS. 

Summary of Contents for 37700

Page 1: ...Page 1 CMXRT Owner s Manual ...

Page 2: ...8072 PHONE 425 402 4062 FAX 425 402 4063 EMAIL info cascadebiketrainers com www cascadebiketrainers com PLEASE KEEP THIS BOOKLET FOR IMPORTANT WARRANTY INFORMATION FUTURE REFERENCE PLEASE FILL IN BELOW CHART WITH REQUESTED INFORMATION FOR FUTURE USE MODEL NUMBER 37700 DATE OF PURCHASE SERIAL NUMBER DEALER NAME DEALER PHONE NUMBER ...

Page 3: ... of the CMX CMX CMX CMXRT RT RT RT it also includes great workout tips and exercise principles If at any time you have questions about this information please call us at 425 402 4062 and we will be happy to help you To help us answer your questions quickly we recommend that you have the serial number of your bike ready when you call us The serial number of your bike is located on the bike frame Th...

Page 4: ...easy to grab seat adjustment bar Wide and easy to grab seat adjustment bar Wide and easy to grab seat adjustment bar Wide and easy to grab seat adjustment bar Quick and easy bar to grab to change seat position Self Self Self Self leveling leveling leveling leveling pedals pedals pedals pedals with locking strap with locking strap with locking strap with locking strap for ease of use Convenient Con...

Page 5: ... CMX CMX CMXRT RT RT RT The information enclosed here will help you get the most enjoyment out of your workout and includes valuable operating service safety and trouble shooting information as well as guidelines for an effective exercise program We are confident that you will love your new CMX CMX CMX CMXRT RT RT RT Enjoy your riding ...

Page 6: ...G INSTRUCTIONS PAGE 13 ASSEMBLY INSTRUCTIONS PAGE 14 OPERATING INSTRUCTIONS PAGE 19 GUIDELINES FOR SAFE OPERATION PAGE 21 BASIC OPERATION PAGE 24 CONSOLE PAGE 25 GENERAL EXERCISE GUIDELINES PAGE 29 MAINTENANCE INSTRUCTIONS PAGE 31 TROUBLESHOOTING PAGE 33 SPECIFICATIONS PAGE 35 EXERCISE LOG PAGE 37 WARRANTY REGISTRATION PAGE 40 ...

Page 7: ...able bike s Your Billing Address The above information will ensure that you are the only one ordering parts under your warranty protection If warranty replacement parts are shipped to you you may be required to return the inoperable part s To facilitate this process the following policy has been established Contact our Customer Service Department Customer Service Department Customer Service Depart...

Page 8: ...e at high pedal speeds until you have practiced and are comfortable riding at slower pedal speeds 2 This unit is NOT equipped with a freewheel system If the flywheel is in motion the pedals will be in motion a Do not attempt to stop the unit by applying reverse pressure to the pedals as knee injury may occur 3 Do not attempt to remove your feet from the pedals while they are in motion as serious i...

Page 9: ...n and pets away from the unit while in use 9 Do not perform push up type movements on the handlebars 10 Never drop or insert any object into any opening on the exercise equipment 11 Only use the unit on a stable level floor 12 Follow the instructions for safe use of the equipment including proper seat position and use of the foot positioning system of the pedals 13 For safe operation allow for at ...

Page 10: ...d Failure to follow all guidelines above may compromise your exercise experience expose you and others to injury and reduce the longevity of the equipment D D D DELIVERY ELIVERY ELIVERY ELIVERY Upon delivery of your Cascade CMXRT take a moment to check the box exterior for any damage and make a note of it on the delivery receipt before signing Make your delivery agent aware of any concerns you hav...

Page 11: ...tback Screws 4 Power supply 6 Water bottle holder 2 Screws 4 Handlebar Washers 4 and Screws 4 Front Cross leg Rear Cross leg Screws 4 Nuts 4 Washers 8 M8 Console and mast Console mast hood Tools for assembly HR Monitor ...

Page 12: ...Page 12 DIAGRAM DIAGRAM DIAGRAM DIAGRAM ...

Page 13: ...e where there is a large clear area in order to facilitate an easy assembly 1 With the box in upright position remove the strapping material Next remove the staples on the top of the carton and slit the tape 2 Open the carton from the top 3 Carefully begin removing the parts 4 To remove the frame of the bike remove the staples from the base of the carton and lift the carton off over the frame 5 Re...

Page 14: ... below the front cover 2 Attach the stabilizer with 2 M8x60mm screws and 4 Washers two on top of frame and two on bottom of stabilizer 3 Tighten with the provided Hex key and multi tool 4 Align the rear stabilizer rear stabilizer rear stabilizer rear stabilizer the one with the stretch pads with holes in the main frame as shown 5 Attach the stabilizer with 2 M8x60mm screws and 4 Washers two on top...

Page 15: ... installed in the frame Loosen them so the Mast can be attached Before attaching the Mast be sure to connect all the cables in the Mast to the appropriate cables in the frame Once all cables are connected put the Mast over the bolts slide into position and tighten the bolts Make sure the cables are securely put away and do not get pinched 2 Attach the hood cover around and over the mast post ...

Page 16: ...Page 16 MESH MESH MESH MESH SEAT SEAT SEAT SEAT BACK BACK BACK BACK 1 Align the seat back to the seat back support of the frame as shown in the diagram 2 Attach with the 4 bolts provided ...

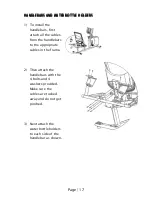
Page 17: ...TLE HOLDERS S S S 1 To install the handlebars first attach all the cables from the handlebars to the appropriate cables in the frame 2 Then attach the handlebars with the 4 bolts and 4 washers provided Make sure the cables are tucked away and do not get pinched 3 Next attach the water bottle holders to each side of the handlebar as shown ...

Page 18: ...rm arm 3 Use the wrench tool to strongly tighten the pedal Torque pedals to 47 Nm 35 ft lb 4 4 4 4 Repeat this step for the left pedal NOTE The LEFT PEDAL NOTE The LEFT PEDAL NOTE The LEFT PEDAL NOTE The LEFT PEDAL is is is is REVERSE REVERSE REVERSE REVERSE THREADED THREADED THREADED THREADED ASSEMBLY INSTRUCTIONS ASSEMBLY INSTRUCTIONS ASSEMBLY INSTRUCTIONS ASSEMBLY INSTRUCTIONS CONNECT THE CONNE...

Page 19: ...y unconditioned individuals should be particularly cautious when using the equipment for the first time Even though such individuals may not have histories of serious physical problems they may perceive the exercise to be far less intense than it really is resulting in the possibility of overexertion or injury Although all equipment manufactured by Cascade Health and Fitness has been thoroughly in...

Page 20: ...jury may occur Do not attempt to remove your feet from the pedals while they are in motion as serious injury may occur from the spinning pedals If you want to stop the flywheel push the red brake knob Do not attempt to dismount the CMX RT unless the pedals and the flywheel are at a complete stop ...

Page 21: ...ciently Using the bike when it is incorrectly adjusted can result in unnecessary discomfort and increase your risk of injury WARNING WARNING WARNING WARNING DO NOT ATTEMPT TO MAKE ANY ADJUSTMENTS TO THIS EQUIPMENT WHILE PEDALING STOP PEDALING THE BIKE PRIOR TO MAKING ALL ADJUSTMENTS WARNING WARNING WARNING WARNING This unit is NOT equipped with a freewheel system If the flywheel is in motion the p...

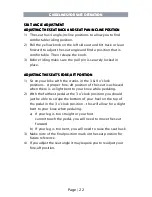
Page 22: ...ll pin is securely locked in place ADJUSTING THE SEAT S FORE AFT POSITION ADJUSTING THE SEAT S FORE AFT POSITION ADJUSTING THE SEAT S FORE AFT POSITION ADJUSTING THE SEAT S FORE AFT POSITION 1 Sit on your bike with the cranks in the 3 9 o clock positions A proper fore aft position of the seat is achieved when there is a slight bent to your knee while pedaling 2 With the furthest pedal at the 3 o c...

Page 23: ...e Make sure that the strap is secure but not overly tight or pressing uncomfortably on your foot 4 Repeat for the other foot 5 To loosen the pedal strap press down on the clip that holds the strap secure and pull slightly upward 6 Release the clip to lock the strap into place Now that you have established a riding position take a few minutes to ride the bike and determine that your position is com...

Page 24: ...owly reduce your pedaling speed until you come to a stop 3 Before dismounting make sure the flywheel and pedals are at a complete stop 4 To dismount the bike first loosen each toe strap and remove your feet from the pedals then step off the bike WARNING WARNING WARNING WARNING IF AT ANY TIME DURING YOUR WORKOUT YOU FEEL CHEST PAIN EXPERIENCE SEVERE MUSCULAR DISCOMFORT FEEL FAINT OR ARE SHORT OF BR...

Page 25: ...leep The bike must be plugged in for the console to work Operating Instructions 1 TO RESET THE DISPLAY Press Hold the START STOP key 2 TO ACTIVATE WAKEUP THE CONSOLE Press any key 3 TO USE QUICK START QUICK START QUICK START QUICK START Press the START STOP key 4 TO SCROLL THROUGH THE 11 PROGRAMS Press the UP DOWN keys a Press START STOP Key to skip entering workout information and begin workout ...

Page 26: ...top middle window displays either RPM s or Speed to toggle between the displays push the SPEED RPM CALORIES WATT key 3 The lower left window displays either Watts or Calories to toggle between the displays push the SPEED RPM CALORIES WATT key To change between MPH and KPH or to change the console volume 1 Reset the display by holding down the START STOP Key for 3 seconds 2 Press down the UP DOWN a...

Page 27: ...ed to set time age and HR 3 During workout used to change level ENTER SELECT 1 Used to accept selection and then move to the next window START STOP 1 Used to begin workout or stop a workout 2 To reset display press and hold this key for 3 seconds SPEED RPM CALORIES WATT 1 Used to change display toggles between RPM s and Speed and between Watts and Calories Programs For Programs 1 7 Press START STO...

Page 28: ...kout 8 75 Target HR 9 85 Target HR For Programs 10 11 Press START STOP key to begin custom program previously created immediately Press ENTER Key once to be able to set workout time Press ENTER Key again to create the profile There are ten segments that can be customized Use the UP and DOWN keys to set the level for each segment To go to the next segment select the ENTER Key Press START STOP key t...

Page 29: ...e change that encourages a lifetime of physical activity One way to guarantee success in reaching your goal is to eat correctly A well rounded diet provides the proteins carbohydrates fats vitamins minerals and water necessary for good health If you are unsure of your dietary needs seek the advice of your physician an exercise professional or visit your local bookstore for more information on nutr...

Page 30: ...rograms for healthy adults and the need for guidelines The following recommendations concern the quantity and quality of exercise training for developing and maintaining cardiovascular fitness in a healthy adult Frequency 3 5 days per week Intensity 50 85 of maximum oxygen uptake VO2 max Duration 20 to 60 minutes of continuous aerobic activity Mode of Activity Any activity that uses the large musc...

Page 31: ...ou were on the exercise equipment ready to exercise INITIAL SERVICE Upon receiving your equipment use a soft clean cloth to wipe off the dust that may have accumulated during shipping Your equipment will need minor assembly Refer to the Assembly Instructions section of this manual for details MAINTANCE SCHEDULE Part Recommended Action Frequency Cleaner2 Lubricant2 Pedals1 Ensure that the pedals ar...

Page 32: ...ove bolt apply Loctite 242 on bolt threads and reinstall Tighten to 48 ft lbs or 575 in lbs Belt Inspect for correct tension replace cracked frayed or otherwise non uniform belt Monthly N A N A 1Cascade does not recommend attempting to service the internal parts of the pedals If pedals are internally worn it is recommended that they be replaced 2Use of lubricants or cleaning solutions other than t...

Page 33: ...pping the bike as the pedals turn 2 Assure pedal straps are tight and that no excess strap on inner part of pedal is catching on the crank arm as it turns 3 Assure that pedals are tight on crank arms SYMPTOM SYMPTOM SYMPTOM SYMPTOM DRI DRI DRI DRIV V V VE E E E BELT BELT BELT BELT IS IS IS IS SLIPPIN SLIPPIN SLIPPIN SLIPPING G G G 1 Remove right side cover 2 Loosen idler and tighten tensioner bolt...

Page 34: ...t authorized service technician for replacement of bottom bracket bearings SYMPTOM SYMPTOM SYMPTOM SYMPTOM ROC ROC ROC ROCK K K KING ING ING ING OR OR OR OR M M M MO O O OV V V VEME EME EME EMEN N N NT T T T F F F FR R R ROM OM OM OM CMX CMX CMX CMXRT RT RT RT WHILE WHILE WHILE WHILE IN IN IN IN US US US USE E E E 1 Using a hex wrench check the attachment bolts on the front and rear stabilizers an...

Page 35: ...ase with large diameter adjustable levelers FLYWHEEL Precision Anodized Aluminum Machined Flywheel BRAKING AND RESISTANCE MECHANISM Console 11 programs 16 levels of resistance and red brake knob Eddy Current Magnetic Resistance CRANK SET Forged Cranks 170 mm Oversized and hardened Cr Moly bracket spindle Press fit style bottom bracket with oversized bearings Length 66 in 168cm Height 44 in 111 7 c...

Page 36: ...level controls at your thumbs Over molded grips for greater comfort STRETCH PADS Foot pads on base of rear stabilizer for stretching SEAT Wide range to fit both short and tall users 4 incline positions for a comfortable ride Comfortable mesh back is breathable TRANSPORTATION WHEELS Extra Large In Line skate wheels DRIVE TRAIN Reinforced Poly V Drive Belt Precision Drive Pulleys ...

Page 37: ...Page 37 EXERCISE LOG EXERCISE LOG EXERCISE LOG EXERCISE LOG Week Date Distance Calories Time Comments Day Monday Tuesday Wednesday Thursday Friday Saturday Sunday Weekly Totals Weekly Goals ...

Page 38: ...Page 38 EXERCISE LOG EXERCISE LOG EXERCISE LOG EXERCISE LOG Week Date Distance Calories Time Comments Day Monday Tuesday Wednesday Thursday Friday Saturday Sunday Weekly Totals Weekly Goals ...

Page 39: ...Page 39 EXERCISE LOG EXERCISE LOG EXERCISE LOG EXERCISE LOG Week Date Distance Calories Time Comments Day Monday Tuesday Wednesday Thursday Friday Saturday Sunday Weekly Totals Weekly Goals ...

Page 40: ...orking days from the date of equipment purchase Name of Purchaser Address City State Zip Country Phone Fax Please send me special offers timely fitness tips and health information via email Email Date of Purchase Purchased From Serial No Model No CMXRT Signature Make sure to register your warranty register your warranty register your warranty register your warranty by sending the above information...

Page 41: ...Page 41 CASCADE HEALTH AND FITNESS LLC 17280 WOODINVILLE REDMOND RD NE 800 WOODINVILLE WA 98072 PHONE 425 402 4062 FAX 425 402 4063 EMAIL info cascadebiketrainers com www cascadebiketrainers com ...

Reviews: