IOM-Ranger
12
into the stuffing box similar to the lower
braided ring (13.4) of Step 4.b. Leave
packing follower (15) in position.
j. Place the packing flange (14) over the
stem's (7) end and over the packing studs
(21). Place the retainers (28) over each
stud (21). Install packing nuts (22) and
finger-tighten.
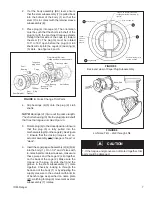
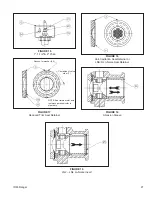
k. Repeat Step 4.g. with the exception that
the packing set (13) is to be compressed
into the stuffing box until the “lower groove”
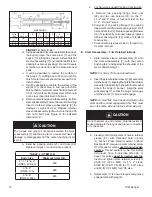
identified as “Line B” (see Figure 13) on
the packing follower (15) is flush with the
top edge of the body's (1) stuffing box.
l. Remove the packing nuts (22), retainers
(28) and packing flange (14).
m. For body sizes 1", 1-1/2" & 2":
m.1. Slide both yoke (12) and packing
flange (14) over end of stem (7),
prop er ly ori ent ed, and over pack ing
studs (21). Align matchmarks
be tween body (1) and yoke (12).
m.2. Install two cap screws (19) to
as sem ble the yoke (12) to the body
(1) securely.
n. For body sizes 3", 4", 6" & 8":
n.1. Slide yoke (12) over end of stem (7),
properly oriented, and over packing
studs (21). Align matchmarks
be tween body (1) and yoke (12).
n.2. Slide packing flange (14) over end
of stem (7), properly oriented, and
over pack ing studs (21).
n.3. Install two nuts (22) on studs (20) to
assemble the yoke (12) to the body
(1) securely.
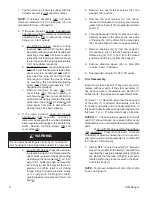
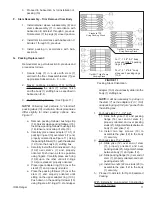
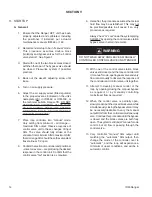
o. Place each spring washer (27) stack over
its packing stud (21) oriented as shown
in Figure 9.
p. Place each spacer ring (29) over its
pack ing stud (21) and spring washer (27)
stack oriented as shown in Figure 9.
q. Place each retainer (28) over its packing
stud (21) oriented as shown in Fig ure 9.
Ensure that each retainer (28) is properly
positioned into each spac er ring's (29)
groove, and that the retainer's (28)
in ver sion is correct.
5. Common For All Live-Loaded Designs:
a. Install packing nuts (22) finger-tight down
to each retainer (28).
b. Draw down each packing nut (22) in
al ter nat ing 1/2 revolution increments,
i. Place each spring washer (27) stack over
its packing stud (21) oriented as shown
in Figure 9.
j. Place each spacer ring (29) over its
pack ing stud (21) and spring washer stack
(27) oriented as shown in Figure 9.
k. Place each retainer (28) over its packing
stud (21) oriented as shown in Figure 9.
Ensure that each retainer (28) is properly
positioned into each spacer ring's (29)
groove, and that the retainer's (28)
in ver sion is correct.
l. Proceed to Article 5. , this Subsection.
4. For Opt-38HT High Temp Packing:
a. Solvent clean the packing follower (15).
b. Carefully place the lower braided ring
(13.4) over the stem's (7) end. Using the
packing follower (15) push the braided
ring (13.4) into the body's (1) stuffing box.
NOTE:
It will be necessary to pull up on
the stem (7) as the rings (13.2, 13.4) and
lower adapter (13.1) are “pushed” into the
stuffing box.
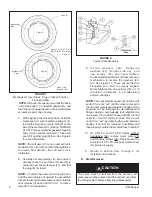
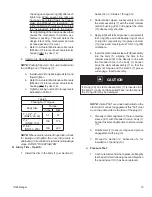
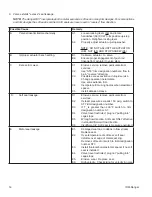
c. Carefully place the lower adapter (13.1)
properly ori ent ed (see Figure 11) over the
stem's (7) end and push into the stuffing
box similar to the lower braided ring (13.4)
of Step 4.b.
d. Carefully place a packing ring (13.2)
prop er ly oriented (see Figure 11) over the
stem's (7) end and push into the stuffing
box similar to the lower braided ring (13.4)
of Step 4.b. Repeat for each ring (13.2).
e. Carefully place the upper adapter (13.3)
similar to the lower retainer (13.1) of
Step 4.b. Leave packing follower (15) in
po si tion, properly oriented.
f. Place the packing flange (14) over the
stem's (7) end and over the packing studs
(21). Place the retainer (28) over each
stud (21). Install packing nuts (22) and
finger-tighten.
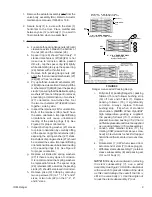
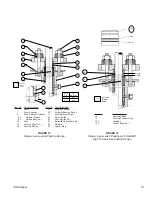
g. Wrench-tighten the packing nuts (22) in
1/2 revolution increments until the “upper
groove” identified as “Line A” (see Figure
13) on the packing follower (15) is flush
with the top edge of the body's (1) stuffing
box.
h. Remove the packing nuts (22), retainers
(28), packing follower (15) and packing
flange (14).
i. Carefully place the upper braided ring
(13.5) over the stem's (7) end and push


