IOM-Ranger
15
SECTION VI
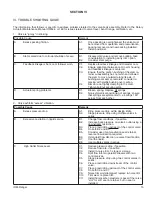
VI. TROUBLE SHOOTING GUIDE
The information that follows is specific to address prob lems related to the valve body assembly. Refer to the Rotary
Actuator Maintenance Manual IOM-48 or 148 for issues related to valve travel, bench range, calibration, etc.
1. Valve is “jumpy” in stroking.
Possible Cause
Remedy
A. Excess packing friction.
A1.
Once packing is overtightened, the valve must
be removed from operation and pressurization,
packing removed, and new packing installed.
A2. Install
positioner.
B. Stem seized due to corrosion/buildup of scale.
B1.
Disassemble valve and remove buildup. Give
consideration to installing slurry trim option.
B2.
Consider stem purge.
C.
Feedback linkage is bent; cam follower worn.
C1.
Replace feedback linkage and character cam.
C2.
Ensure alignment between cam in arm housing
and feedback linkage is centered.
C3.
Ensure that the carbon bushing of the stem re-
tainer subassembly has not worn and allowed
the stem to move outward along its axis. If
bushing wear seems premature, consider re-
placing with stellite bushing over carbon.
C4.
Arms are not tightly clamping to the stem.
Tighten bolt/nut securing arms.
D.
Actuator spring problems.
D1.
Broken spring. Replace all springs.
D2.
Non-symmetrical positioning of springs; ensure
that springs are symmetrical; i.e. springs 180°
across from each other.
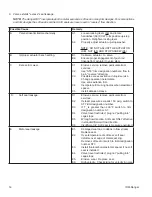
2. Valve exhibits “excess” vibration.
Possible Cause
Remedy
A. Excess pressure drop.
A1.
Bring pressure drop within design limits.
A2.
Stage pressure drop using multiple valves in
series.
B.
Excessive cavitation in liquid service.
B1.
Change flow conditions, if possible.
B2.
Increase back pressure on valve's outlet using a
downstream
restriction.
B3.
Place a restriction upstream of the control valve.
B4.
Do both B2 and B3.
B5.
Consider use of anti-cavitation seal retainer;
reverse flow direction required.
B6.
If standard flow direction, reverse flow direction.
B7.
Cool the liquid.
B8.
Use multiple valves in series.
C. High Outlet Noise Level
C1.
Reduce pressure drop, if possible.
C2.
Reduce flow rate, if possible.
C3.
Install lo-noise trim, 1-stage or 2-stage.
C4.
Split flow into two parallel streams with two
control valves.
C5.
Stage pressure drop using two control valves in
series.
C6.
Place a restriction downstream of the control
valve.
C7.
Place a restriction upstream of the control valve.
C8.
Do both C6 and C7.
C9.
Noise trim worn/damaged; replace lo-noise trim.
C10.
Trim wear; replace trim.
C11.
Install fluorocarbon elastomer spacer if there is a
“slot” for soft seal in retainer, but no seal is
installed.


