Operation Guide 3202
3
•
When mountain climbing, you can specify a reference altitude value in accordance
with a marker along the way or altitude information from a map. After that, the
altitude readings produced by the watch will be more accurate than they would
without a reference altitude value.
To take an altimeter reading
1. Make sure the watch is in the Timekeeping Mode.
2. Press
D
to start Altimeter measurement.
•
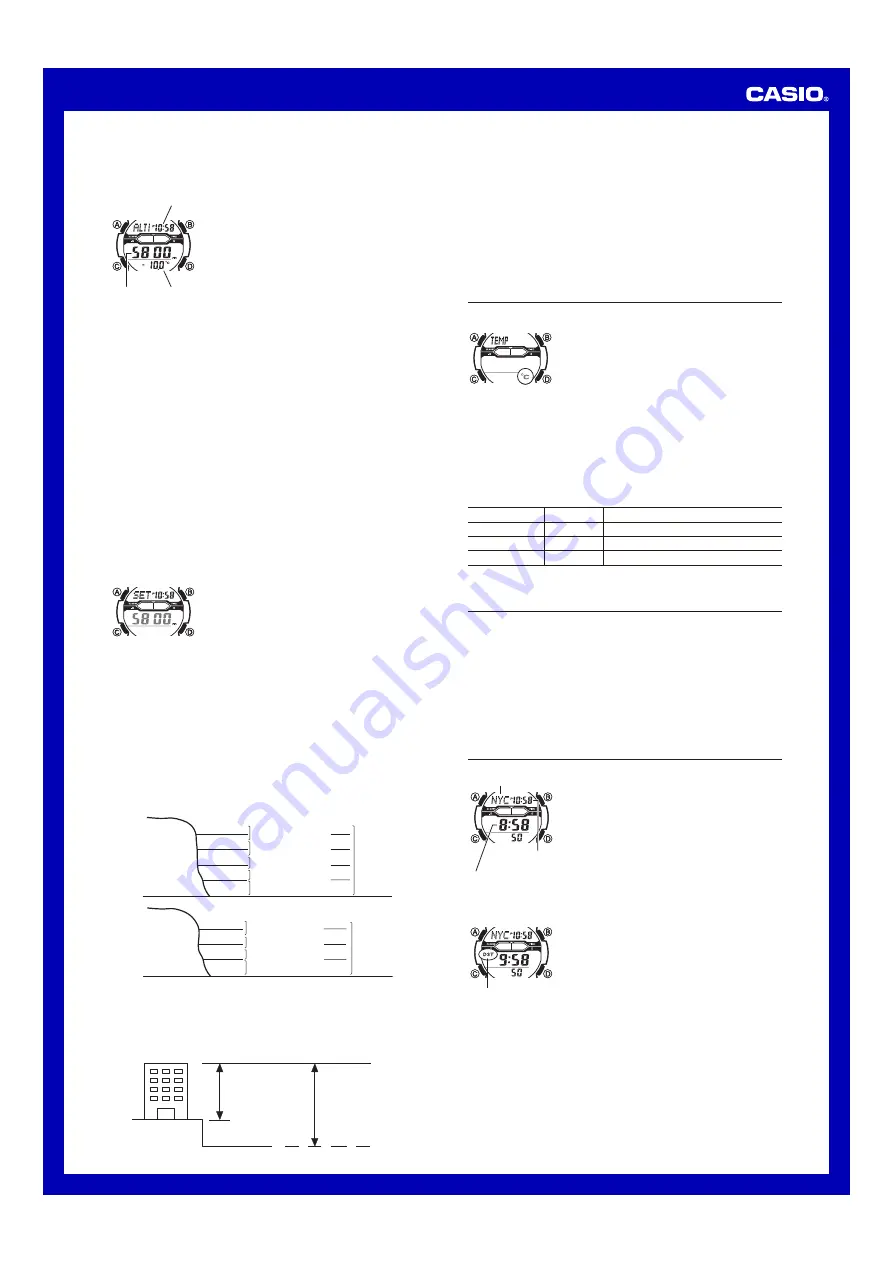
ALTI
will appear on the display, indicating that
Altimeter measurement is in progress. The first
reading will appear on the display after about four
or five seconds.
•
The current altitude value is displayed in units of 5
meters (20 feet).
•
After the first reading is obtained, the watch
continues to take altimeter readings automatically
every five seconds for the first three minutes, and
then every two minutes after that.
•
If you leave the watch in the Altimeter Mode, it will update the displayed altitude
value regularly.
•
Temperature is measured in the Barometer/Thermometer Mode and in the
Altimeter Mode. For details about temperature readings, see "Temperature".
3. After you are finished using the Altimeter, press
C
to return to the Timekeeping
Mode and stop auto measurement.
•
The watch will return to the Timekeeping Mode automatically if you do not
perform any operation for about 10 hours after entering the Altimeter Mode.
Note
•
The measurement range for altitude is –700 to 10,000 meters (–2,300 to 32,800
feet).
•
The displayed altitude value changes to
- - - -
if an altitude reading falls outside the
measurement range. An altitude value will reappear as soon as the altitude reading
is within the allowable range.
•
Normally, displayed altitude values are based on the watch’s preset conversion
values. You also can specify a reference altitude value, if you want. See “Specifying
a Reference Altitude Value” below.
•
You can change the unit for displayed altitude values to either meters (m) or feet (ft).
See “To specify temperature, barometric pressure, and altitude units”.
Specifying a Reference Altitude Value
The altitude readings produced by this watch are subject to error caused by changes
in air pressure. Because of this, we recommend that you update the reference altitude
value whenever accurate altitude information is available during your climb. After you
specify a reference altitude value, the watch adjusts its air-pressure-to-altitude
conversion calculation accordingly.
To specify a reference altitude value
1. In the Altimeter Mode, hold down
A
until the current
reference altitude value starts to flash. This is the
setting screen.
•
Before the reference altitude value starts to flash,
the message
SET Hold
will appear on the display.
Keep
A
depressed until
SET Hold
disappears.
2. Press
D
(+) or
B
(–) to change the current reference
altitude value by 5 meters (or 20 feet).
•
Specify a reference altitude value based on
accurate altitude information about your current
location from a map, etc.
•
You can set the reference altitude value within the range of –10,000 to 10,000
meters (–32,800 to 32,800 feet).
•
Pressing
B
and
D
at the same time returns to
OFF
(no reference altitude value),
so the watch performs air pressure to altitude conversions based on preset data
only.
3. Press
A
to exit the setting screen.
How does the altimeter work?
Generally, air pressure and temperature decrease as altitude increases. This watch
bases its altitude measurements on International Standard Atmosphere (ISA) values
stipulated by the International Civil Aviation Organization (ICAO). These values define
relationships between altitude, air pressure, and temperature.
0 m
500 m
1000 m
1500 m
2000 m
2500 m
3000 m
3500 m
4000 m
899 hPa
795 hPa
701 hPa
616 hPa
8.5°C
2°C
–4.5°C
–11°C
15°C
1013 hPa
About 6.5°C
per 1000 m
About 8 hPa per 100 m
About 9 hPa per 100 m
About 10 hPa per 100 m
About 11 hPa per 100 m
About 12 hPa per 100 m
Altitude
Air Pressure
Temperature
0 ft.
2000 ft.
4000 ft.
6000 ft.
8000 ft.
10000 ft.
12000 ft.
14000 ft.
25.84 inHg
22.23 inHg
19.03 inHg
44.7°F
30.5°F
16.2°F
59.0°F
29.92 inHg
About 3.6°F
per 1000 ft.
About 0.15 inHg per 200 ft.
About 0.17 inHg per 200 ft.
About 0.192 inHg per 200 ft.
About 0.21 inHg per 200 ft.
Source: International Civil Aviation Organization
•
Note that the following conditions will prevent you from obtaining accurate readings:
When air pressure changes because of changes in the weather
Extreme temperature changes
When the watch itself is subjected to strong impact
There are two standard methods of expressing altitude: Absolute altitude and relative
altitude. Absolute altitude expresses an absolute height above sea level. Relative
altitude expresses the difference between the height of two different places.
Height of building 130 m
(relative altitude)
Rooftop at an altitude of
230 m above sea level
(absolute altitude)
Sea Level
Current time
Current
altitude
Temperature
Current time
Current
altitude
Temperature
l l l l l
lll
ll
ll
ll
ll
l l
l l l l l l l l
lll
ll
ll
ll
ll
l l
l l l l l l l l
lll
ll
ll
ll
ll
l l
l l l l l l l l
lll
ll
ll
ll
ll
l l
l l l
Altimeter Precautions
•
This watch estimates altitude based on air pressure. This means that altitude
readings for the same location may vary if air pressure changes.
•
The semiconductor pressure sensor used by the watch for altitude measurements
is also affected by temperature. When taking altitude measurements, do not subject
the watch to temperature changes.
•
Do not rely upon this watch for altitude measurements or perform button operations
while sky diving, hang gliding, or paragliding, while riding a gyrocopter, glider, or
any other aircraft, or while engaging in any other activity where there is the chance
of sudden altitude changes.
•
Do not use this watch for measuring altitude in applications that demand
professional or industrial level precision.
•
Remember that the air inside of a commercial aircraft is pressurized. Because of
this, the readings produced by this watch will not match the altitude readings
announced or indicated the flight crew.
Specifying Temperature, Barometric Pressure, and Altitude Units
Use the procedure below to specify the temperature, barometric pressure, and altitude
units to be used in the Barometer/Thermometer Mode and the Altimeter Mode.
Important!
When
TYO
(Tokyo) is selected as the Home City, the
altitude unit is set automatically to meters (
m
), the
barometric pressure unit to hectopascals (
hPa
), and the
temperature unit to Celsius (
°C
). These settings cannot
be changed.
To specify temperature, barometric pressure, and altitude units
1. In the Timekeeping Mode, hold down
A
until the currently selected city code starts
to flash. This is the city code setting screen.
•
Before the city code starts to flash, the message
SET Hold
will appear on
the display. Keep
A
depressed until
SET Hold
disappears and the city code
starts to flash.
2. Keep pressing
C
until
TEMP
(temperature),
ALTI
(altitude), or
BARO
(barometric
pressure) appears in the upper left corner of the screen.
•
See step 3 under “To change the current time and date settings” for information
about how to scroll through setting screens.
3. Perform the operations below to specify the units you want.
To specify this unit: Press this key: To toggle between these settings:
Temperature
D
°C
(Celsius) and
°F
(Fahrenheit)
Altitude
D
m
(meters) and
ft
(feet)
Barometric Pressure
D
hPa
(hectopascals) and
inHg
(inches of mercury)
4. After the settings are the way you want, press
A
to exit the setting screen.
Precautions Concerning Simultaneous Measurement of Altitude and Temperature
Though you can perform altitude and temperature measurements at the same time,
you should remember that each of these measurements requires different conditions
for best results. With temperature measurement, it is best to remove the watch from
your wrist in order to eliminate the effects of body heat. In the case of altitude
measurement, on the other hand, it is better to leave the watch on your wrist, because
doing so keeps the watch at a constant temperature, which contributes to more
accurate altitude measurements.
•
To give altitude measurement priority, leave the watch on your wrist or in any other
location where the temperature of the watch is kept constant.
•
To give temperature measurement priority, remove the watch from your wrist and
allow it to hang freely from your bag or in another location where it is not exposed
to direct sunlight. Note that removing the watch from your wrist can affect pressure
sensor readings momentarily.
Checking the Current Time in a Different Time Zone
You can use the World Time Mode to view the current
time in one of 31 time zones (48 cities) around the globe.
The city that is currently selected in the World Time Mode
is called the “World Time City”.
To enter the World Time Mode
Use
C
to select the World Time Mode (
WT
) as shown in
“Selecting a Mode”.
•
WT
will appear on the display for about one second.
Next, the display will change to show the city code of
the currently selected World Time City.
To view the time in another time zone
In the World Time Mode, use
D
(East) to scroll through
city codes.
To specify standard time or daylight saving time (DST) for a city
1. In the World Time Mode, use
D
(East) to display the
city code (time zone) whose Standard Time/Daylight
Saving Time setting you want to change.
2. Hold down
A
until
DST Hold
appears on the display
and then disappears. Release
A
after
DST Hold
disappears.
•
This toggles the city code you selected in step
1 between Daylight Saving Time (
DST
indicator
displayed) and standard time (
DST
indicator not
displayed).
•
You cannot use the World Time Mode to change the current standard time/
daylight saving time (DST) setting of the Home City.
•
Note that you cannot switch between standard time/daylight saving time
(DST) while
UTC
is selected as the World Time City.
•
Note that the standard time/daylight saving time (DST) setting affects only the
currently selected time zone. Other time zones are not affected.
l l l
ll
ll
ll
ll
l l l ll
lll
ll
ll
l l l ll
lll
ll
ll
l l l ll
lll
ll
ll
l
Currently selected
World Time City
Current time in the currently
selected World Time City
Current Timekeeping
Mode time
Currently selected
World Time City
Current time in the currently
selected World Time City
Current Timekeeping
Mode time
DST indicator
DST indicator


