
Operation Guide 3283
E-30
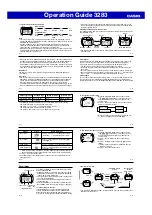
To turn Alarms
2
2
2
2
2
through
5
5
5
5
5
on and off
1. In the Alarm Mode, use
D
to select a one-time alarm
(alarm number
2
through
5
).
2. Press
B
to toggle the displayed alarm on and off.
•
Turning on a one-time alarm (
2
through
5
) displays the
alarm on indicator on its screen.
•
The alarm on indicator is displayed in all modes.
•
If any alarm is on, the alarm on indicator is shown on
the display in all modes.
Alarm on indicator
E-31
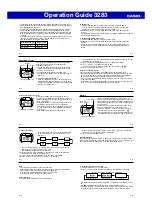
To turn the hourly time signal on and off
1. In the Alarm Mode, use
D
to select the Hourly Time
Signal.
2. Press
B
to toggle the displayed item on and off.
•
Turning on the Hourly Time Signal displays the hourly
time signal on indicator on its screen.
•
The hourly time signal on indicator is displayed in all
modes.
Hourly time signal
on indicator
E-32
Dual Time
The Dual Time Mode lets you keep track of time in a
different time zone.
•
The seconds count of the Dual Time is synchronized
with the seconds count of the Timekeeping Mode.
To set the Dual Time
1. Press
C
to enter the Dual Time Mode (page E-5).
2. Use
A
,
B
, and
D
to set the Dual Time Mode time.
•
Each press of
D
(+) and
B
(–) changes the time
setting in 30-minute increments.
•
Pressing
A
sets the Dual Time Mode to the same time
as the Timekeeping Mode.
Dual time
(Hour : Minutes Seconds)
Timekeeping Mode time
E-33
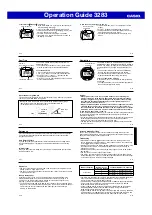
Illumination
The display of the watch is illuminated by an LED (light-
emitting diode) and a light guide panel for easy reading in
the dark. The watch’s auto light switch automatically turns
on illumination when you angle the watch towards your
face.
•
The auto light switch must be turned on (indicated by
the auto light switch on indicator) for it to operate.
•
See “Illumination Precautions” (page E-41) for other
important information about using illumination.
To turn on illumination manually
In any mode, press
L
to illuminate the display for about
one second.
•
The above operation turns on illumination regardless of
the current auto light switch setting.
Auto light switch
on indicator
E-34
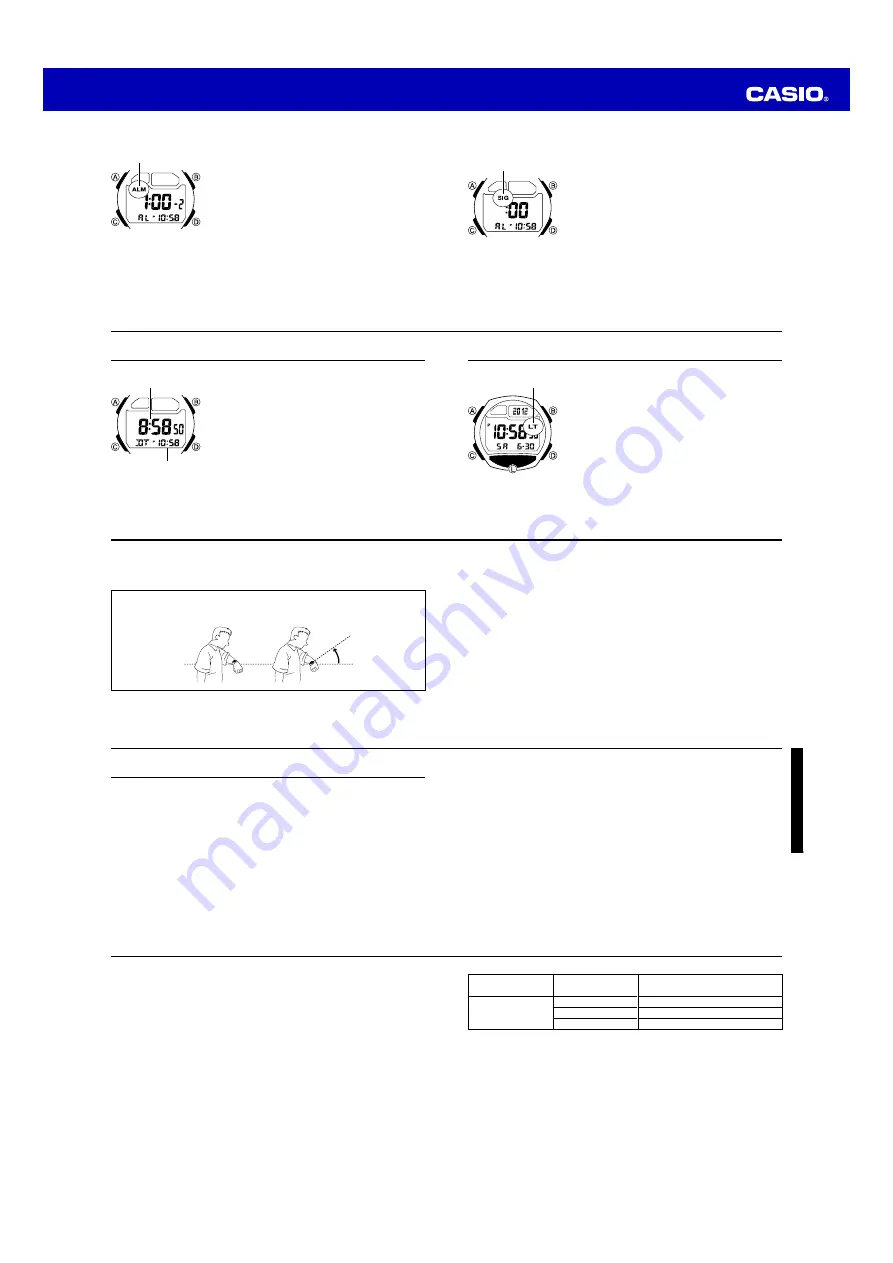
About the Auto Light Switch
Turning on the auto light switch causes illumination to turn on, whenever you position
your wrist as described below in any mode.
Moving the watch to a position that is parallel to the ground and then tilting it
towards you at more than 40 degrees causes illumination to turn on.
• Wear the watch on the outside of your wist.
Parallel to
ground
More than
40°
E-35
Warning!
•
Always make sure you are in a safe place whenever you are reading the
display of the watch using the auto light switch. Be especially careful when
running or engaged in any other activity that can result in accident or injury.
Also take care that sudden illumination by the auto light switch does not
startle or distract others around you.
•
When you are wearing the watch, make sure that its auto light switch is turned
off before riding on a bicycle or operating a motorcycle or any other motor
vehicle. Sudden and unintended operation of the auto light switch can create a
distraction, which can result in a traffic accident and serious personal injury.
To turn the auto light switch on and off
In the Timekeeping Mode, hold down
D
for about two seconds to toggle the auto light
switch on (auto light switch on indicator displayed) and off (auto light switch on
indicator not displayed).
•
In order to protect against running down the battery, the auto light switch will turn off
automatically approximately six hours after you turn it on. Repeat the above
procedure to turn the auto light switch back on if you want.
•
The auto light switch on indicator is on the display in all modes while the auto light
switch is turned on.
E-36
Reference
This section contains more detailed and technical information about watch operation.
It also contains important precautions and notes about the various features and
functions of this watch.
Auto Return Feature
If you do not perform any operation for two or three minutes while a setting screen
(one with flashing digits) is displayed, the watch will automatically exit the setting
screen.
Initial Screens
When you enter the Alarm Mode, the screen you were viewing when you last exited
the mode appears first.
E-37
Data and Setting Scrolling
The
B
and
D
buttons are used in various modes and setting screens to scroll
through data on the display. In most cases, holding down these buttons during a scroll
operation scrolls through the data at high speed.
Timekeeping
•
Resetting the seconds to
00
while the current count is in the range of 30 to 59
causes the minutes to be increased by 1. In the range of 00 to 29, the seconds are
reset to
00
without changing the minutes.
•
With the 12-hour format, the
P
(PM) indicator appears on the display for times in the
range of noon to 11:59 p.m. and no indicator appears for times in the range of
midnight to 11:59 a.m.
•
With the 24-hour format, times are displayed in the range of 0:00 to 23:59, without
any indicator.
•
The year can be set in the range of 2000 to 2039.
•
The watch’s built-in full automatic calendar makes allowances for different month
lengths and leap years. Once you set the date, there should be no reason to change
it except after you have the watch’s battery replaced.
E-38
Stopwatch
•
You can use lap time measurement to time how long it takes to complete a specific
portion (such as a single lap) of a race.
•
You can use split time measurement to time how long it takes to get from the start to
a specific point in a race.
Memory Management
Each time you press
B
to start a new elapsed time or lap/split operation in the
Stopwatch Mode (page E-10), the watch automatically creates a new “log” in its
memory. The log remains open for data storage until you permanently close it by
pressing
D
to clear the stopwatch to all zeros.
•
The watch has enough memory to hold up to 61 records. Since each log title screen
(page E-19) uses up one record of memory space, the maximum number of lap/split
time records you can store depends on how many logs there are currently in
memory, as shown below.
E-39
•
The watch also calculates the cumulative total distance for all stopwatch operations
since the last time the cumulative total distance was reset (page E-21). The
cumulative total does not affect memory capacity.
•
If watch memory is already full when you perform a stopwatch button operation that
creates a new log, the oldest log in memory and all of its records are deleted
automatically to make room for the new log.
•
If you are adding records to the only log in memory and watch memory becomes
full, adding another record causes the oldest record in the log to be deleted
automatically to make room for the new record.
•
If you are adding records to a log when there are multiple logs in memory and watch
memory becomes full, adding another record causes the oldest log in memory and
all of its records to be deleted automatically to make room for new records.
Number of Logs
Currently in Memory
1
2
5
Memory Capacity
61 Records
Lap/Split Time Record Capacity
61 records – 1 log title screen = 60
61 records – 2 log title screens = 59
61 records – 5 log title screens = 56


