


Operation Guide 3296
E-10
2. Press
C
to move the flashing in the sequence shown below to select other
settings.
Hour
UTC
Differential
Minutes
Year
DST
Day
Month
Seconds
Flash Alert
3. When the setting you want to change is flashing, use
D
and
B
to change it as
described below.
Reset the seconds to
Toggle between Daylight Saving
Time (
) and Standard Time
(
)
Press
D
.
Press
D
.
Screen
To do this:
Do this:
E-11
•
See “Daylight Saving Time (DST) Setting” (page E-12) for details about the DST
setting.
•
The UTC differential setting range is –12.0 to +14.0, in 0.5-hour units.
•
When DST is turned on, the UTC differential setting range is –11.0 to +15.0, in
0.5-hour units.
•
For information about Flash Alert, see “Flash Alert” (page E-44).
4. Press
A
twice to exit the setting screen.
•
The day of the week is displayed automatically in accordance with the date (year,
month, and day) settings.
Screen
To do this:
Do this:
Specify the UTC differential
Change the hour or minutes
Change the year, month or day
Use
D
(+) and
B
(–).
Use
D
(+) and
B
(–).
Use
D
(+) and
B
(–).
E-12
To toggle between 12-hour and 24-hour timekeeping
In the Timekeeping Mode, press
D
to toggle between 12-hour timekeeping and
24-hour timekeeping.
•
With the 12-hour format, the
P
(PM) indicator appears to the left of the hour digits for
times in the range of noon to 11:59 p.m. and no indicator appears to the left of the
hour digits for times in the range of midnight to 11:59 a.m.
•
With the 24-hour format, times are displayed in the range of 0:00 to 23:59, without
any indicator.
•
The 12-hour/24-hour timekeeping format you select in the Timekeeping Mode is
applied in all other modes.
Daylight Saving Time (DST) Setting
Daylight Saving Time (summer time) advances the time setting by one hour from
Standard Time. Remember that not all countries or even local areas use Daylight
Saving Time.
E-13
To toggle the Timekeeping Mode time between DST and Standard Time
1.In the Timekeeping Mode, hold down
A
until the
seconds start to flash, which indicates the setting
screen.
2. Press
C
once and the DST setting screen appears.
3. Press
D
to toggle between Daylight Saving Time
(
displayed) and Standard Time (
displayed).
4. Press
A
twice to exit the setting screen.
•
The DST indicator appears on the Timekeeping, and
Tide/Moon Data screens to indicate that Daylight Saving
Time is turned on. In the case of the Tide/Moon Data
Mode, the DST indicator appears on the Tide Data
screen only.
Home Site Data
Moon age, tide graph data, and Tide/Moon Data Mode data will not be displayed
properly unless Home Site data (UTC differential, longitude and lunitidal interval) is
configured correctly.
DST indicator
On/Off status
E-14
•
The lunitidal interval is the time elapsing between the Moon’s transit over a meridian
and the next high tide at that meridian. See “Lunitidal Interval” (page E-43) for more
information.
•
This watch displays lunitidal intervals in terms of hours and minutes.
•
The “Site/Lunitidal Interval Data List” at the back of this manual provides UTC
differential and longitude information around the world.
•
The following is the initial factory default Home Site data (Tokyo, Japan) when you
first purchase the watch and whenever you have the battery replaced. Change these
settings to match the area where you normally use the watch.
UTC differential (+9.0); Longitude (East 140 degrees); Lunitidal interval (5 hours,
20 minutes)
E-15
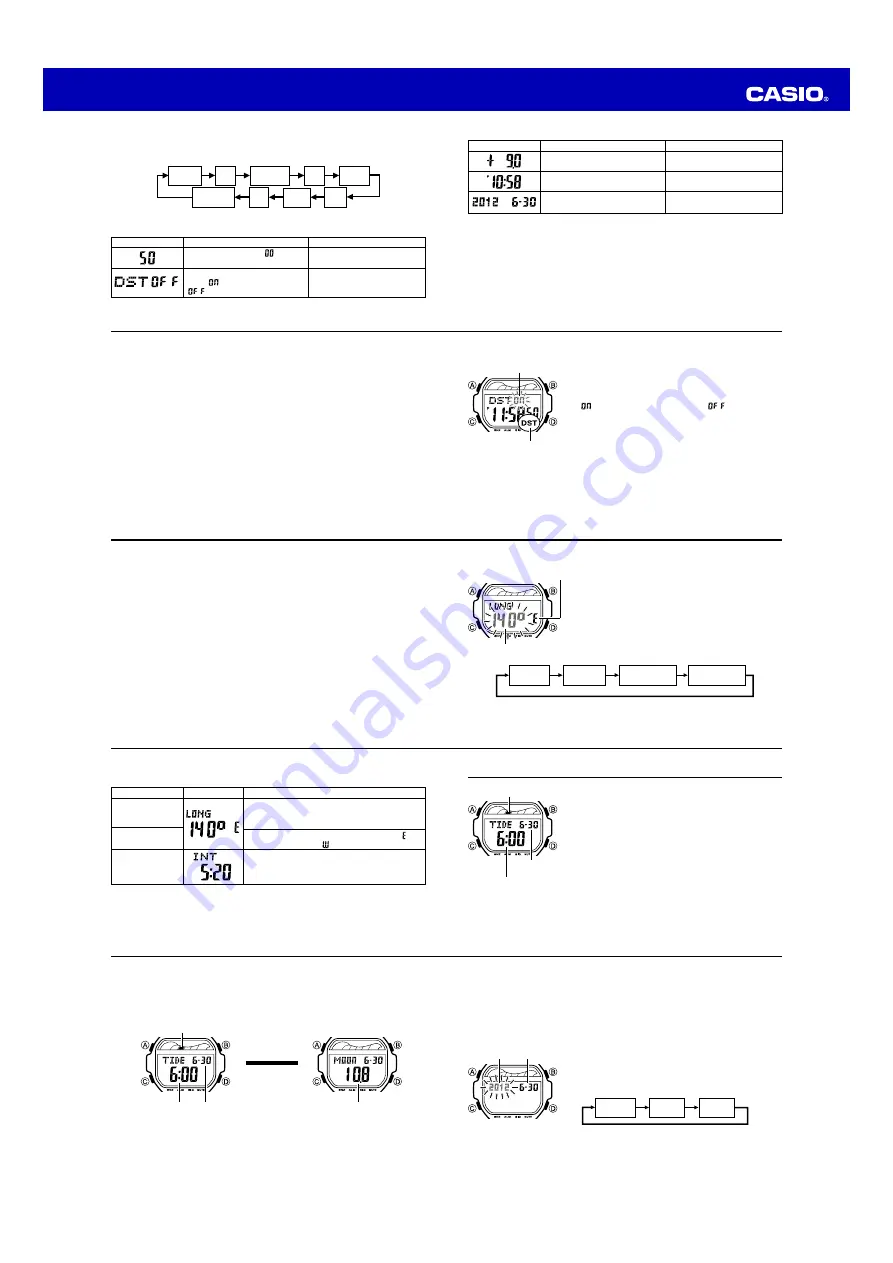
To configure Home Site data
1. In the Timekeeping Mode, hold down
A
until the
seconds start to flash, which indicates the setting
screen.
2. Press
C
twice to display the UTC differential setting
screen, and confirm that the setting is correct.
•
If the UTC differential setting is not correct, use
D
(+)
and
B
(–) to change it.
3. Press
A
to display the longitude value setting screen.
4. Press
C
to move the flashing in the sequence shown
below to select other settings.
Lunitidal Interval
Hours
Lunitidal Interval
Minutes
Longitude
(East/West)
Longitude
Value
Longitude value
Longitude (East/West)
E-16
5. While the setting you want to change is flashing, use
D
and
B
to change it as
described below.
Setting
Longitude Value
Longitude
(East/West)
Lunitidal Interval
Hours, Minutes
Button Operations
Use
D
(+) and
B
(–) to change the setting.
•
You can specify a value from 0
°
to 180
°
, in
1-degree units.
Use
D
to switch between east longitude ( )
and west longitude (
).
Use
D
(+) and
B
(–) to change the setting.
Screen
6. Press
A
to exit the setting screen.
E-17
Tide/Moon Data
Tide/Moon data lets you view the moon age for a
particular date, and tidal movements for a particular date
and time for your Home Site.
•
When you enter the Tide/Moon Data Mode, the data for
6:00 a.m. on the current date appears first.
•
If you suspect that the Tide/Moon data is not correct for
some reason, check the Timekeeping Mode data
(current time, date, and Home Site settings), and make
changes as required.
•
See “Tide Graph” (page E-42) for information about the
tide graph.
•
All of the operations in this section are performed in the
Tide/Moon Data Mode, which you enter by pressing
C
(page E-7).
Month – Day
Tide graph
Time
E-18
Tide/Moon Data Screens
In the Tide/Moon Data Mode, press
A
to toggle between the Tide Data screen and
the Moon Data screen.
Press
A
.
Moon Data Screen
Tide Data Screen
▲
▲
Time
Moon age
Tide graph
Month – Day
E-19
•
While the Tide Data screen is displayed, press
D
to advance to the next hour.
•
While the Moon Data screen is displayed, press
D
to advance to the next day.
•
You also can specify a particular date (year, month, day) to view its tide data and
moon data. See “To specify a date” for more information.
•
When you enter the Tide/Moon Data Mode, the screen (tide data or moon data) that
was displayed the last time you exited the mode appears first.
To specify a date
1. In the Tide/Moon Data Mode, hold down
A
until the
year setting starts to flash, which indicates the setting
screen.
2. Press
C
to move the flashing in the sequence shown
below to select the other settings.
Month
Day
Year
Month – Day
Year


