background image

10.

Use (A) and (D) to select the item you want
to in the currently selected display area.

[SPLIT TIME]

Split time

[DISTANCE]

Running distance

[PACE]

Pace

[LAP TIME]

Lap time

[LAP DISTANCE] Lap distance

[LAP PACE]

Lap pace

[AVG.PACE]

Average pace

[SPEED]

Speed

[AVG.SPEED]

Average speed

[CALORIES]

Calories burned

[TIME]

Time

[DATE]

Day

If you want to change the contents of
another display area, press (E) and then
select the display area you want.
Repeat steps 8, 9, and 10 above as
required.

11.

Press (C) to complete the setting
operation.

After the setting operation is complete,
[SETTING COMPLETED] will appear for
a few seconds, and then the RUN FACE
setting screen will re-appear.

12.

Press (E) twice to exit the setting screen.

Note

You can also use G-SHOCK MOVE to
customize display screen items.

Settings Configured with the

Application

Some Training Function settings can be
configured using either watch operations or G-
SHOCK MOVE, while some settings must be
configured using G-SHOCK MOVE.

Settings that can be configured on the
watch or using G-SHOCK MOVE

Customization of screens displayed during
run timing

Alert enable/disable

Distance unit

Auto Lap Timing enable/disable

Auto Pause enable/disable

Settings that can be configured using G-
SHOCK MOVE only

Auto Lap screen display item: [SPLIT
TIME] or [DISTANCE]

Alert calories burned interval

Alert time interval

Auto Lap Timing distance

Viewing Training Log

Records

Your watch stores data (log records) acquired
during run timing. There is enough memory to
store up to 100 log records.
You can tell how much storage space is
available by checking the 

 indicator.

During run timing

Indicator:

Meaning:

Displayed

Storage space
available

Flashing Storage space low

Flashing Storage memory full

Not during run timing

Indicator:

Meaning:

None

Storage space
available

Displayed Storage space low

Displayed Storage memory full

Training Log Data Accuracy

Your watch calculates step counts, calories
burned, and other information based on
data picked up by its built-in sensors. No
guarantees are made concerning the
statistics and values calculated by this
watch, so they should be used as general
reference information only.

Viewable Training Log Items

The items below are shown on the Training
Log screen.

[DISTANCE]

Running distance

[TIME]

Travel time

[PACE]

Pace

[CALORIES]

Calories burned

[CADENCE]

Cadence

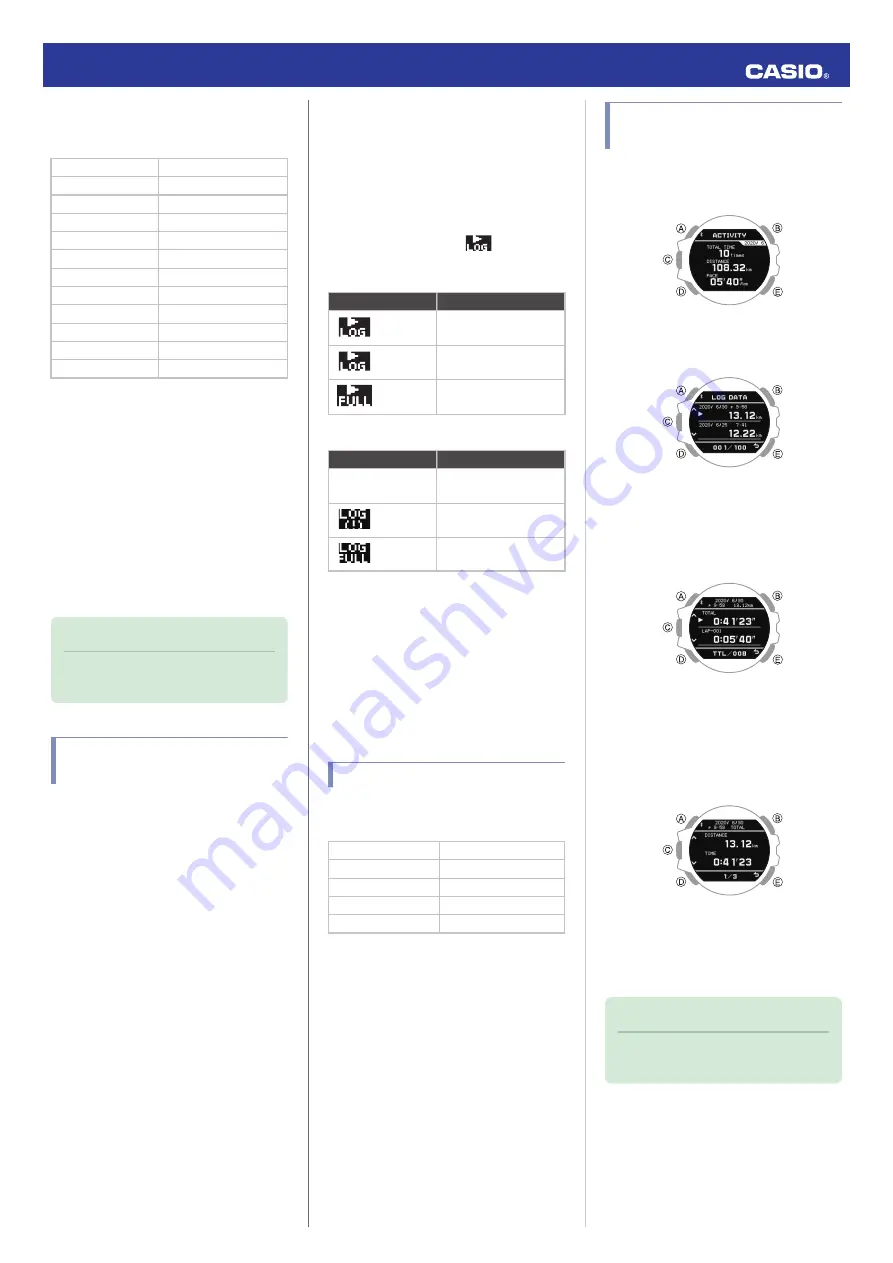
Viewing Recorded Log Data

Records

1.

Enter the Training Log Mode.

l

Navigating Between Modes

2.

Press (C).

This displays the training log list.

3.

Use (A) and (D) to move the pointer to the
log data record you want to view.

4.

Press (C).

This displays the selected log data items.

5.

Use (A) and (D) to move the pointer to the
item whose details you want to view.

6.

Press (C).

This displays details about the selected
item.

You can use (A) and (D) to scroll screen
contents.

7.

Hold down (D) for at least one second to
return to the Timekeeping Mode.

Note

Pressing (E) during the above
procedure will go back one screen.

Operation Guide 3481

16

Summary of Contents for 3481

Page 1: ...Settings Configured with the Application Viewing Training Log Records Viewable Training Log Items Viewing Recorded Log Data Records Deleting a Particular Log Data Record Deleting All Log Data Records Receiving Phone Notifications Enabling and Disabling Incoming Call Notifications Displaying Notification Contents Deleting a Particular Notification Deleting All Notifications Timer Setting the Timer ...

Page 2: ...ining Mode Pressing this button while any mode s setting screen is displayed applies all of the screen s pending settings or changes D button Hold down this button for at least one second to return to the Timekeeping Mode Pressing this button while a run timing operation is in progress returns to the run timing screen Pressing this button while a setting screen is displayed scrolls available menu ...

Page 3: ...s C to register your date of birth After registration of the information is complete SETTING COMPLETED will appear for a few seconds and then the profile item selection screen will re appear Note To exit the date of birth setting operation at any point press E and advance to step G 10 Specify the wrist where you wear the watch On the profile item selection screen select WRIST A Use A and D to move...

Page 4: ...e You can use the Timekeeping Mode to check the current time and date and to view your daily step count your running distance for a specific month and other information You can also use this mode to configure Home City alarm and other basic timekeeping settings Training Mode Use this mode to measure and record distance elapsed time pace and other running data l Using the Training Function Timer Mo...

Page 5: ...in the illustration below Electro static charge or magnetism can interfere with proper auto light operation If this happens try lowering your arm and then angle it towards your face again When moving the watch you may note a slight rattling sound This is due to operation of the auto light switch which determines the current orientation of the watch It does not indicate malfunction Note Auto Light ...

Page 6: ... Related Data Selection of More Than 300 World Time cities l Configuring World Time Settings In addition a number of other watch settings can be configured using your phone To transfer data to a watch and to configure settings you first need to pair the watch with your phone l Getting Ready Your phone needs to have the CASIO G SHOCK MOVE app installed to pair with the watch Time Adjustment Your wa...

Page 7: ...AUTO Auto switching between standard time and summer time OFF Always standard time ON Always summer time 8 Press C to complete the setting operation After the setting operation is complete SETTING COMPLETED will appear for a few seconds and then the Home Time setting screen will re appear 9 Press E twice to exit the setting screen Manual Time Adjustment 1 Enter the Timekeeping Mode l Navigating Be...

Page 8: ...s the Timekeeping Mode setting screen Pointer 3 Use A and D to move the pointer to AIRPLANE MODE 4 Press C 5 Use A and D to select an Airplane Mode setting OFF Exits Airplane Mode ON Enables Airplane Mode 6 Press C to complete the setting operation After the setting operation is complete SETTING COMPLETED will appear for a few seconds and then the Timekeeping Mode setting screen will re appear 7 P...

Page 9: ...on Configure settings to allow background use of location information Auto Time Adjustment Your watch can connect with your phone to adjust the watch s time setting If you leave your watch in the Timekeeping Mode it will perform the adjustment operation automatically as you go about your daily life without any operation required by you 12 30 Important The watch may not be able to perform auto time...

Page 10: ...Y Tap the G SHOCK MOVE icon 2 Y On the menu bar tap More 3 Y Tap User 4 Y Select the target you want to specify and then perform the operation shown on the phone screen Creating a Training Plan Use G SHOCK MOVE to create a training plan You can create a daily training plan to maintain or increase your athletic performance or one with a specific target date or time Make sure that the esymbol is sho...

Page 11: ... when you perform the procedure below If e is not displayed refer to the information at the link below l Connecting with a Phone Note G SHOCK MOVE World Time lets you select from among approximately 300 cities as the World Time City Selecting a World Time City 1 Y Tap the G SHOCK MOVE icon 2 Y On the menu bar tap More 3 Y Tap Watch 4 Y Select your preferred watch 5 Y Select the setting you want to...

Page 12: ... enabled To connect with your phone disable the Airplane Mode l Using the Watch in a Medical Facility or Aircraft Configuring Watch Settings After establishing a connection between the watch and a phone you can use G SHOCK MOVE to configure watch settings and to view information acquired by the watch Make sure that the esymbol is shown on the watch display when you perform the procedure below If e...

Page 13: ...Function The Training Mode uses an accelerometer to measure and record distance elapsed time pace and other data while you are running or walking You can review recorded data on the watch or with G SHOCK MOVE Run Timing Using the Training Function start running Starting Run Timing 1 Enter the Timekeeping Mode l Navigating Between Modes 2 Press C This displays the Training Mode screen Training Mode...

Page 14: ...an alert operation is performed whenever a target value is reached 9 Press C to complete the setting operation After the setting operation is complete SETTING COMPLETED will appear for a few seconds and then the alert setting screen will re appear If you want to configure settings for another item repeat steps 6 through 9 10 Press E twice to exit the setting screen Important To specify the alert i...

Page 15: ...g Between Modes 2 Press C This displays the Training Mode screen 3 Hold down A for at least two seconds This displays the Training Mode setting screen Pointer 4 Use A and D to move the pointer to AUTO PAUSE 5 Press C 6 Use A and D to move the pointer to ON enabled or OFF disabled 7 Press C to complete the setting operation After the setting operation is complete SETTING COMPLETED will appear for a...

Page 16: ...e Viewing Training Log Records Your watch stores data log records acquired during run timing There is enough memory to store up to 100 log records You can tell how much storage space is available by checking the indicator During run timing Indicator Meaning Displayed Storage space available Flashing Storage space low Flashing Storage memory full Not during run timing Indicator Meaning None Storage...

Page 17: ...CEL 7 Press C This displays a confirmation screen 8 Use A and D to move the pointer to YES or NO 9 Press C After the data delete operation is complete DELETE COMPLETED will appear for a few seconds and then the Training Log Mode screen will re appear Receiving Phone Notifications You can use your watch to check the details of incoming calls mail and SNS alerts and information that are received by ...

Page 18: ...ifications will cause the oldest notification in the list to be deleted to make room for the new one 3 Use A and D to move the pointer to the title of the notification you want to view 4 Press C Thisdisplaysthedetailsofthenotification From 83 to 100 double width characters are displayed for the body text You can use A and D to scroll To return to the notification list press E To return to the Time...

Page 19: ...e position of the timer in the sequence Timer sequence 6 Press C This moves the cursor to the minutes setting 7 Use A and D to change the minutes setting Minutes 8 Press C This moves the cursor to the seconds setting 9 Use A and D to change the seconds setting Seconds 10 Press C 11 Use A and D to select whether or not you want to save your current settings YES Saves current settings NO Discards cu...

Page 20: ...etup the first timer setup WORKOUT_1 Timer sequence 6 Press C This causes the cursor to appear at the minutes setting of the first timer 7 Use A and D to change the minutes setting Minutes 8 Press C This causes the cursor to move to the seconds setting of the first timer 9 Use A and D to change the seconds setting Seconds 10 Press C 11 Use A and D to select whether or not you want to save your cur...

Page 21: ...globe and UTC Universal Coordinated Time Note World Time cities that can be selected onlybyusingG SHOCKMOVEcannot be selected using watch operations l Configuring World Time Settings Checking World Time 1 Enter the Timekeeping Mode l Navigating Between Modes 2 Use A to display the World Time l Selecting a Timekeeping Mode Digital Display Format This displays to the current World Time City and the ...

Page 22: ...e the setting operation After the setting operation is complete SETTING COMPLETED will appear for a few seconds and then the World Time setting screen will re appear 9 Press E twice to exit the setting screen Note The initial factory default summer time setting for all cities is AUTO In many cases AUTO lets you use the watch without switching manually between summer time and standard time While UT...

Page 23: ...n perform the steps below to turn it off To reactivate an alarm sound and or vibration operation turn it back on Note An indicators is displayed while any one of the alarms is turned on The alarm indicator is not displayed while all of the alarms are turned off 1 Enter the Timekeeping Mode l Navigating Between Modes 2 Hold down A for at least two seconds This displays the Timekeeping Mode setting ...

Page 24: ...tions below may make proper counting impossible Walking while wearing slippers sandals or other footwear that encourages a shuffling gait Walking on tile carpeting snow or other surface that causes a shuffling gait Irregular walking in a crowded location in a line where walking stops and starts at short intervals etc Extremely slow walking or extremely fast running Pushing a shopping cart or baby ...

Page 25: ...ed Configuring Operation Vibration Settings 1 Enter the Timekeeping Mode l Navigating Between Modes 2 Hold down A for at least two seconds This displays the Timekeeping Mode setting screen Pointer 3 Use A and D to move the pointer to VIBRATION 4 Press C 5 Use A and D to move the pointer to OPERATION 6 Press C 7 Use A and D to enable or disable operation vibration ON Enables operation vibration OFF...

Page 26: ...lorie Display Unit You can select either calories cal or joules J as the calories burned unit Important When Tokyo TOKYO is the Home City the unit is fixed as calories cal and cannot be changed 1 Enter the Timekeeping Mode l Navigating Between Modes 2 Hold down A for at least two seconds This displays the Timekeeping Mode setting screen Pointer 3 Use A and D to move the pointer to UNIT 4 Press C 5...

Page 27: ...on 6 5 BANGKOK Bangkok 7 HONG KONG Hong Kong 8 EUCLA Eucla 8 75 TOKYO Tokyo 9 ADELAIDE Adelaide 9 5 SYDNEY Sydney 10 LORD HOWE ISLAND Lord Howe Island 10 5 NOUMEA Noumea 11 WELLINGTON Wellington 12 CHATHAM ISLAND Chatham Islands 12 75 NUKU ALOFA Nuku alofa 13 KIRITIMATI Kiritimati 14 BAKER ISLAND Baker Island 12 PAGO PAGO Pago Pago 11 HONOLULU Honolulu 10 MARQUESAS ISLANDS Marquesas Islands 9 5 AN...

Page 28: ... enhanced by Mobile Link Auto Time Adjustment Simple time setting World Time Current time in 300 cities 38 time zones auto summer time switching and UTC Coordinated Universal Time time Watch settings Phone finder Data updating Updating of time zone and summer time rule information Training Function Calculation and display of distance speed pace and other information Training plan creation Training...

Page 29: ...onnel Precautions when using Mobile Link When using this watch in combination with a phone keep the watch and phone close to each other A range of two meters is recommended as a guideline but the local environment walls furniture etc the structure of a building and other factors may require a much closer range This watch can be affected by other devices electrical devices audio visual equipment of...

Page 30: ...ion with the watch is not possible while the phone s Airplane Mode is enabled Disable your phone s Airplane Mode On it s home screen tap the G SHOCK MOVE icon Next perform the operation shown on the screen to pair with the watch l C Pair the watch with a phone Q3 I can t connect while the watch is in the Airplane Mode Exit the watch s Airplane Mode l Using the Watch in a Medical Facility or Aircra...

Page 31: ...th your phone is not possible while the watch s Airplane Mode is enabled To connect with your phone disable the Airplane Mode l Using the Watch in a Medical Facility or Aircraft Q3 Time is not displayed correctly The phone s time setting may be incorrect because it is unable to connect with its network due to being out of range etc If this happens connect the phone to its network and then adjust t...

Reviews: