background image

u

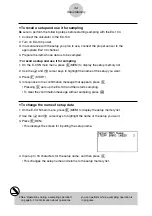
To delete setup data

1. On the E-CON main menu, press 

2

(MEM) to display the setup memory list.

2. Use the 

f

 and 

c

 cursor keys to highlight the name of the setup you want.

3. Press 

4

(DEL).

4. In response to the confirmation message that appears, press 

w

 to delete the setup.

• To clear the confirmation message without deleting anything, press 

i

.

u

To recall setup data

Recalling setup data stores it in the current setup memory area. You can then use Advanced
Setup to edit the setup. This capability comes in handy when you need to perform a setup
that is slightly different from one you have stored in memory.

1. On the E-CON main menu, press 

2

(MEM) to display the setup memory list.

2. Use the 

f

 and 

c

 cursor keys to highlight the name of the setup you want.

3. Press 

5

(LOAD).

4. In response to the confirmation message that appears, press 

w

 to recall the setup.

• To clear the confirmation message without recalling the setup, press 

i

.

3-4

Setup Memory

# Recalling setup data replaces any other data

currently in the current setup memory area.

Summary of Contents for EA-100

Page 1: ...ready familiar with the operating precautions terminology and operational procedures of the calculator and the EA 100 E CON Ver 1 20 Software for the ALGEBRA FX 2 0 Series 1 E CON Overview 2 EA 100 Setup 3 Setup Memory 4 Program Converter 5 Starting a Sampling Operation ...

Page 2: ...verts EA 100 setup data created by E CON to a program It can also be used to convert data to a program that can be run on a CFX 9850 Series fx 7400 Series calculator and to transfer the data to the calculator 4 START Starts data collection 6 HELP Displays E CON help Pressing the K key Setup Preview or a cursor key while the E CON main menu is on the screen displays a preview dialog box that shows ...

Page 3: ...eters Setup Wizard lets you make changes to the following three EA 100 basic sampling parameters using an interactive wizard format Sensor Select Sensor Specify a CASIO or VERNIER 1 sensor from a menu of choices Sampling Interval Sampling Time When you have Photogate specified as the sensor type you can specify the sampling timing Gate Status and sampling time recording method Record Time with thi...

Page 4: ...izard and display the sensor specification screen Press 1 to specify a CASIO sensor or 2 to specify a VERNIER sensor From the menu of supported sensors that appears select the one you want 5 The screen that appears after you select a sensor in step 4 depends on whether or not you specified Photogate as the sensor If you did not specify Photogate a screen for setting the sampling interval appears a...

Page 5: ...O in step 7 returns to the E CON main menu and stores the setup in the E CON Mode s current setup memory area You can use the following function key operations from the E CON main menu to manipulate the contents of the current setup memory area 2 MEM Saves the current setup memory area setup page 3 1 3 PRGM Converts the setup in the current setup memory area to a program page 4 1 4 START Starts sa...

Page 6: ...2 You can also configure a custom probe during the procedure under To change Channel parameter settings on page 2 6 Custom probe configurations you have stored in memory can be selected using Channel in step 5 below 5 Use the Advanced Setup function keys described below to set other parameters b Channel Displays a screen for setting the following parameters sampling channel sensor sensor configura...

Page 7: ...ure when you want to return the parameters of the setup in the current setup memory area to their initial defaults 1 While the Advanced Setup menu is on the display press g Initialize 2 In response to the confirmation message that appears press w to initialize the setup To clear the confirmation message without initializing the setup press i u Advanced setup parameters This section provides detail...

Page 8: ... 1 CH1 Channel 1 2 CH2 Channel 2 3 CH3 Channel 3 4 SONIC Sonic channel 2 Selected Sensor Sensor 1 CASIO CASIO sensor 2 VERN VERNIER sensor 3 CSTM Custom probe 4 None No sensor 3 Sample Data Storage Location Store Data 1 LIST Displays a dialog box for specifying the list for storage of measurement data Specify a list number from 1 to 20 To change the setting of an item first use the f and c cursor ...

Page 9: ...he highlighting to the item Next use the function keys to select the setting you want 1 Real time Settings Real Time 1 NO Disables real time sampling 2 YES Enables real time sampling 2 Sampling Interval Interval 1 TIMER Displays a dialog box for specifying a timer value and enables fixed interval sampling 2 KEY Enables sampling triggered by the EA 100 TRIGGER key which must be pressed for each sam...

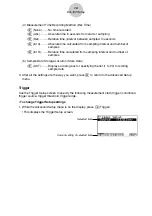
Page 10: ... Storage Location Store Data 1 LIST Displays a dialog box for specifying the list 1 to 20 for storing sample data 3 After all the settings are the way you want press w to return to the Advanced Setup menu Trigger Use the Trigger Setup screen to specify the following measurement start trigger conditions trigger source trigger threshold trigger edge To change Trigger Setup settings 1 While the Advan...

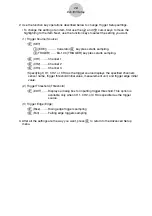
Page 11: ...1 3 CH2 Channel 2 4 CH3 Channel 3 Specifying CH1 CH2 or CH3 as the trigger source displays the specified channel s sensor name trigger threshold initial value measurement unit and trigger edge initial value 2 Trigger Threshold Threshold 1 EDIT Displays a dialog box for inputting trigger threshold This option is available only when CH1 CH2 or CH3 is specified as the trigger source 3 Trigger Edge Ed...

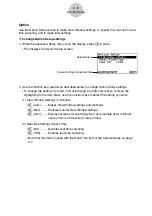
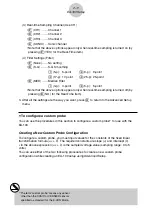
Page 12: ...se the f and c cursor keys to move the highlighting to the item Next use the function keys to select the setting you want 1 View Window Settings V Window 1 Auto Makes View Window settings automatically 2 Man Enables manual View Window settings 3 Set Y Displays screens for specifying the Y axis sample data minimum value Ymin and maximum value Ymax 2 Real time Settings Real Time 1 NO Disables real t...

Page 13: ...ant press w to return to the Advanced Setup menu u To configure a custom probe You can use the procedures in this section to configure a custom probe 1 for use with the EA 100 Creating a New Custom Probe Configuration To configure a custom probe you must input values for the constants of the fixed linear transformation formula ax b The required constants are slope a and intercept b x in the above ...

Page 14: ...function key operations described below to make custom probe configuration settings To change the setting of an item first use the f and c cursor keys to move the highlighting to the item Next use the function keys to select the setting you want 1 Slope Press 1 EDIT to display a dialog box for inputting the slope for the linear transformation formula 2 Intercept Press 1 EDIT to display a dialog bo...

Page 15: ...ting custom probe 1 Display the Custom Probe List 2 Select the custom probe whose configuration you want to edit Use the f and c cursor keys to highlight the name of the custom probe you want 3 Press 3 EDIT This displays the screen for configuring a custom probe To edit the custom probe settings perform the procedure starting from step 5 under To configure a custom probe starting from the Advanced...

Page 16: ...LT This displays the channel selection screen for MULTIMETER Mode sampling 3 Specify a channel for sampling Pressing a function key to specify a channel causes the EA 100 to enter the MULTIMETER Mode and start sampling over the specified channel 4 To stop MULTIMETER Mode sampling first press the A key After the Break screen appears press i Sample data is updated at intervals of 0 52 second Do not ...

Page 17: ...While the E CON main menu is on the display Performing the setup save operation while the E CON main menu is on the display saves the contents of the current setup memory area which were created using Setup Wizard or Advanced Setup The setup save procedure is identical in all of the above cases u To save a setup 1 Start the save operation by performing one of the function key operations described ...

Page 18: ... save are shown in the setup memory list After selecting a setup in the list you can use it to sample data or you can edit it u To preview saved setup data You can use the following procedure to check the contents of a setup before you use it for sampling 1 On the E CON main menu press 2 MEM to display the setup memory list 2 Use the f and c cursor keys to highlight the name of the setup you want ...

Page 19: ...Press 1 START 4 In response to the confirmation message that appears press w Pressing w sets up the EA 100 and then starts sampling To clear the confirmation message without sampling press i u To change the name of setup data 1 On the E CON main menu press 2 MEM to display the setup memory list 2 Use the f and c cursor keys to highlight the name of the setup you want 3 Press 3 REN This displays th...

Page 20: ...p memory area You can then use Advanced Setup to edit the setup This capability comes in handy when you need to perform a setup that is slightly different from one you have stored in memory 1 On the E CON main menu press 2 MEM to display the setup memory list 2 Use the f and c cursor keys to highlight the name of the setup you want 3 Press 5 LOAD 4 In response to the confirmation message that appe...

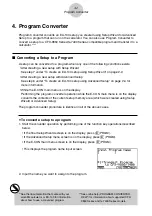
Page 21: ... the program converter operation while the E CON main menu is on the display converts the contents of the current setup memory area which were created using Setup Wizard or Advanced Setup The program converter procedure is identical in all of the above cases u To convert a setup to a program 1 Start the converter operation by performing one of the function key operations described below If the fin...

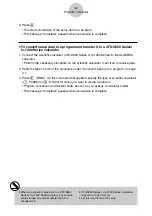
Page 22: ...nd 2 of the procedure under To convert a setup to a program on page 4 1 3 Press 1 TRNS On the sub menu that appears specify the type of scientific calculator b FX9850 or c fx7400 for which you want to create a program Program conversion and transfer starts as soon as you specify a calculator model The message Complete appears when conversion is complete 4 2 Program Converter When you convent setup...

Page 23: ...p Wizard See step 7 under To create an EA 100 setup using Setup Wizard on page 2 2 After creating a new setup with Advanced Setup See step 6 under To create an EA 100 setup using Advanced Setup on page 2 4 While the E CON main menu is on the display Starting a sampling operation while the E CON main menu is on the display performs sampling using the contents of the current setup memory area which ...

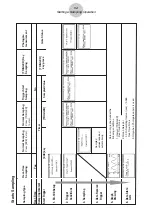
Page 24: ...log box appears after setup of the EA 100 is complete The content of the sampling start dialog box depends on the settings contained in the setup See Operations during a sampling operation below for information about this dialog box and other display screens u Operations during a sampling operation Sending a sample start command from the calculator to the EA 100 causes the following sequence to be...

Page 25: ... Interval Timer Start Trigger EXE key TRIGGER Sampled Value TRIGGER Gate Status key press Starts Sampling 1 EA 100 Setup 2 Trigger Conditions 3 Sampling 4 Data Receive Trigger 5 Graph Drawing 6 Data Store Lists Data is not graphed under the following conditions 1 Interval TRIGGER Rec Time None 2 Motion Detector 0 02 Sampling Interval sec 0 065 Rec Time None 3 Only when Photogate sensor is used Sam...

Reviews: