3.2.11 Data Import and Export
The following section uses data export in dBase-Format to show you how it is possible
to exchange data with other programs using the import and export functions. In this
example we assume that there are already data in the Telephone Directory. Change to
the Telephone Directory and select 'Export...' from the 'File' menu. A dialog box appears
in which the desired export format can be defined. For this example select
"DBF (xBase
standard)"
.
Confirm your entry with [OK] which brings you to a file selector box in which
you should enter the name under which the data is to be exported onto disk or hard disk
e.g. "tphone.dbf".
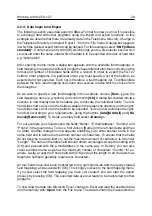
After entering the file name a dialog box appears with the available field mappings. A
field mapping is required as different programs have different structures concerning the
format and number of individual fields within a record. In order to export the FA-127
fields to other programs in a particular order, you must specify a list of the fields to be
exported and not exported. Each list is therefore a field mapping list. To differentiate
between the lists, (field mapping lists) each one receives a name which is chosen from
the dialog box.
As we wish to specify a new field mapping in this example, choose
[New...]
,
give the
field mapping a name (e.g. tphone) and confirm with
[OK]
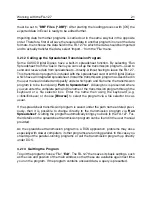
. A dialog box divided into two
sections is now displayed which enables you to allocate the individual fields. The left-
hand side shows a list of all the fields available in the telephone directory and the right-
hand side shows a list of all the fields to be exported. You can now customize the right-
hand list according to your requirements, using the buttons
[Add]/[Add All]
and
[Re-
move]/[Remove All]
. To create an empty field select
<Dummy>
.
For our example you should export the fields "Name", "E-mail/Address", "Dummy" and
"Phone" in the given order. To do so, first click on [Name] on the left-hand side and then
on [Add]. A further dialog box now appears enabling you to enter another name in the
name field and to define the maximum number of characters. To ensure that the fields
do not become too wide later on, set the maximum amount of characters to 30 under
"Length". The name in the name field should remain unchanged. Accept the setting with
[OK]
and proceed with the e-mail/address in the same way. In Dummy you can also
choose another name as well as the maximum number of characters "Country" for ex-
ample. Lastly, accept the Phone field with [OK] and set the length to 20 characters as
telephone numbers generally require less characters.
All four fields have now been transferred to the right-hand side and the newly created
field mapping can be saved with
[OK].
This brings you back to the field mapping menu.
If you now select the field mapping you have just created, you can start the export
process by pressing [OK]. The exported data are now ready to be transferred to other
programs.
To now read the data into Microsoft Excel, change to Excel and load the exported data
into the memory with
'Open'
from the 'File' menu. The data format in the file selector box
Working with the FA-127
20

