background image

73

2

Using Mobile Cockpit

Your FIVA comes with Mobile Cockpit pre-installed, an original CASIO

application that makes operation quicker and easier. To start up

Mobile Cockpit, tap the 

 on the Task Bar.

Mobile Cockpit can be displayed as a toolbar along the top of the

display, which gives you quick and easy one-touch access to its

functions.

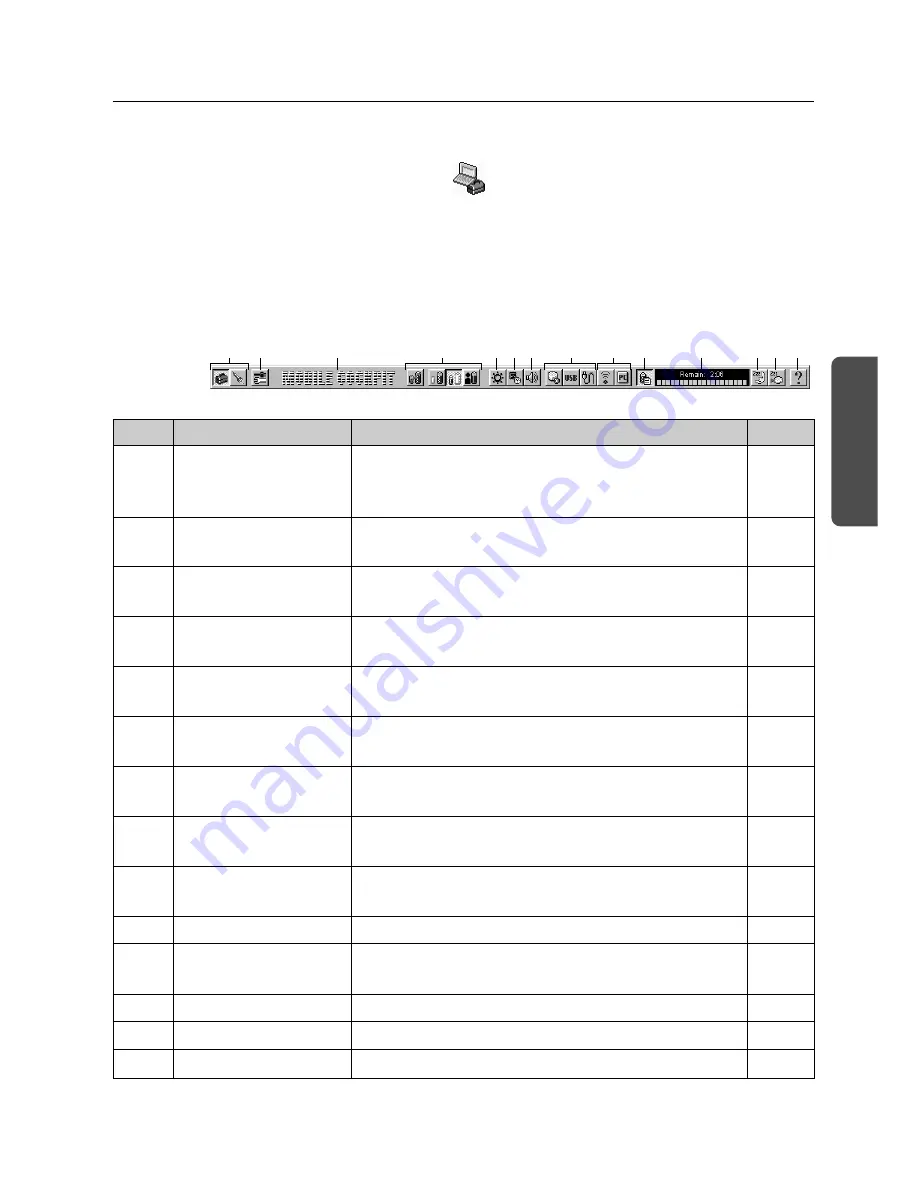
System Management Toolbar

2

1

4

9

3

567

8

0

q

w e r

Name

Toolbar Switch

System Tool
Startup

Mobile Cockpit
Settings

Power Management
Settings

LCD Brightness

CPU Clock Speed

Sound Volume

Hardware Power
Management

Show Properties

Battery Report

Battery Status

Standby Mode

Hibernation Mode

Help

No.

1

2

3

4

5

6

7

8

9

0

q

w

e

r

Description

Tap these buttons to switch between the
System Management Toolbar and the
Application Startup Toolbar.

Tap this button to access Power Management
Tools and BIOS Tools.

Right-tap here to display a menu for
controlling icon size, hiding of the toolbar, etc.

Tap these buttons to switch between 

Economy

,

Normal

, and 

User Defined

 Modes.

Tap this button to display a slider that controls
display brightness.

Tap this button to display a slider that controls
CPU Clock Speed.

Tap this button to display a slider that controls
speaker volume.

Tap these buttons to cut off power to the hard
disk, USB, multi-communication port.

Tap these buttons to display the properties of
the infrared port or PC card.

Tap this button to display the battery report.

Tap this button to display the current battery
status.

Tap this button to enter the 

Standby

 Mode.

Tap this button to enter the 

Hibernation

 Mode.

Tap this button to display on-line help.

Page

74

75

79

81

84

84

85

86

87

87

88

88

88

,

89

89

Summary of Contents for FIVA MPC-501 Series

Page 1: ... This guide describes the basic operations of the product Read this guide in its entirely before handling or operating the product and keep it close at hand so it can be easily referenced MPC 501 series User s Guide FIVA User s Guide MPC 501 series ...

Page 2: ...he International ENERGY STAR Program CASIO products have been judged to meet International ENERGY STAR standards ENERGY STAR is a U S registered mark Power Plug and AC Adaptor Note AC cord plug and wall outlet illustrated in this User s Guide shows the two pin plug type It may not be the same shape of AC cord plug used in your area FIVA s AC adaptor has an automatic voltage switching circuit input...

Page 3: ...IA FIVA MPC 501 series A list of the items included with this product is given below Confirm that nothing is missing or damaged If anything is missing or damaged contact the dealer from which you purchased this product FIVA MPC 501 Stylus Screen protective film AC adaptor Neck strap Battery pack User s Guide ID sticker Windows98 SE First Step Guide Product Recovery CD ROM Not included with the MPC...

Page 4: ...d also to prevent damage to property and this product The icons and definitions are given below Indicates that there is a risk of severe injury or death if used incorrectly Indicates that injury or damage may result if used incorrectly Icon examples To bring attention to risks and possible damage the following types of icons are used The symbol indicates that it includes some symbol for attracting...

Page 5: ...ontact your original retailer or authorized distributor Never bring in FIVA a bathroom or any other location where the possibility of splashing or high humidity exists Use of FIVA in such an area creates the danger of electric shock Be especially carefully when using FIVA while rain or snow is falling or in beach areas Never try to take FIVA apart or modify it in any way High voltage components in...

Page 6: ...e and electric shock Overloading an electric outlet creates the danger of overheating and fire Make sure the power plug and AC adaptor plug are inserted as far as they will go Loose plugs create the danger of electric shock overheating and fire Do not use the adaptor if the plug is damaged Never connect to a power outlet that is loose Use a dry cloth to periodically wipe off any dust built up on t...

Page 7: ...he battery pack Never throw the battery pack into fire or otherwise expose it to direct flame Doing so creates the danger of fire and explosion Never allow the positive and negative poles of the batteries to become connected by metal Do not store or transport the battery pack together with metal necklaces hairpins or other metal items Connection of the battery pack poles creates the danger of over...

Page 8: ...hich creates the danger of fire When transporting FIVA take care to avoid subjecting it to vibration and impact This unit contains a hard disk and other precision components that can be damaged by rough handling The AC adaptor normally becomes warm during use Avoid allowing the AC adaptor to rest on your lap or other part of your body when using it for long period Long term with the AC adaptor cre...

Page 9: ...Never touch the plug while your hands are wet Doing so creates the danger of electric shock Pulling on the cord can damage it break the wiring or cause short creating the danger of fire and electric shock Avoid use in areas where the brightness around the display is very different from surrounding lighting or where the sunlight is shining directly on the display Such conditions can cause eye fatig...

Page 10: ...ware is prohibited This product is guaranteed only when operating under the version of Windows 98 that comes bundled with it Product Application This product is intended for use as a general office computing device CASIO makes no warranties that this product is fault tolerant It is not designed manufactured or intended for use in any equipment or system such as traffic control devices safety devic...

Page 11: ...e master copies of your programs and data files Never open data files or run programs of unknown origin Use a commercially available virus checker to check new programs and periodically check your system for virus contamination Use the latest version of a commercially available virus checker to check your system An immediate virus check is recommended in the following cases Check your system each ...

Page 12: ... or otherwise cut off power to FIVA while the system is starting up or while a program is running Doing so can cause data to be lost or corrupted and can lead to malfunction of FIVA Do not turn power off and then suddenly back on again Doing so can cause data to be lost or corrupted and can lead to malfunction of FIVA Cables Use only the cables that come with FIVA to connect it to other optional e...

Page 13: ...disconnecting peripherals Failure to do so can damage FIVA or the peripheral AC adaptor WARNING Use AC adaptor type MPC 577ADP SQS45W16P 02 Main battery WARNING Replace this main battery with Model MPC 173BAT or MPC 174LBAT Use of another battery may present a risk of fire or explosion This battery pack is suitable for use only with MPC 501 series Keep away from children Dispose of used batteries ...

Page 14: ... due to the loss of data stored on FIVA s hard disk Formatting a Floppy Diskette Formatting a floppy diskette deletes all data stored on it Be sure to check the contents of a floppy diskette before formatting it CD ROM Protecting CD ROMs from Dirt and Dust Keep CD ROMs in their original cases and store them in a safe place Handle CD ROMs by pinching between two fingers one inside the center hold a...

Page 15: ... down the power and unplug the power cord from the power outlet before cleaning FIVA Cleaning FIVA with the power on creates the danger of electric shock Clean FIVA by wiping it with a soft dry cloth If FIVA is very dirty wipe it with a cloth that has been moistened with a weak solution of water and a mild neutral detergent Wring out all excess of moisture before wiping Take particular care to kee...

Page 16: ...r otherwise try to take it apart or modify it in any way High voltage inside the case creates the danger of electric shock Whenever you notice any of the following symptoms immediately shut down the power unplug the AC adaptor from the power outlet and contact your original dealer or authorized distributor Damaged power cord or plug Liquid leaking from FIVA Exposure of FIVA to water or rain Unit b...

Page 17: ...the user is encouraged to try to correct the interference by on or more of the following measures Reorient or relocate the receiving antenna Increase the separation between the equipment and receiver Connect the equipment into an outlet on a circuit different from that to which the receiver is connected Consult the dealer or an experienced radio TV technician for help FCC WARNING Changes or modifi...

Page 18: ...upply 29 Attaching and Removing the Battery Pack 29 Charging the Battery Pack 31 Turning on Power 33 To turn on the power 33 Shutting Down the Power 34 To shut down Windows 98 from the Start menu 35 To enter the Standby Mode from the Start menu 36 To enter the Hibernation Mode with the power switch 37 Chapter 2 Using FIVA 39 Using the Stylus 41 To calibrate the screen 41 Pen Operations 42 Using th...

Page 19: ... Up smARTscribble 67 Working with Images 67 Working with Text 68 Ink 70 smARTscribble Documents 71 Navigating Around a Document 71 Guidelines 71 Page Size 72 Previewing a Document 72 Using Mobile Cockpit 73 1 Toolbar Switch 74 2 Starting Up a System Tool 75 3 Making Mobile Cockpit Settings 79 4 Making Power Management Settings 81 5 Adjusting Display Brightness 84 6 Changing the CPU Clock Speed 84 ...

Page 20: ...Communication Port 95 Infrared Data Communication 96 USB Connection 97 Loading PC Card and Expansion Memory 98 Using a PC Card 98 Using the Port Replicator 99 Using the Floppy Disk Drive 101 Using an External Monitor 102 Connecting a Mouse or External Keyboard 104 Connecting a USB Device 104 Connecting an RS 232C Peripheral 104 Connecting a Printer 104 Troubleshooting 105 Using the Terminal Equipm...

Page 21: ... required procedures for turning power on and off for the first time Chapter 2 Using FIVA This chapter explains how to turn on power and perform a number of basic computer operations Chapter 3 Supplementary Information This chapter contains information about how to connect peripherals and what to do when you experience problems Important This mark indicates important cautions and things to which y...

Page 22: ...Chapter 1 Getting Ready This chapter provides you with general description of functions and part names It also explains required procedures for turning power on and off for the first time ...

Page 23: ......

Page 24: ...sk built in Two way power supply operates on batteries or AC for operation just about anywhere Power management functions include standby and hibernation modes Built in Windows 98 lets you take your desktop files along everywhere Versatile Stylus Interface Pointing is performed by touching the screen with a stylus Highly efficient handwriting recognition Versatile Networking Use of a LAN card SS w...

Page 25: ...dicator lamps PW Power indicator pages 34 and 90 BAT Battery status indicator page 32 HDD Hard disk access lamp green during access Multi Communication port 1 Connect the cable here for data communication 1 Multi communication port is not equipped in some models Stylus Use this stylus for touch panel input See pages 28 and 41 Speaker Hooks Secure FIVA in place The part names introduced in this cha...

Page 26: ...h with a thin pointed object turns off unit power Only press this switch when experiencing operational problems PC card slot Port replicator connector Connects to the port replicator USB connector For connection of USB compatible devices AC adaptor connector Back Cradle Contact Establishes contact when FIVA is placed on a cradle Infrared port Control Shift key ...

Page 27: ...te commands Shifts the keyboard between upper case and lower case Inputs numbers 0 to 9 Enters data or inserts a carriage return Inputs a decimal point Inputs a hyphen or a minus sign Inputs a blank space Moves the cursor on the screen Key Esc Del BS Tab Fn Alt Ctrl Shift 0 9 Enter Spc Home PgUp PgDn End Keyboard This section describes the basic functions of the keyboard Actual keyboard functions ...

Page 28: ...IVA into Hibernation Mode pages 88 and 89 Decreases speaker sound volume page 85 Increases speaker sound volume page 85 Cycles through monitor function in the following sequence LCD FIVA CRT CRT and LCD FIVA LCD FIVA Places a displayed image of the active window onto the clipboard Restarts the system without turning off power Launches the screen calibration routine page 41 The SOFT KEYBOARD will a...

Page 29: ...ilm in the middle and insert its edges on either side of the FIVA display Pulling out the Stylus Use your finger to slide the stylus from its storage slot on the front of the FIVA unit To replace the stylus slide it carefully back into the slot so the raised part of the stylus enters the slit Important Take care to avoid misplacing the stylus Take care to avoid damaging or breaking the tip of the ...

Page 30: ...using the AC adaptor only it is a good idea to attach the battery pack and charge it before using FIVA for the first time Important Battery packs can also be charged using a separately available charger unit MPC 570CHG Note The supplied battery pack is not charged when you purchase your FIVA Note that the battery pack takes about four hours to reach a full charge certain condition can cause chargi...

Page 31: ...y turns off FIVA power To protect against losing unsaved data make sure that FIVA power is turned off when you start the above procedure The battery pack discharges naturally even when you do not use FIVA Be sure to charge the battery pack before using FIVA for the first time after a long period of non use Make sure the battery pack is set securely to FIVA Make sure you attach the battery pack sec...

Page 32: ... it to fall on your foot or otherwise cause personal injury Charging the Battery Pack You can use either of the following two methods to charge the battery pack With the battery pack attached to FIVA The battery pack is charged while the AC adaptor is connected and plugged into a power outlet regardless of whether or not the FIVA is turned on Turn off FIVA and charge the battery pack for about two...

Page 33: ...owers FIVA for a relatively short period after a full charge When this happens replace the battery pack with a new one Locate the AC adaptor power cord in a place where it will not be tripped over Charge the battery pack in an area where the temperature is within the range of 5 C to 35 C 41 F to 95 F The battery pack may fail to reach a full charge at temperatures outside this range In this case t...

Page 34: ...ait for at least 10 seconds before turning it back on again The first time you turn on the power you must perform a Windows 98 setup procedure Consult your original detailer for information about the setup procedure You need to perform this procedure only once After that Windows 98 will boot up automatically when you turn on the power Note The screen goes through a number of changes and may even f...

Page 35: ...tion Mode These methods differ in the amount of power consumed while power is off and the amount of time it takes before Windows 98 is ready to be used from any of the power off states An understanding of these differences will help you decide which one you should use Shut down Windows from the Start menu or press the power switch to enter the Hibernation Mode if you do not plan to use FIVA for a ...

Page 36: ... no battery power This mode extends battery life but requires that Windows 98 be restarted from the very beginning to restore power This means that the status of Windows 98 or any application that is running is not maintained in memory when the Power Off Mode is entered Enter the Power Off Mode if you do not plan to use FIVA for a long time and before installing expansion memory Choose this option...

Page 37: ... Mode This means that Windows 98 is restored within the shortest time from this mode but it also means that this mode requires more power consumption than that of the other two modes The Standby Mode is best when you plan to be away from the computer for only a short time and need to immediately pick up from where you last left off when you return Tappling the keyboard or other controls on FIVA au...

Page 38: ...Hibernation Mode is recommended when you do not plan to use your computer for a long time but you want to restore the status of Windows 98 and your applications when you return Important Avoid entering the Hibernation Mode while a communication operation is in progress or while a peripheral disk printer etc is in use Entering the Hibernation Mode while a communication operation is in progress will...

Page 39: ...Chapter 2 Using FIVA This chapter explains how to turn on power and per form a number of basic computer operations ...

Page 40: ......

Page 41: ... screen 1 Open the Taskbar touch Start Programs FIVA TOOLS and then Calibration Tool This causes the calibration screen shown below to appear with a cross mark in the upper left corner You can also display the calibration screen by pressing Fn 2 Tap the cross marks with the stylus in the sequence they appear on the screen 3 After you tap the final cross mark a title bar appears in the title bar at...

Page 42: ... selected range of text from one location on the screen to another Touch and hold the beginning of the range of text you want to select and drag stylus to the end of the range Remove the stylus from the screen when all the text you want is selected Selected text is highlighted on the screen as shown above Holding the stylus anywhere inside the highlighted text drag it to the location to which you ...

Page 43: ...put panel The most appropriate keyboard for the type of operation you are performing appears list but you can switch between keyboards at anytime smARTwriter handwriting input panel Use this input panel to input text by hand writing directly on the screen smARTwriter cannot be used in combination with the Mobile Keyboard Mobile Keyboard Use this keyboard when setting up the system and performing o...

Page 44: ...so the pointer changes from to Drag the stylus on the screen to change the size of the keyboard Note that the size of the smARTwriter handwriting input panel cannot be changed Moving the Mobile Keyboard on the Screen Hold and tap the area on the left side of the keyboard and drag it to the location you want ...

Page 45: ...ons Try them out and find the one that suits you best Top change the configuration of the Mobile Keyboard tap the icon in the upper left corner of the current keyboard and then select the keyboard you want from the menu that appears 1 Full Qwerty key 2 Middle Qwerty key 3 Small Qwerty key 4 ABC key ...

Page 46: ...46 5 Ten key ...

Page 47: ...timeout occurs when you lift the pen for a certain time interval smARTwriter passes the recognized output to the active application The recognition process is performed by comparing the symbols you write against a set of defined smARTwriter symbols This set of symbols is called a Library The Library contains shapes of letters digits punctuation marks etc The Library can contain more than one versi...

Page 48: ...commended that you edit the Library and delete any redundant or incorrect models See Library on page 60 for more information Using Quick Trainer Quick Trainer is an application you can use to teach smARTwriter your particular style of writing which helps to improve recognition results It takes less than five minutes to complete one Quick Trainer session To run Quick Trainer 1 Start up Quick Traine...

Page 49: ...icates the progress of the session 5 After you finish writing all the characters tap the Accept button If you want to clear the screen and start over tap the Clear button Note You can repeat Quick Trainer sessions as often as you want Repeating sessions improves recognition results even more Using the Euro Trainer Using the Euro Trainer you can train smARTwriter to recognize your handwriting in We...

Page 50: ... icon 2 The above step causes the smARTwriter control icon to appear in the icon tray in the bottom right corner of the screen This indicates that smARTwriter is active smARTwriter Modes You can control pen operations and handwriting recognition using the smARTwriter icon in the bottom right corner of the screen The shape of the icon indicates the current mode Pointing Mode This icon indicates tha...

Page 51: ...rt up an application such as Word 2 Switch to Writing Mode and tap in the input area of the application so the insertion cursor appears You are ready to start writing on the screen 3 Using the stylus write a few words in the Pocket Word document area Write continuously It is not necessary to pause after each letter smARTwriter reads the ink recognizes it and converts it into printed text 4 The rec...

Page 52: ... the screen 3 This causes the character to the left of the cursor position to be deleted Activating the Correction Box The Correction Box is a built in tool that makes it easy to correct misrecognized text You can use any of the three different procedures to activate the Correction Box To activate the Correction Box with the Correction gesture 1 Write until a recognition error occurs 2 Draw the Co...

Page 53: ...rrection Box The Correction Box displays the characters that make up the selected word with a down arrow underneath each one To make corrections 1 Tap the down arrow under the character you want to change This displays a menu of other possibilities for the character 2 Choose the character you want by tapping it You can also change a character by writing the new character directly into the box or s...

Page 54: ... smARTwriter your handwriting style See Training smARTwriter on page 47 Library Opens the Library Manager See Library Models on page 61 Properties Displays the smARTwriter Properties dialog box See Properties on page 63 Help Displays smARTwriter online help or copyright and version information Exit Tap here when you want to manually shutdown smARTwriter Pen mode Toggles between the smARTwriter Wri...

Page 55: ...icon tray select Train from the smARTwriter Menu and then select one of the training options Character Macros and Gestures or Application Shortcuts Character This option opens the Trainer dialog box You can also draw the gesture shown below to open the Trainer dialog box When the Trainer dialog box opens it shows the last ink pattern you wrote or selected Use this dialog box to teach smARTwriter t...

Page 56: ...ter in the As box will be associated with the ink pattern in the Trainer dialog box 4 Tap the Train button to train the character and save your changes to the Library of Models 5 Tap the close box to close the Trainer dialog box Other Symbols If the character you want is not in the list select Other from the list to open the Train Symbol dialog box The Train Symbol dialog box provides a selection ...

Page 57: ...ther pattern by tapping the Clear Ink button and then drawing another ink pattern 2 When the ink pattern is the way you want tap the Next button to continue To cancel training tap the Cancel button 3 In response to the prompt that appears tap New Macro if you are creating a new macro or Existing Macro or Gesture to associate the ink pattern with an existing macro Next tap Next to continue What hap...

Page 58: ...ast ink pattern you wrote or selected Use this dialog box to teach smARTwriter to interpret the pattern as a shortcut to launch an application To teach smARTwriter an application shortcut 1 Display the Train Macro Wizard dialog box by tapping the smARTwriter icon and then selecting Train Application Shortcuts The last ink pattern you drew is shown in the Draw Macro Ink box You can use this pattern...

Page 59: ... step 3 of the above procedure New Shortcut 1 Tap the Browse button On the dialog box that appears select the application for which you want to create a shortcut and then tap OK 2 The path to the application you selected appears in the Shortcut command line box and the name of the application appears in the Shortcut name box 3 Tap Finish to save the shortcut and close the Train Shortcut Wizard Exi...

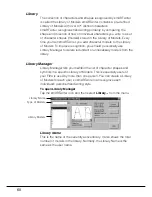
Page 60: ...riodically use Library Manager to delete redundant or unnecessary models from the library Library Manager Library Manager lets you maintain the list of character shapes and symbols in a specific Library of Models This is especially useful if your FIVA is used by more than one person You can create a Library of Models for each user so smARTwriter can recognize each individual s personal handwriting...

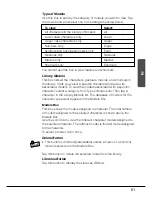
Page 61: ... models To view the models associated with a specific character select a category from Type of Models list Then tap a character in the Library Models list The database of models for the character you select appears in the Models Box Models Box This box shows the models assigned to character The total number of models assigned to the selected character is shown above the Models Box Use the scroll b...

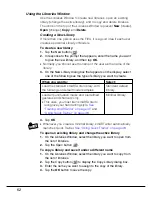
Page 62: ...henever you create a minimal library smARTwriter automatically launches Quick Trainer See Using Quick Trainer on page 48 To open an existing library and change the active library 1 On the Libraries Window select the library you want to open from the list of libraries 2 Tap the Open button To copy a library and save it under a different name 1 On the Libraries Window select the library you want to ...

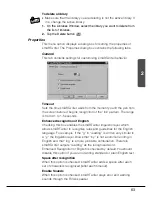
Page 63: ...om 0 1 to 1 5 seconds Enhanced recognition of English Checking this box enables the smARTwriter linguistic layer which allows smARTwriter to recognize rules and guidelines for the English language For example if the g in reading is written very similar to a y the linguistic layer knows that iny is not a common ending in English and that ing is a more probable combination Therefore smARTwriter outp...

Page 64: ...e of 1 to 5 points Ink Color This area shows a sample of the color currently selected for the ink and provides a button for changing the color To change the color of the ink 1 Tap the Change button to display the Color dialog box which is a standard Windows color palette 2 Select the color you want to use for the electronic ink Note Refer to your Windows documentation for more information about us...

Page 65: ...ake sure that this setting is the same for both writing and training sessions Eliminate random ink spikes Check this option to remove sharp ink edges making the edges of the electronic ink appear rounded For optimal recognition make sure that this setting is the same for both writing and training sessions Hot Key Use this tab to create a hot key or shortcut that toggles between the Writing Mode an...

Page 66: ...ny combination of sets to fit your writing style Note For every recognition operation smARTwriter searches through all the character sets that are checked on the Constraints tab The following is an example of using Constraints 1 Tap the smARTwriter icon in the icon tray and select Properties Next display the Constraints tab 2 On the Constraints tab uncheck all sets except Lowercase and then tap OK...

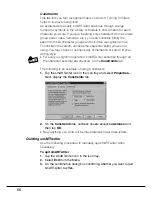
Page 67: ...t icon Working with Images To draw an image Simply use the stylus to draw on the screen of the FIVA as if you were drawing on paper To edit an image Use standard Windows editing procedures to edit images with smARTscribble In other words select the image and then edit it using Cut Copy Paste or Delete You can access editing features by selecting them on the smARTscribble Edit menu or by using keyb...

Page 68: ...e Copied images can be pasted into documents created with other applications such as Word To paste an image from the clipboard 1 Tap the Paste button 2 Drag the pasted image which is surrounded by a selection boundary to the location you want it 3 Tap anywhere outside the selection boundary to deselect the pasted image To move an image 1 Select the image 2 Drag the image to its new location with t...

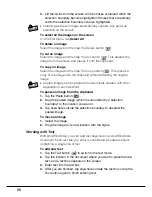
Page 69: ...xt you want to select To delete text Select the text and then tap the Delete button To cut text Select the text and then tap the Cut button This deletes the text from the screen and places it onto the clipboard To copy text Select the text and then tap the Copy button This places a copy of the text onto the clipboard without affecting the original text Note Copied text can be pasted into documents...

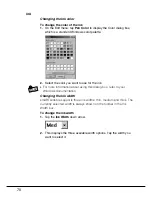
Page 70: ...r the ink Note For more information about using this dialog box refer to your Windows documentation Changing the Ink width smARTscribble supports three ink widths thin medium and thick The currently selected width is always shown on the toolbar in the Ink Width box To change the ink width 1 Tap the Ink Width down arrow 2 This displays the three available width options Tap the width you want to sel...

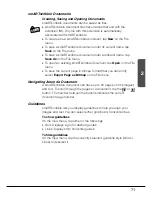
Page 71: ...on the File menu To save the current page in bitmap format that you can print select Export Page as Bitmap on the File menu Navigating Around a Document A smARTscribble document can have up to 20 pages of ink images and text To scroll through the pages of a document tap the or button The number between the buttons indicates the current document page number Guidelines smARTscribble lets you display...

Page 72: ... area of the page off the bottom of the screen by using the vertical scrollbar on the right of the page Note When you switch between pages smARTscribble automatically adjusts the page size so all the data fits on the page Previewing a Document To preview the current page 1 On the View menu select Page Preview This displays the Page Preview window which shows the contents of the entire page 2 To cl...

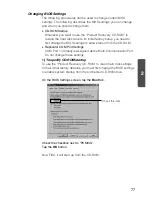
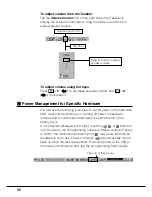
Page 73: ...tem Management Toolbar and the Application Startup Toolbar Tap this button to access Power Management Tools and BIOS Tools Right tap here to display a menu for controlling icon size hiding of the toolbar etc Tap these buttons to switch between Economy Normal and User Defined Modes Tap this button to display a slider that controls display brightness Tap this button to display a slider that controls...

Page 74: ...o make settings as indicated on the screen Application Startup Toolbar Once you assign an application to the Application Startup Toolbar you can start it up by simply tapping its icon Use this toolbar for easy access to your frequently used applications About the Application Startup Toolbar Tap the Toolbar Switch to display the Application Startup Toolbar Assigning an Application to the Applicatio...

Page 75: ...ation you want to remove page 42 Note The above procedure simply removes the application s icon from the Application Toolbar It does not uninstall the application 2 2 2 2 2 Starting Up a System Tool Tap the icon on the System Management Toolbar On the dialog box that appears start up either Power Management Setup Tool or BIOS Startup Tool See 4 Making Power Management Settings on page 81 for infor...

Page 76: ...the Safe Mode correctly for some reason execute setup default from the BIOS Set UP UTILITY by holding down Del key while FIVA is starting up Start up may be impossible if BIOS settings are not correct Note BIOS stands for Basic Input Output System which is the name of software that controls certain basic functions of your system Tap the Mobile Cockpit Tools icon To display BIOS settings Use the fo...

Page 77: ...IOS settings to allow startup from the CD ROM Replicator COM Port Settings COM Port 1 normally is assigned as the Multi Communication Port Do not change these settings 1 To specify CD ROM startup To use the Product Recovery CD ROM to return hard disk settings to their initial factory defaults you must first change the BIOS settings to enable system startup from the connected CD ROM drive On the BI...

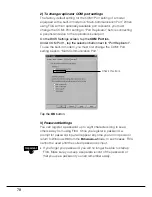
Page 78: ... Replicator To use the built in modem you must first change the COM1 Port setting back to Multi Communication Port Tap the OK button 3 Password Settings You can register a password up to eight characters long to keep others away from using FIVA Once you register a password a prompt for password input will appear any time you turn on power or return to Windows 98 from the Hibernation Mode In such c...

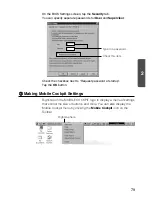
Page 79: ...Request password at startup Tap the OK button 3 3 3 3 3 Making Mobile Cockpit Settings Right tap on the MOBILE COCKPIT logo to display a menu of settings that control the size of buttons and more You can also display the Mobile Cockpit menu by clicking the Mobile Cockpit icon on the Toolbar Check this item Type in a password Right tap here ...

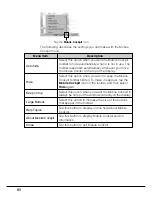
Page 80: ...ove the mouse pointer to the top of the display Select this option when you want to keep the Mobile Cockpit toolbar hidden To make it reappear tap the Mobile Cockpit icon on the toolbar and then select Hide again Select this option when you want the Mobile Cockpit to always be on top of the windows currently on the display Select this option to increase the size of the buttons that appear in the t...

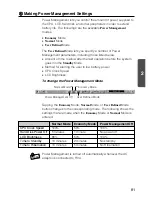
Page 81: ...y Mode Normal Mode User Defined Mode The User Defined Mode lets you specify a number of Power Management parameters including those listed below Amount of time to allow after the last operation before the system goes into the Standby Mode Method for alerting the user to low battery power CPU Clock Speed LCD Brightness To change the Power Management Mode Tapping the Economy Mode Normal Mode or User...

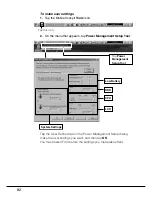
Page 82: ...tap Power Management Setup Tool Low Battery System Settings HDD CPU LCD Tap the User Defined tab on the Power Management Setup dialog make the user settings you want and then tap OK You must restart FIVA before the settings you made take effect Tap this icon Tap Power Management Setup Tool ...

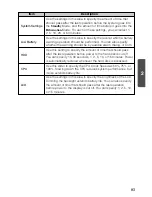
Page 83: ...be by audible alarm dialog or both Use this setting to specify the amount of time that should pass after the last operation before power to the hard disk is cut off You can specify 15 30 seconds 1 2 5 10 or 15 minutes Power is automatically restored whenever the hard disk is accessed Use this slider to specify the CPU Clock Speed as 50 75 or 100 Slowing down the CPU reduces system performance but ...

Page 84: ...en darker and Fn 2 to make it brighter 6 6 6 6 6 Changing the CPU Clock Speed Controlling the CPU clock speed reduces power consumption and helps to extend the life of the battery pack On the System Management Toolbar tap the button and make the settings you want on the dialog box that appears You can select one of three CPU clock speed settings 50 75 or 100 Tap here Drag this slider to adjust LCD...

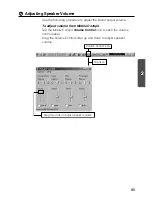
Page 85: ...t the sound output volume To adjust volume from Mobile Cockpit Tap the Mobile Cockpit Volume Control icon to open the volume control panel Drag the Volume Control slider up and down to adjust speaker volume Volume Control icon Tap here Drag this slider to adjust speaker volume ...

Page 86: ...multi communication port Cutting off power to hardware reduces power consumption and helps to extend the life of the battery pack On the System Management Toolbar touch the or button to cut off power to the corresponding hardware Before cutting off power to USB or the multi communication port make sure first that the hardware is not in use Power to the disk is automatically turned back on when the...

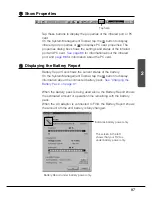
Page 87: ...ing the Battery Report Battery Report Tool shows the current status of the battery On the System Management Toolbar tap the button to display information about the connected battery pack See Charging the Battery Pack on page 31 When the battery pack is being used alone the Battery Report shows the estimated amount of operation time remaining with the battery pack When the AC adaptor is connected t...

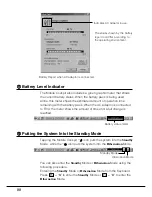
Page 88: ...ystem Into the Standby Mode Tapping the Mobile Cockpit icon puts the system into the Standby Mode while the icon puts the system into the Hibernation Mode You can also enter the Standby Mode or Hibernation Mode using the following procedure Entering the Standby Mode or Hibernation Mode from the Keyboard Press Fn 3 to enter the Standby Mode or Fn 4 to enter the Hibernation Mode Indicates AC adaptor...

Page 89: ...ntering the Hibernation Mode See w above r r r r r Using Mobile Cockpit Help To display on line help for Mobile Cockpit select Mobile Cockpit Help from the Mobile Cockpit menu or tap the button on the toolbar Tap here ...

Page 90: ...ge the battery pack fully before trying to use it to power FIVA You can use any of the following three methods to check the current charge level of the battery pack Checking the Power Indicator Lamp Color The indicator lamp flashes amber if the battery charge level drops while FIVA is operating under battery power only When this happens connect the AC adaptor and charge the battery If you continue...

Page 91: ... operating time you get from the battery pack is greatly affected by operating conditions and how you use it FIVA s mobile computing Power Management functions help to ensure that you get maximum power out of the battery pack Forced Hibernation Mode To help ensure that you do not lose application data files FIVA goes into forced Hibernation mode whenever the battery charge level drops below a cert...

Page 92: ...by operating environment and other conditions Using the Large capacity Battery Pack Use the optionally available battery pack MPC 173BAT or MPC 174LBAT when you need to operate FIVA for longer periods without AC adaptor power The large capacity battery pack provides about four hours of continuous operation on a full charge The operation of the standard battery pack and the large capacity battery p...

Page 93: ...Chapter 3 Supplementary Information This chapter contains information about how to connect peripherals and what to do when you experience problems ...

Page 94: ......

Page 95: ...connecting a peripheral use the procedures provided in this user s guide in combination with the documentation that comes with the peripheral Connecting a Peripheral to FIVA A peripheral is a device like a printer or external floppy disk drive that you connect to FIVA The following procedure describes how to connect a peripheral to FIVA and how to install a PC card Important For information about ...

Page 96: ...ed Data Communication To exchange data you have to start up the pre installed infrared software 1 On the Taskbar tap the Infrared Monitor icon to open the Infrared Monitor screen 2 Tap the Options tab and then check the checkbox next to the Enable infrared communication on 3 Tap the OK button Infrared communication port Check this option Infrared Monitor icon infrared disabled ...

Page 97: ...lets you connect or disconnect peripherals without turning off FIVA power There is one USB connector built into FIVA and one more on the port replicator or cradle USB devices include the mouse keyboard printer etc Each requires a USB cable for connection Use the appropriate cable for the device you are connecting A peripheral connected to the USB port draws power from the port Click the USB icon a...

Page 98: ... Never install or remove a PC card while system operation is suspended or in Hibernation Mode Doing so can cause data to be deleted Note You can use the Product Recovery CD ROM that comes bundled with FIVA to restore the hard disk Use the optional CASIO MPC 142CDDE CD ROM drive to access the CD ROM A PC card must be oriented correctly when you insert it into the slot Forcing a card into the slot u...

Page 99: ...Card button to disable the PC card and then remove it Using the Port Replicator The optionally available port replicator MPC 160PR provides connection ports for a PS 2 device for mouse or keyboard a USB device a monitor an RS 232C port device a printer and an external floppy disk drive To connect FIVA to the port replicator 1 Quit all applications and shut down the system 2 Disconnect the AC adapt...

Page 100: ... all applications and shut down the system 2 Disconnect the AC adaptor and all peripheral cables 3 Pressing the port replicator s eject lever lift FIVA from the port replicator Important Never transport FIVA while it is mounted on the port replicator If you do FIVA may suddenly fall off and become damaged Using a number of peripherals in combination with the port replicator can put large power dem...

Page 101: ...iate connector of the port replicator Press the connector in until the locks on both sides engage The access lamp on the floppy disk driver lights or flashes whenever data is being written to or recalled from a disk Never remove the floppy disk from the drive while the access lamp is lit or flashing Doing so can cause data to be corrupted or even lost data entirely To write protect a floppy disk F...

Page 102: ...monitor to the appropriate connector of the port replicator Making sure the connector is oriented correctly connect the cable from the monitor to the appropriate port on the port replicator Plug the power cord of the monitor into a wall outlet See the documentation that comes with the monitor for details on its use 3 Turn on FIVA and start up Windows 98 4 Press Fn 0 to switch to the external monit...

Page 103: ...t indicate malfunction Note You can specify the resolution and number of colors when using an external monitor alone Right tap on the Windows 98 desktop and on the menu that appears select Properties Tap the Settings tab and then make the Colors and Screen area settings you want The following table shows the setting combinations that can be made for Colors and Screen area The actual Colors and Scr...

Page 104: ...SB compatible device Connecting an RS 232C Peripheral The RS 232C port which is named COM1 under Windows 98 can be used to connect serial device Note that you cannot use the RS 232C port while the built in modem is enabled Use Mobile Cockpit to switch between the built in modem and the RS 232C port Connecting a Printer Use the parallel port to connect a separately available printer or other parall...

Page 105: ...information that appears on the display Message numbers and codes that appear on the display may provide hints to the cause of the problem and what you need to overcome it Keep notes of such information when it appears on the display 3 Try to determine the possible cause of the problem If FIVA is the source of the problem or is it being caused by a peripheral or application Does the same operation...

Page 106: ...xternal Monitor Printer PC Card Other Peripherals Software Windows Version Remarks All applications running when problem occurred System Outline Have the following information handy whenever you request user support Memo about your system Other information about FIVA can be found by visiting the CASSIOPEIA Website at http www casio co jp English system ...

Page 107: ... wall outlet Contact your original dealer or authorized distributor Have the following information on hand Product name and model number Date of purchase Current status and the names of applications being used Contact your authorized distributor Have the following information on hand Product name and model number Date of purchase Current status and the names of applications being used ...

Page 108: ...attery pack does not supply much operation time even after a full charge Recommended Action Use the AC adaptor to power FIVA Use a fully charged battery pack If the battery pack has small charge when power is turned on a warning message appears momentarily and power turns off Leaving power turned on press the RESET switch on the bottom of FIVA Note that the RESET operation will result in loss of a...

Page 109: ... operation is performed for some time See page 88 Input a new user name in the Windows Log On screen or restore the system to its factory defaults With your FIVA model number on hand contact your original dealer or authorized distributor Reorient FIVA so you can view the display at a different angle Use Fn 1 or Fn 2 to adjust display brightness If the display remains dim at a bright setting it may...

Page 110: ...sure the data transfer speed set for FIVA is the same as that set on the other device Change the distance between FIVA and the other device Move the two devices to an area that is not exposed to direct sunlight or fluorescent lighting Turn off sound playback and then turn it back on again Tap the Mobile Cockpit CPU icon and then use the slider to set the CPU Clock Speed to 100 Quit other applicati...

Page 111: ...ddenly cuts off during playback Recommended Action On the BIOS Settings screen change the COM1 Port setting to Multi Communication Port See page 78 of this User s Guide Check the Mobile Cockpit screen to see if the Port Replicator icon is enabled See page 79 of this User s guide Change the audio volume setting or restart the application ...

Page 112: ...If you suspect that the problem is being caused by the application you are using press the RESET switch and restart Windows 98 Try turning power off and then back on again Memory may be low which means you have to increase it by installing a separately available DIMM board If Power Management is causing the system to go into the Economy Mode try changing the Normal Mode or turning Power Management...

Page 113: ...ms menu If Mobile Cockpit is not running tap the Taskbar s Start button and start up Mobile Cockpit from the Programs menu If the Mobile Cockpit toolbar is hidden tap the Mobile Cockpit icon on the Taskbar and then uncheck the Hide option on the menu that appears Press Ctrl Alt Del and then tap the Shut Down button Next restart Windows 98 If Ctrl Alt Del does not work press the RESET switch and th...

Page 114: ...in the United States This equipment complies with Part 68 of the FCC rules On the back side of this equipment is a label that contains among other information the FCC registration number and ringer equivalence number REN for this equipment If requested this information must be provided to the telephone company USOC Jack RJ11C is available to this equipment An FCC compliant telephone cord and modul...

Page 115: ...blic coin phone service provided by telephone company Connection to party line service is subject to state tariffs Contact the state public utility commission public service commission or corporation commission for information The Telephone Consumer Protection Act of 1991 makes it unlawful for any person to use a computer or other electric device including fax machines to send any message unless s...

Page 116: ...pliance evaluation You may need to test and make a modification filing to the FCC before that modified component can be used If you continue to produce this component you are required to comply with the FCC s Continuing Compliance requirements Therefore is all recommended that only FCC Part 68 registered devices bearing the CN or CE equipment code as part of FCC registration number be used To dete...

Page 117: ...lier Any repairs or alterations made by the user to this equipment or equipment malfunctions may give the telecommunications company cause to request the user to disconnect the equipment Users should ensure for their own protection that the electrical ground connections of the power utility telephone lines and internal metallic water pipe system if present are connected together This precaution ma...

Page 118: ...rotocols Conforms to MNP 4 ITU V 42 300 2400 1200 9600 4800 14400 12000 9600 7200 4800 28800 26400 24000 21600 19200 16800 14400 12000 9600 7200 4800 2400 33600 31200 28800 26400 24000 21600 19200 16800 14400 12000 9600 7200 4800 2400 56000 54667 53333 52000 50667 49333 48000 46667 45333 42667 41333 40000 38667 37333 36000 34667 33333 32000 30667 29333 28000 56000 54000 52000 50000 48000 46000 440...

Page 119: ...hall be used to connect the modem to the telephone line In this case if the telephone line is available through the modular jack it is possible to connect the modem to the telephone line with the dedicated communication cable directly Otherwise an adapter is required or modification of the telephone line socket might be necessary ...

Page 120: ... off the power of the FIVA first and then connect as depicted below Modular cable Part No PX735 UL MC CASIO INC Toll free 973 361 5400 Connector for communication for connection to the dedicated modular cable Dedicated modular cable ...

Page 121: ...duct is precisely designed 3 Do not spill any liquid such as water on the product 4 Do not touch the electric terminals without discharging static fully otherwise it will cause electric static damage 5 In case the product is used exceeding the maximum specification there is possibility that LSIs inside might be damaged permanently Therefore it is favorable to use the product under the normal opera...

Page 122: ...keys control keys Touch Screen Analog film resistor touch panel Monaural speaker built in monaural microphone built in PCM Sound Blaster 16 compatible sound source Monaural speaker built in Monaural microphone built in PCM Sound Blaster 16 compatible sound source USB 1 channel Built in IrDA1 1 compliant infrared port Data Transfer Rate 4Mbps 115 2Kbps ASK maximum Communi cation Ports USB 1 Externa...

Page 123: ...y Rating 11 1V 3000mAh correspondstotheMPC 174LBAT Power Off Approximately 4 hours Dimensions 206 W 46 D 25 H mm 8 1 W 1 81 D 0 98 H Weight 320g Power 45W by AC adaptor 16V AC adaptor Input 100 to 240V AC 50 60Hz Dimensions with battery 210 W 151 D 28 H mm 8 3 W 5 9 D 1 1 H pack excluding projections Approximate weight with battery pack 1020g 2 24lbs 1005g 2 21lbs Operating Environment Temperature...

Page 124: ...icator Product No MPC 151RAM 32MB Product No MPC 160PR MPC 152RAM 64MB Floppy Disk Drive CD ROM Drive Product No MPC 140FDDE Product No MPC 142CDDE Large capacity Battery Pack Battery Pack Product No MPC 174LBAT Product No MPC 173BAT AC Adaptor Battery Pack Charger Product No MPC 577ADPE Product No MPC 570CHG Interface Card CD ROM DRIVE ...

Page 125: ... possi ble However if any unclear portions or omissions are found please contact your dealer Descriptions and specifications furnished herein the User s Guide by CASIO Computer Co Ltd are believed to be accurate and reliable However CASIO reserves the right to make changes or improvements in the descriptions and specifications without any advanced notice CASIO does not assume any liability arising...

Page 126: ...O COMPUTER CO LTD 6 2 Hon machi 1 chome Shibuya ku Tokyo 151 8543 Japan Printed in Japan MPC 501 series User s Guide Printed on recycled paper This document is printed using environmentally friendly soy ink ...

Reviews: