background image

60 

EN

Number of printable lines:  1 to 2 for 6mm (

1

/

4

") wide tape


1 to 3 for 9mm (

3

/

8

") wide tape


1 to 5 for 12mm (

1

/

2

") wide tape


1 to 8 for 18mm (

3

/

4

") and 24mm (1") 

wide tape

Built-in Memory

Text memory: Approximately 2,000 characters
Phrase Memory: Up to 49 characters (50 sets)
Copy/paste: Up to 49 characters (9 sets)

Power Supply, Other

Operation power supply:  Specifi ed AC adaptor (AD-1832L)

8 AA-size alkaline batteries (commercially available)

Built-in clock battery life: Approximately 8 years

If the date and time inserted into labels are wrong, it could mean that 
the built-in clock battery is low. If this happens, request servicing from 
your original retailer. (Charges borne by you.)

Rated voltage: 18.8V DC
Power consumption: 800mA (15W)
Auto Power Off: Approximately 6 minutes

• 

Auto Power Off is disabled while the printer is being powered by the AC 
adaptor and connected to a computer.

Clock accuracy: ±3 seconds per day at normal temperature of 15°C to 35°C 
(59°F to 95°F)

Dimensions: 67.5 (H) × 202 (W) × 212 (D) mm (2 

7

/

16

"H × 7 

15

/

16

"W × 8 

3

/

8

"D)

Weight: Approximately 850 g (1.87 lb) excluding batteries
Operating temperature: 10°C to 35°C (50°F to 95°F)

Summary of Contents for KL-G2

Page 1: ...User s Guide KL G2 EN RJA532734 001V02 Supported Tape Widths 6 mm 9 mm 12 mm 18 mm 24 mm ...

Page 2: ...Important Be sure to keep all user documentation handy for future reference ...

Page 3: ...not be held liable for any loss or claims by you or any other person or entity that may arise through the use of this printer Reproduction of this manual in any form either in part or its entirety is forbidden without the express permission of CASIO COMPUTER CO LTD The contents of the manual are subject to change without notice The software is continually being revised and updated Because of this ...

Page 4: ... Inputting Text 41 Editing and Deleting Text 43 Changing the Font 44 Changing the Character Style 44 Using Text Effects 45 Contents Safety Precautions 4 Precautions during Use 7 Check to make sure that everything has been included with the printer 8 Read this before using the printer 8 About the supplied CD ROM 9 Installing the Software 10 Part 1 Getting Ready 12 Names of Parts and Their Functions...

Page 5: ...e and or Time into Text 47 Copying and Pasting Input Text 48 Creating a User Character 48 Part 9 Printer Settings 51 Configuring Printer Settings 51 Setting Items 51 Part 10 Reference 52 Power Requirements 52 User Maintenance 53 Troubleshooting 53 Error Messages 55 Specifications 59 Appendix APP 1 ...

Page 6: ...mediately perform the following steps whenever any of the above symptoms are present 1 Turn off power 2 Disconnect the USB cable 3 Unplug the AC adaptor from the wall outlet 4 Contact your original retailer AC Adaptor USB Cable Misuse of the optional AC adaptor USB Cable creates the risk of fire and electric shock Make sure you observe the following Use only the specified AC adaptor Use only a pow...

Page 7: ...from the power outlet If there are batteries loaded in the printer remove them 4 Contact your original retailer Warning Disassembly and Modification Never try to take this product apart or modify it in any way Doing so creates the risk of electric shock burn injury and other personal injury Leave all internal inspection maintenance and repair up to your original retailer Liquids and Foreign Matter...

Page 8: ... adaptor to the printer using the supplied power cord Do not use the power cord that comes with this product with any other device Doing so can lead to malfunction Caution Batteries Misuse of batteries can cause them to leak resulting in damage to nearby objects or to explode creating the risk of fire and personal injury Always make sure you observe the following precautions Use only batteries tha...

Page 9: ...so creates the risk of finger cuts and personal injury Precautions during Use Observe the following precautions to ensure that the printer provides you with the years of trouble free operation for which it is designed Avoid using the printer in areas exposed to direct sunlight and in areas subjected to high humidity electrostatic charge sudden temperature changes and temperature extremes Operating...

Page 10: ...nting needs take you Software installation and connection to a computer is not required Connecting the printer to a computer to print This method lets you view a print image on your computer screen as you edit the label The final data is printed on the printer Before connecting the printer to a computer you need to install the Label Printing Software FA 3000 onto your computer from the CD that com...

Page 11: ...s 7 Windows Vista Windows XP SP3 Computer Computer that satisfies the conditions below One of the above operating system pre installed CPU recommended for the operating system being used USB port built in as standard CD ROM drive keyboard Memory At least 1 GB as recommended for operating system being used At least 512MB in the case of Windows XP Hard disk At least 120MB of free space available Dis...

Page 12: ...x appears click Yes or Continue This displays a screen like the one shown nearby Windows XP Normally placing the CD ROM into the CD drive should automatically display a screen like the one shown nearby On some computers the nearby screen may not appear automatically If this happens press Win R on your computer keyboard On the Run dialog box that appears enter D setup exe and then click OK 2 Select...

Page 13: ...printer software 4 After printer software installation is complete restart the programs you exited in step 2 of this procedure Check to make sure that the printer software is installed correctly FA 3000 Application Installing this printer software on your computer puts a shortcut icon on your computer s desktop USB driver On your Windows Start menu right click Computer and then select Properties o...

Page 14: ...e compartment OFF With backlight that can be turned on or off as required page 51 AC adaptor connection terminal Recessed handle USB port Battery cover If the tape compartment cover comes off Re attach the cover as shown in the illustration Take care when handling and re attaching the cover Trying to force it into place can break it ...

Page 15: ...e AC adaptor from the printer while printing is in progress Doing so can lead to malfunction Do not disconnect the AC adaptor from the printer while printer power is turned on After turning off power wait until the display goes blank before disconnecting the AC adaptor Otherwise temporarily stored text text stored in printer memory user characters copied text or printer settings may be deleted If ...

Page 16: ...lick Next to proceed with the installation The message READY TO TRANSFER DATA will appear on the printer display after USB driver installation is complete Important To print computer data with the printer first press PC LINK on the printer to display the message READY TO TRANSFER DATA on the printer display For information about how to use the PC Link software refer to the Label Printing Software ...

Page 17: ...C adaptor and when it is connected to a computer Creating Text for Printing There are three ways that you can create text for printing Create new text Select NEW and then select the type of label you want to create Recall existing text Select STORED DATA select RECALL and then select the data you want to recall Recall the text that was being input the last time the printer was turned off last sess...

Page 18: ...e tape is passing through the tape guide Make sure there is no slack in the ink ribbon Tape Pull out about 3cm 1 3 16 Ink ribbon under the tape Tape guide Important Tape once pulled out of the cartridge cannot be pushed back in Do not apply excessive force when pulling on the tape Doing so can break or otherwise damage the ink ribbon Loading the tape cartridge into the printer while the ink ribbon...

Page 19: ...e back in while the tape cartridge is loaded in the printer Removing a Tape Cartridge 1 Press OFF to turn off the printer 2 Press the tape compartment cover open button and open the cover 3 Grasp the left and right sides of the tape cartridge with your fingers and lift straight up The print head is hot immediately after printing so wait until it is cooled down before removing the tape cartridge Ma...

Page 20: ...ect the type of label you want to create and then press SET Here we will select FREE DESIGN Display Indicators For information about how to adjust the display contrast and to change the backlight setting see page 51 Function indicator shift indicator Scroll indicator Upper case lower case indicator Character style indicator Block number indicator SMALL FONT indicator Tape length Vertical text indi...

Page 21: ... label you have created You can specify the number of copies and print multiple labels with a single operation You also can select from among a variety of different tape cutting options Before using the tape cutter be sure to read the information under Cutter Precautions in the Safety Precautions page 7 Note that the tape length displayed by the printer is only a rough approximation Certain usage ...

Page 22: ...t label HAPPY PPY Bending a corner of the label makes the backing easier to peel off Removing a label from a surface where it was affixed may cause adhesive residue to remain on the surface Important Do not try to affix a label to the objects or in the locations described below On a surface exposed to direct sunlight or rain On the body of a person or animal On a utility pole on a fence or structu...

Page 23: ...n printing multiple labels during a single print operation you can configure printer settings that control whether or not there should be an automatic cut between each of them Depending on the type of tape you are printing use of the cutter can cause cutter wear and malfunction The tape types in the table below are special tape Make sure you use FULL CUT or UNCUT whenever printing on special tape ...

Page 24: ...3 4 or less CONT HALF CUT CONT HALF CUT performs a half cut between labels and a full cut when the end of the printing is reached S a l e s S a l e s FULL HALF CUT FULL HALF CUT perform a full cut at the end of each label and a half cut near the beginning of each label to make the backing paper easier to remove S a l e s S a l e s FULL CUT FULL CUT performs a full cut at the end of each label When...

Page 25: ...int Large label page 27 You can print multiple labels and then assemble them into a large multi label sign etc Important You can change the font page 44 and character style page 44 as you like You can also save data you create in printer memory page 40 Creating Labels that Include an Automatically Incremented Number Numbered Label You can use the procedure in this section to create labels with an ...

Page 26: ...T2 text and then press SET 7 Select the numbering style and then press SET 8 Select PRINT and then press SET 9 Specify the number of copies to be printed with consecutive numbers confirm that the start and end numbers are what you want and then press SET You can input a number of copies value from 1 to 100 Direct input of values is also supported 10 Specify a cut mode page 21 and then press SET Th...

Page 27: ...commended Creating an Index Label with Text You Input Enter any text you want to include in your index label You can create and print up to six different index labels at one time 1 On the main menu select NEW and then press SET 2 Select INDEX and then press SET 3 Select the desired print orientation and then press SET 4 Select USER CREATED and then press SET 5 Input text and then press SET This di...

Page 28: ...rm steps 8 through 11 of the procedure on page 25 Canned phrases are printed using the initial power on default font page 51 Index Label Canned Phrase List Category Printed Content Maximum Number of Copies 1 2 3 4 5 6 7 8 9 INDEX A to Z 26 A B C D E F G H I a to z 26 a b c d e f g h i NUMBERS 1 to 99 99 1 2 3 4 5 6 7 8 9 No 1 to No 99 99 No 1 No 2 No 3 No 4 No 5 No 6 No 7 No 8 No 9 1 to 90 10 1 10...

Page 29: ...parts that make up a large label cannot be displayed 6 Specify which of the parts of the label you want to print and then press SET Normally select ALL here 7 Specify a cut mode page 21 and then press SET When printing multiple parts that contain a large amount of text you may not be able to print all of the parts with a single tape cartridge In this case printing one part of a time while keeping ...

Page 30: ...locks and then specify a print format and number of lines for each block Sample Print Block 18mm 3 4 wide tape Block Two lines page 28 Part 4 Free Design Label Creating a Free Design Label with Text You Input 1 On the main menu select NEW and then press SET 2 Select FREE DESIGN and then press SET 3 Input the text you want Refer to page 19 for information about the printing operation Creating a Lab...

Page 31: ...ing text alignment etc You can change the format of each block and for the overall label Specifying the Print Format of Each Block You can specify text direction text alignment and other settings for each block page 28 1 Input text and divide it into blocks 2 Move the cursor to the block whose print format you want to change The cursor can be located anywhere within the block 3 Press FORM If there...

Page 32: ...ct NORMAL to print normal not mirror image text Select mirror image text when printing with an iron on transfer cartridge sold separately for transfer to a handkerchief T shirt etc MIRROR setting is not required when printing to iron on fabric tape sold separately Mirror image text can also be printed with a transparent tape cartridges sold separately and affixed to the back of glass or some other...

Page 33: ...ies the overall label length Note that the label length displayed by the printer is only a rough approximation Certain usage conditions and print contents may result a printed label that does not exactly match the displayed length value Specifying the Length of Each Block Fixed Block Length 1 Input text and divide it into blocks page 28 2 Move the cursor to the block whose length you want to speci...

Page 34: ... check the printout with the Imager in the upper side of the display Specifying the Overall Label Length Fixed Tape Length 1 Input text 2 Press FORM If there is only one block in the label advance to step 4 3 Select ALL FORM and then press SET 4 Use the and arrow keys to display the TAPE LENGTH setting screen 5 Select FIX and then press the arrow key 6 Specify the length of the label and then pres...

Page 35: ...BLOCK LENGTH setting screen 6 Select the desired alignment 7 Use the and arrow keys to display the BLOCK LENGTH setting screen 8 Select FIX and then press the arrow key 9 Specify a value that is greater than the original value and then press SET Direct input of values is also supported When there is more than one line of text you can specify alignment even when AUTO is selected for the BLOCK LENGT...

Page 36: ...cifying Character Size You can use the procedures in this section to manually specify character size If you don t specify character size manually the size is adjusted automatically Just Fit Print Specifying the Size of Specific Characters You can specify the size of specific characters within the range of 1x1 to 5x8 The maximum character size vertical that can be printed depends on the tape width ...

Page 37: ...s the character size to change automatically in accordance with the tape width and the number of lines Note however that if there is a size factor indicator to the left of the one that is deleted the text will change to the size specified by the remaining size factor indicator A character size factor specification affects only the block where it is located Specifying the Character Size for a Speci...

Page 38: ... of the events below will cause a line character size setting to be cancelled automatically Changing the number of lines Specifying the size of specific characters page 34 Small Font Certain number of line number of input lines or the number of lines in a selected format and tape width combinations may cause SMALL FONT to become selected A pointer will appear next to SMALL FONT on the right side o...

Page 39: ... then press SET This starts printing The BOX text effect cannot be used in a framed label The number of lines you can include in a framed label depends on the width of the tape you are using 24mm 1 18mm 3 4 wide 12 mm 1 2 wide 9mm 3 8 wide 6mm 1 4 wide Number of framed label lines Up to 6 Up to 3 Up to 2 1 Part 5 Bar Code Labels Creating a Bar Code Label Bar Code Types You can use your printer and...

Page 40: ...ove a bar code up to 60 characters You should confirm that a printed bar code can be read correctly before actually using it If a bar code cannot be read correctly make the adjustments below Lighten the print density page 51 Increase the size of the print step 6 page 38 Use FULL CUT or UNCUT as the cut mode page 21 The tapes below are suitable for bar code label printing Black lettering on white t...

Page 41: ...ing a check digit with CODE39 or CODABAR the check digit is appended one digit before the final digit 2 UPC E includes a check digit but it is not printed as a numeral below the bar code 3 The number of digits printed below a bar code equals the input characters plus automatically appended characters 4 An error message is displayed whenever there are insufficient digits The printer will not allow ...

Page 42: ...splay To pause preview image scrolling press SET To exit the preview image press ESC 4 Select the language you want to use in the logo then press SET Part 6 Storing and Recalling Label Data Storing Label Data You can use the screen that appears after text input is complete to assign a name to the data and save it in printer memory 1 After you finish inputting text select STORE and then press SET 2...

Page 43: ...abel on an 18mm 3 4 or 24mm 1 wide tape will result in margins above and below the printing Trim away the margins before assembling the parts into a final label Or you can print on transparent tape and overlap the margins of the different tapes without trimming them Part 8 Inputting and Editing Text This section explains basic text input and editing operations It also includes information about ho...

Page 44: ...le page APP 3 1 Press 2 Select the group that contains the symbol you want to use and then press SET 3 Select the symbol you want to use and then press SET Inputting Illustrations The printer has a collection of built in illustrations divided between two groups For information about available illustrations and their groups see the illustrations table page APP 4 Character styles are not applied to ...

Page 45: ... of Characters Free Design Label Only 1 Press FUNCTION and then press 2 Select PART delete part and then press SET To cancel the operation press ESC 3 Move the cursor to the first character of the part you want to delete and then press SET 4 Move the cursor to the last character of the part you want to delete and then press SET Editing Input Text The method for editing text depends on whether you ...

Page 46: ...a range of text 4 Move the cursor to the first character of the text whose font you want to change and then press SET 5 Move the cursor to the last character of the text whose font you want to change and then press SET The font of the text being input is shown in the upper right corner of the display screen You can use SET UP page 51 to specify the printer s initial power on default font When usin...

Page 47: ...text in a box SHADING UNDERLINE BOX CHARACTER BOX TEXT Specifying a Text Effect 1 Input text 2 Press 3 Select the desired text effect type and then press SET Selecting CANCEL removes the currently applied text effect 4 Select the range of text where you want to apply the text effect and then press SET BLOCK Specifies all the text in a particular block LINE Specifies all the text in a particular li...

Page 48: ...tiple text effects are applied press here instead of SET Saving and Recalling Frequently Used Expressions Phrase Memory You can save frequently used terms and expressions in printer memory for later recall when you need them You can store up to 50 entries each with up to 49 characters The printer comes with eight expressions preset You can edit or overwrite the preset expressions if you want 1 Dig...

Page 49: ... the text that you were inputting before you pressed EDIT in step 1 of this procedure will be displayed Edit the text as required and then press SET You cannot configure font character style or print format settings for expressions 5 Select the location where you want to save the expression and then press SET 6 Press SET To cancel the save operation press ESC Precautions when Using Existing Text t...

Page 50: ... the text you want to paste and then press SET Creating a User Character You can create user characters that are not included with the printer s normal character and symbol set You can have up to four user characters stored in printer memory You cannot configure character style settings for a user character You can use either of the two methods below to create a user character From scratch Use thi...

Page 51: ...wing operations to make the cursor jump to one of the edges of the input area FUNCTION left edge FUNCTION right edge FUNCTION top edge FUNCTION bottom edge 5 After creating a user character press SET 6 Select the location where you want to save the user character and then press SET If the location already contains a user character the above step will delete the existing character and replace it wi...

Page 52: ...acter 2 Press USER CHR 3 Select RECALL and then press SET 4 Select the user character you want to use and then press SET You can delete an input user character using the same procedure as that for a standard character Deleting a User Character from Memory 1 Press USER CHR 2 Select DELETE and then press SET 3 Select the user character you want to delete and then press SET 4 Press SET Deleting a use...

Page 53: ...RITE and then press SET Setting Items Setting Item Description DEFAULT FONT Specifies the initial default font setting for input INPUT Specifies the text input mode INSERT or OVERWRITE BACKLIGHT Enables or disables the screen backlight CONTRAST Adjusts display contrast Pressing the arrow key makes screen figures lighter while pressing makes them darker DENSITY Adjusts the density of printed text 1...

Page 54: ...ge LOW BATTERY to appear on the printer display Use the printer in a location within the operating temperature range of 10 C to 35 C 50 F to 95 F Do not disconnect the AC adaptor or remove batteries from the printer while printer power is turned on After turning off power wait until the display goes blank before disconnecting the AC adaptor or removing batteries Otherwise temporarily stored text t...

Page 55: ...handy when you experience problems with printer operation If for any reason you cannot find the solution to your problem here contact your original retailer or authorized CASIO service center Nothing appears on the display when I press ON Display contrast needs to be adjusted Adjust display contrast page 51 The AC adaptor is not connected securely Correctly connect the AC adaptor page 13 Batteries...

Page 56: ...printer page 17 Ink ribbon is coming out of the tape outlet along with the tape The tape cartridge was loaded while there was slack in the ink ribbon Remove the tape cartridge from the printer After checking to make sure the ink ribbon is not broken take up any slack in it After taking up ink ribbon slack load the tape cartridge back into the printer page 16 Important Be sure to always take up any...

Page 57: ...printer has become overheated due to successive print operations Please wait without doing anything Printing will resume when the printer returns to normal temperature ODD NUMBER OF DIGITS There is an odd number of input digits when printing an ITF bar code with NO specified for the check digit Re input with a leading zero page 39 There is an even number of input digits when printing an ITF bar co...

Page 58: ...n 49 characters Reduce the number of characters page 48 TOO MANY LINES TO FRAME You are trying to print a label with more lines than allowed for frame printing on the width of tape you are using Decrease the number of label lines or change to a wider tape TOO MANY LINES The label you are trying to print contains more than the allowable number of lines for the tape width you are using Reduce the nu...

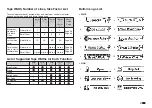
Page 59: ...mal font 1 1 2 4 Page 28 Page 36 Small Font 2 3 5 8 Maximum vertical size factor Normal font 1X 2X 3X 5X Page 34 Total vertical size factor for multiple lines Normal font Up to 2 Up to 4 Page 28 Page 34 Page 36 Small Font Up to 2 Up to 3 Up to 5 Up to 8 List of Supported Tape Widths for Each Function 6mm 1 4 9mm 3 8 12mm 1 2 18mm 3 4 24mm 1 Free Design Frame Index Large Label Bar Code Numbering Lo...

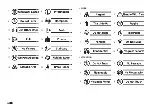
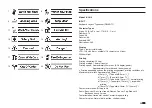
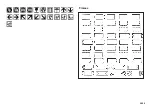
Page 60: ...58 EN 7 8 9 10 11 12 13 14 15 16 17 18 19 20 WORK 1 2 3 4 5 6 7 8 9 10 ATTENTION 1 2 3 4 5 6 ...

Page 61: ...imately 20mm sec AC adaptor power Approximately 10mm second battery power Printing speed depends on the printing environment printing conditions etc Maximum print width Approximately 16mm 5 8 a 4mm 3 16 Tape width 6mm 1 4 b 7mm 1 4 Tape width 9mm 3 8 c 10mm 3 8 Tape width 12mm 1 2 normal printing d 12mm 1 2 Tape width 12mm 1 2 large label printing e 16mm 5 8 Tape width 18mm 3 4 24mm 1 Character fo...

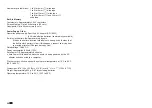
Page 62: ...Approximately 8 years If the date and time inserted into labels are wrong it could mean that the built in clock battery is low If this happens request servicing from your original retailer Charges borne by you Rated voltage 18 8V DC Power consumption 800mA 15W Auto Power Off Approximately 6 minutes Auto Power Off is disabled while the printer is being powered by the AC adaptor and connected to a c...

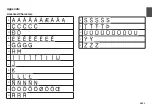
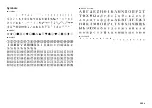
Page 63: ...APP 1 Appendix Accented Characters A C D E G H I J K L N O R S T U Y Z ...

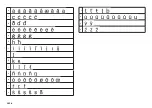
Page 64: ...APP 2 a c d e g h i j k l n o r s t u y z ...

Page 65: ...APP 3 GREEK RUSSIAN SUPER SUB Symbols SYMBOL DINGBAT NUMBER ...

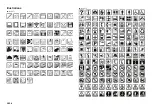
Page 66: ...APP 4 Illustrations ILLUST 1 ILLUST 2 ...

Page 67: ...APP 5 Frames ...

Page 68: ...APP 6 ...

Page 69: ...ufacturer CASIO COMPUTER CO LTD 6 2 Hon machi 1 chome Shibuya ku Tokyo 151 8543 Japan Responsible within the European Union Casio Europe GmbH Casio Platz 1 22848 Norderstedt Germany www casio europe com B ...

Page 70: ...CASIO COMPUTER CO LTD 6 2 Hon machi 1 chome Shibuya ku Tokyo 151 8543 Japan MO1504 B Printed in China Imprimé en Chine 2015 CASIO COMPUTER CO LTD ...

Reviews: