background image

278A-E-105A

MA-170_ESF_APPENDIX.p65

03.10.8, 0:39 PM

7

Summary of Contents for MA-170

Page 1: ...MA170 ESF 1 ESF USER S GUIDE GUÍA DEL USUARIO MODE D EMPLOI MA 170_ESF_cover1 p65 03 10 8 0 39 PM 1 ...

Page 2: ... WARNING Changes or modifications not expressly approved by the party responsible for compliance could void the user s authority to operate the equipment Important Information for Parents Parents should please note the following important information before letting children use this product Before using the optional AD 5 Adaptor to power the unit be sure to check the AC Adaptor for any damage firs...

Page 3: ...rious injury if the product is operated incorrectly while ignoring this indication CAUTION This indication stipulates matters that have the risk of causing injury as well as matters for which there is the likelihood of occurrence of physical damage only if the product is operated incorrectly while ignoring this indication Symbol Examples This triangle symbol means that the user should be careful T...

Page 4: ...e only the AC adaptor that is specified for this product Use only a power source whose voltage is within the rating marked on the AC adaptor Do not overload electrical outlets and extension cords AC Adaptor Misuse of the AC adaptor s electric cord can damage or break it creating the risk of fire and electric shock Always make sure you observe the following precautions Never place heavy objects on ...

Page 5: ...tely 1 Turn off power 2 If you are using the AC adaptor for power unplug it from the wall outlet 3 Contact your original retailer or an authorized CASIO Service Provider Disassembly and Modification Never try to take this product apart or modify it in any way Doing so creates the risk of electric shock burn injury or other personal injury Leave all internal inspection adjustment and maintenance up...

Page 6: ...AC Adaptor Misuse of the AC adaptor creates the risk of fire and electric shock Always make sure you observe the following precautions Insert the AC adaptor into the wall outlet as far as it will go Unplug the AC adaptor from the wall outlet during lightening storms or before leaving on a trip or other long term absence At least once a year unplug the AC adaptor from the wall outlet and wipe away ...

Page 7: ...f a vehicle parked in the sun or any other area that subjects the product to high temperatures Display Screen Never push on the display screen s LCD panel or subject it to strong impact Doing so can cause the LCD panel s glass to crack creating the risk of personal injury Should the LCD panel ever crack or break never touch the liquid inside of the panel LCD panel liquid can cause skin irritation ...

Page 8: ...istortion of sound output Occasional interruption of sound when playing at high volume Sudden power failure when playing at high volume Flickering or dimming of the display when playing at high volume Continued sound output even after you release a key A tone that is totally different from the one that is selected Abnormal rhythm pattern and Song Bank play Distortion of microphone input Sudden pow...

Page 9: ... a Rhythm E 18 Using Auto Accompaniment E 18 Using Synchro Start E 21 Inserting a Rhythm Fill in E 21 Using One Touch Preset E 21 Adjusting Accompaniment Volume E 21 Playing Song Bank Tunes E 22 Selecting a Song Bank Tune E 22 Using Song Bank Tunes for Practice 3 Step Lesson E 23 Using Step 1 E 23 Using Steps 2 and 3 E 24 Other Functions E 25 Turning on the Metronome E 25 Using Sustain E 25 Percus...

Page 10: ...E 8 General Guide 278A E 010A K K L M S R T U V W X O N Q P D E F G H J I 1 2 3 5 6 7 8 9 0 A B C 4 Rear Panel MA 170_E08_16 p65 03 10 8 0 39 PM 8 ...

Page 11: ...ument list R MIC IN jack S MIDI OUT terminal T PHONES OUTPUT jack U DC 9V jack V Micropone W Micropone holder X Micropone holder base 5 6 7 8 4 1 2 3 About the Display 1 NORMAL 2 CASIO CHORD 3 FINGERED 4 SUSTAIN 5 ONE TOUCH PRESET 6 STEP 1 7 STEP 2 8 STEP 3 NOTE The tone list rhythm list and Song Bank list do not show all of the tones rhythms and songs that are available See the Appendix at the ba...

Page 12: ...ten battery life Any of the following symptoms indicate low battery power Replace batteries as soon as possible whenever any of the following occurs Instrument does not turn on Display that is flickering dim or difficult to read Abnormally low speaker headphone volume Distortion of sound output Occasional interruption of sound when playing at high volume Sudden power failure when playing at high v...

Page 13: ...ur original retailer or an authorized CASIO Service Provider Never touch the AC adaptor while your hands are wet Doing so creates the risk of electric shock Use the AC adaptor where it will not be splashed with water Water creates the risk of fire and electric shock Do not place a vase or any other container filled with liquid on top of the AC adaptor Water creates the risk of fire and electric sh...

Page 14: ...similar terminal of audio amplifier White Red PIN plug Stereo mini plug Audio connection PHONES OUTPUT Terminal Keyboard amp guitar amp etc Musical Instrument Amplifier Figure 3 Use a commercially available connecting cord to connect the keyboard to a musical instrument amplifier Be sure to use a connecting cord that has a stereo mini plug on the end you connect to the keyboard and a connector tha...

Page 15: ...ow try playing something on the keyboard NOTE Note Names A value next to a note name indicates the relative position of the note on the keyboard as shown below C D E F G A B H C C2 C3 C4 C5 C6 Playing the Demo Tunes 1 Press the DEMO button This starts playback of the demo tunes in sequence starting from the currently selected tune Press the DEMO button again to stop demo tune play NOTE The length ...

Page 16: ... are pointing at each other When affixing the base make sure that you do not cover any of the lettering on the console Do not touch the base for about 30 to 60 minutes after affixing it to the console Doing so can cause the base to come off 4 After waiting for about 30 to 60 minutes align the tab of the holder with the microphone slot of the base and insert the holder into the base Microphone Micr...

Page 17: ...s shown in the illustration Make sure that the microphone is not pointed towards the speaker when it is mounted on the holder NOTE Use only the microphone that comes with this keyboard Never try to connect any other type of microphone The microphone is intended for use exclusively with the MA 170 keyboard Never try to use it with any other device To detach To attach 278A E 017A Using the Microphon...

Page 18: ...not using it The length and key of a built in tune may be different from the original tune as it was written Microphone volume is fixed You cannot adjust it Use only the microphone that comes with this keyboard Never try to connect any other type of microphone The microphone is intended for use exclusively with the MA 170 keyboard Never try to use it with any other device Howling Feedback Noise An...

Page 19: ...OTE The tone list rhythm list and Song Bank list do not show all of the tones rhythms and songs that are available See the Appendix at the back of this manual for complete lists The initial power on default tone setting is 00 GRAND PIANO This keyboard has 8 note polyphony which means it can play up to eight notes at the same time When tone 49 PERCUSSION is selected keyboard keys are assigned the p...

Page 20: ...k of this manual for complete lists Initial Default Tempo Settings The following are the rules that govern the initial default tempo settings of built in rhythms Each rhythm has an initial default tempo setting that best matches the rhythm Changing the selected rhythm while rhythm play is stopped automatically changes the tempo setting to initial default for the newly selected rhythm Changing the ...

Page 21: ...ajor chord key depressed and press any other three a c c o m p a n i m e n t keyboard keys located to the right of the major chord key C D F E G A B C F D F E C D F E G A B C F D F E C D F E G A B C F D F E C D F E G A B C F D F E 3 Try playing a chord on the auto accompaniment keyboard The way you play chords depends on the auto accompaniment mode you select in step 1 above For details see CASIO ...

Page 22: ...g Except for the exception specified in note 2 and note 3 above all of the keys that make up a chord must be pressed Failure to press even a single key will not play the desired FINGERED chord NOTE It makes no difference whether you press black or white keys to the right of a major chord key when playing minor and seventh chords FINGERED FINGERED provides you with a total of 12 different chord typ...

Page 23: ...ss to raise the volume and to lower it The ACC accompaniment volume value on the display indicates the current accompaniment volume level You can set the accompaniment volume to one of 11 levels from 0 to 10 Using Synchro Start When synchro start is turned on rhythm play starts from the point when you play something on the keyboard PREPARATION Select a rhythm and set its tempo Select the accompani...

Page 24: ... the number buttons to input its two digit number You can also use the higher and lower buttons to change the displayed tune number 3 Press the START STOP button to start Song Bank tune play The image of a music staff appears in the center of the display indicating the notes as they are played The graphic keyboard along the bottom of the display indicates the keyboard keys as they are played A bla...

Page 25: ...you need to press The on screen graphic keyboard and staff display show the notes and the keys you need to press to play them You can play at your own pace even if it is very slow Both the on screen indicators and the accompaniment wait until you play the correct note Step 3 In this step you play along at regular speed The on screen guide indicators and accompaniment change at normal speed without...

Page 26: ...his example At this point you could start a Step 2 practice session if you want 5 To turn off 3 Step Lesson press the 3 STEP LESSON button to cycle through the steps until there is no indicator in the 3 Step Lesson indicator area Using Steps 2 and 3 In step 1 of the above procedure use the 3 STEP LESSON button cycle through the steps until the Step 2 or Step 3 indicator is displayed In Step 2 you ...

Page 27: ...You can select one of nine meter settings 00 and 02 through 09 Using Sustain Turning on sustain causes notes you play to linger after you release the keyboard keys 1 Press the SUSTAIN button Each press of the SUSTAIN button toggles sustain on and off The SUSTAIN indicator on the display indicates that sustain is turned on 2 Press the SUSTAIN button again to turn off sustain indicated when there is...

Page 28: ...s C3 through D5 in the center of the keyboard that are marked with images of percussion instruments and find the sound you want to assign to a pad 3 While pressing down on the percussion pad to which you want to assign the sound press the white key you selected in step 2 4 Tap the percussion pad with your finger to hear the sound assigned to it Transpose The initial power on default setting is mid...

Page 29: ...onnect the keyboard to the computer s MIDI interface 3 Turn on the keyboard and your computer Use the VOLUME buttons to set the main volume to a relatively low level Start up the MIDI software on your computer 4 Select the keyboard s MIDI channel Each press of the MIDI button increments the MIDI channel setting The current setting is shown on the display You can select a MIDI channel in the range ...

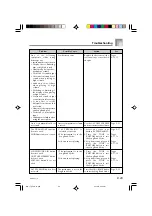
Page 30: ...rned off 1 Correctly attach the AC adaptor make sure that batteries poles are facing correctly and check to make sure that batteries are not dead 2 Press the VOLUME button 3 Unplug the headphones from the PHONES OUTPUT jack 4 Change to the NORMAL accompaniment mode 5 Only keyboard keys in the range of C3 through D5 the ones marked with percussion instrument illustrations produce sounds while 49 PE...

Page 31: ... 3 STEP LESSON button does not work Low battery power Auto accompaniment volume is set to 0 1 49 PERCUSSION is selected as the tone 2 The instrument is in the Song Bank Mode 3 A demo tune is playing 1 The instrument is in the Song Bank Mode 2 A demo tune is playing The instrument is not in the Song Bank Mode Replace the batteries with a set of new ones or use the AC adaptor Use the ACCOMP VOLUME b...

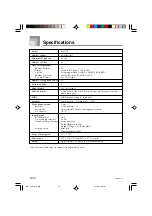
Page 32: ...Demo tunes play MIDI MIDI channel setting 01 through 16 Speakers 8 cm diameter 2 Output 3W ѿ 3W Power Requirements 2 way Batteries C size batteries 6 Battery life Approximately 5 hours on manganese batteries AC adaptor AD 5 Input Output MIDI Terminal OUT Power Supply terminal 9V DC Headphone Output Terminal Stereo mini jack Output Impedance 30Ω Output Voltage 6 0V RMS MAX Microphone In Mini jack I...

Page 33: ...oard with a soft cloth dampened in a weak solution of water and a neutral detergent Soak the cloth in the solution and squeeze until it is almost dry Avoid use in areas subjected to temperature extremes Extreme heat can cause figures on the LCD screen to become dim and difficult to read This condition should correct itself when the keyboard is brought back to normal temperature NOTE You may notice...

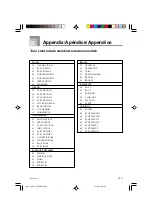
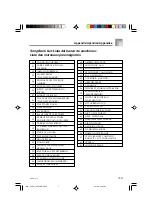
Page 34: ... 2 49 PERCUSSION PIANO 00 GRAND PIANO 01 ELEC PIANO 1 02 ELEC PIANO 2 03 HARPSICHORD 1 04 HARPSICHORD 2 05 VIBRAPHONE 06 MARIMBA ORGAN 07 ELEC ORGAN 1 08 ELEC ORGAN 2 09 ELEC ORGAN 3 10 ELEC ORGAN 4 11 CHURCH ORGAN 12 REED ORGAN 13 ACCORDION 14 HARMONICA GUITAR BASS 15 NYLON STR GT 16 STEEL STR GT 17 CLEAN GUITAR 18 DIST GUITAR 19 ELEC GUITAR 1 20 ELEC GUITAR 2 21 ACOUSTIC BASS 22 FINGERED BASS 23...

Page 35: ...OUL ROCK JAZZ 09 ROCK 1 10 ROCK 2 11 8 BEAT 12 R B 13 BLUES 14 SLOW ROCK 15 SHUFFLE ROCK 16 SHUFFLE BOOGIE 17 ROCK 3 18 SWING 19 JAZZ WALTZ 20 BIG BAND LATIN VARIOUS 21 CHA CHA CHA 22 BOSSA NOVA 1 23 BOSSA NOVA 2 24 RHUMBA 25 BEGUINE 26 TANGO 27 COUNTRY 28 WALTZ 29 MARCH Appendix Apéndice Appendice 278A E 100A MA 170_ESF_APPENDIX p65 03 10 8 0 39 PM 2 ...

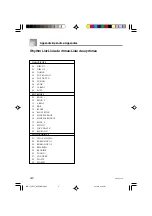
Page 36: ...IBBON 22 THE OLD GRAY MARE 23 SCENE FROM SWAN LAKE 24 HEIDENRÖSLEIN SCHUBERT 25 MINUET J KRIEGER Song Bank List Lista del banco de canciones Liste des morceaux préenregistrés 26 AMERICAN PATROL 27 LONG LONG AGO 28 SANTA LUCIA 29 FRÖHLICHER LANDMANN 30 LA CUCARACHA 31 AVE MARIA GOUNOD 32 GREENSLEEVES 33 ALOHA OE 34 TWINKLE TWINKLE LITTLE STAR 35 FRÜHLINGSLIED MENDELSSOHN 36 WHEN THE SAINTS GO MARCH...

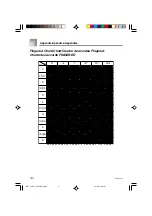
Page 37: ...Apéndice Appendice 278A E 102A Fingered Chord Chart Cuadro de acordes Fingered Charte des accords FINGERED dim M7 M m 7 m7 Chord Type Root C D E F G A B C D D E F G G A A B MA 170_ESF_APPENDIX p65 03 10 8 0 39 PM 4 ...

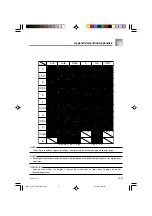
Page 38: ...e fingerings to finger chords within the accompaniment keyboard range NOTA Para digitar los acordes dentro de la gama del teclado de acompañamiento puede usar las digitaciones anteriores REMARQUE Vous pouvez utiliser les doigtés ci dessus pour jouer des accords dans la plage du clavier d accompagnement MA 170_ESF_APPENDIX p65 03 10 8 0 39 PM 5 ...

Page 39: ... 278A E 104A MA 170_ESF_APPENDIX p65 03 10 8 0 39 PM 6 ...

Page 40: ... 278A E 105A MA 170_ESF_APPENDIX p65 03 10 8 0 39 PM 7 ...

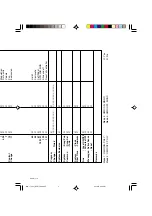
Page 41: ...y s Ch s 1 6 38 7 10 11 64 66 67 100 101 120 1 1 16 Mode 3 X 36 84 O 9nH v 64 X 9nH v 0 X X X X X X X X X X X X X X X X X X X X X X X X X X X X X X X X Modulation Data entry Volume Pan Expression Hold1 Sostenuto Soft Pedal RPN LSB MSB All sound off Transmitted Recognized Remarks MIDI Implementation Chart Version 1 0 Model MA 170 MA 170_esf_MIDI Chart p65 03 10 8 0 39 PM 2 ...

Page 42: ...nse Reset 1 6 38 7 10 11 64 66 67 100 101 120 121 X X X X X X X X X X X X X X X X X X X O X X X X X X X X X X X X X X X X X X X X X X X X Modulation Data entry Volume Pan Expression Hold1 Sostenuto Soft Pedal RPN LSB MSB All sound off Reset all controller Mode 1 OMNI ON POLY Mode 3 OMNI OFF POLY Mode 2 OMNI ON MONO Mode 4 OMNI OFF MONO O Yes X No MA 170_esf_MIDI Chart p65 03 10 8 0 39 PM 3 ...

Page 43: ...tado se ajusta a la legislación de protección ambiental en Alemania Ce sigle signifie que l emballage est conforme à la législation allemande en matière de protection de l environnement CASIO COMPUTER CO LTD 6 2 Hon machi 1 chome Shibuya ku Tokyo 151 8543 Japan MA0307 A Printed in China Imprimé en Chine MA170 ESF 1 O MA 170_ESF_cover4 p65 03 10 8 0 39 PM 1 ...

Reviews: