background image

— 6 —

Following the all reset operation, the NX Unit settings are initialized as noted below.

Home Time:

Washington, D.C.
JAN/1/1996 MON
12:00 AM
12-hour format

World Time:

New York

Daily Alarm:

12:00 PM

Sound:

Schedule alarm, Reminder alarm and To Do alarm — ON
Daily alarm — OFF
Key input tone — ON

Input mode:

Overwrite

TO SAVE THE DATA TO ANOTHER UNIT

NX-4000/6000 can transfer customer's data to another NX-4000/6000 with memory protection only when
replacing the LCD or the outer case.

How to transfer the data

1) Make sure that the power of both units is switched off.

2) Remove the covers from the data communications jacks on the two NX units.

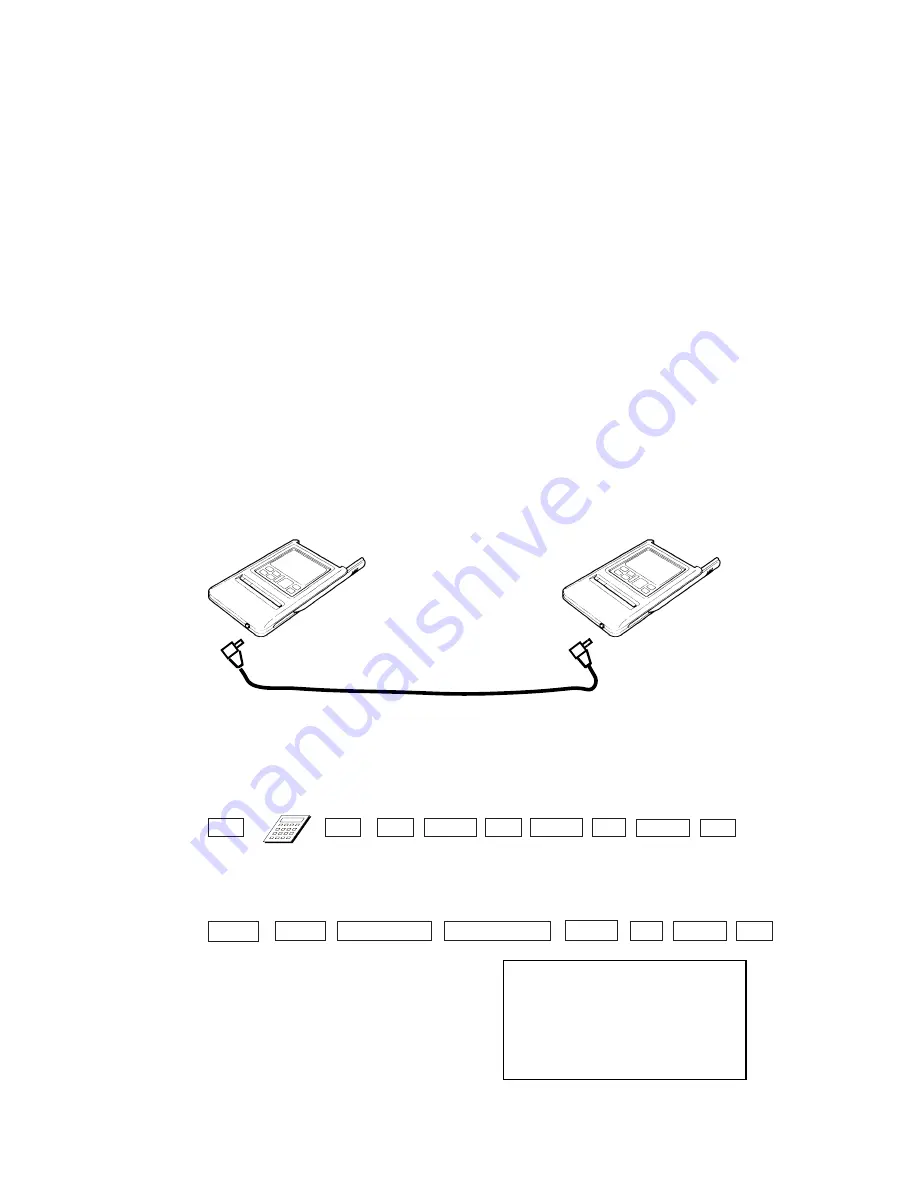
3) Connect the two units using the SB-62 cable as shown in the figure below.

4) Turn the power switch of slave units on.

5) Reset the slave unit.

6) The slave unit must be set the date of Feb. 3rd, 1901 into the memory under the calculator mode.

Operation :   ON

              AC         1       DATE       2       DATE       3       DATE      M+

If you don't set the date, the "PASSWORD" isn't transferred to the slave unit.

7) Check the hardware parameters, and if the both units have another condition, reset as follows;

Operation :  MENU      FUNC     DATA COM.      SET UP PAR.      NONE       7        9600       OK

SB-62 cable

 PARITY

    EVEN  ODD  

NONE

 BIT LENGT


7

        8

 BPS

                4800 /

  9600

   ////////////  SET UP PAR. ////////////

Summary of Contents for NX-4000

Page 1: ...NX 4000 6000 R without price SEP 1995 INDEX ...

Page 2: ...ENT 4 REPLACING THE BACK UP BATTERY 4 RESET OPERATION 5 TO SAVE THE DATA TO ANOTHER UNIT 6 BLOCK DIAGRAM 8 TOUCH PANEL CIRCUIT 9 PIN FUNCTION 10 DIAGNOSTIC PROGRAM 11 MESSAGE TABLE 15 SCHEMATIC DIAGRAMS 17 PARTS LIST 21 EXPLODED VIEW 24 CONTENTS ...

Page 3: ...anager Reminder and Schedule Keeper are at your fingertips throughout the day Secret Drawer A convenient place to lock up confidential information using a secret password Calendar Schedule Keeper Reminder To Do linking Reminder and To Do items are automatically displayed in the applicable Schedule Keeper dates Markers appear on the Calender display to indicate dates for which Schedule Keeper Remin...

Page 4: ...sonal name 10 character telephone number 10 character position 10 character department 20 character address Memo Approximately 10 600 4 900 20 character memos Sketch Approximately 160 80 The number of sketch pages that can be stored varies greatly according to the amount of data included on each sketch page To Do Approximately 6 100 2 800 under the following conditions 20 character description Ill...

Page 5: ...ephone Directory approximately 200 hours on type LR03 AM4 approximately 85 hours repeating one minute of input and 10 minutes of display in Telephone Directory approximately 150 hours on type LR03 AM4 Back up 5 years if main batteries are replaced as soon as they becomes weak 2 year if dead main batteries are left in the unit Power consumption 0 1 W Auto power off Approximately 6 minutes after las...

Page 6: ...place the battery compartment cover 8 Turn on power The Home Time screen always appears whenever you turn power on for the first time after replacing main batteries 9 Check the Home Time setting and make changes if necessary REPLACING THE BACK UP BATTERY Before replacing the back up battery note the following precautions Do not remove the back up battery from the NX Unit while the main batteries a...

Page 7: ...inted object At this time the touch panel screen appears 4 Tap the tip of the pencil icon as each one appears When you tap the fourth pencil icon the RESET screen appears Warning The next step deletes all data stored in the NX Unit s memory Make sure that you really want to delete the data before you continue 5 Tap ALL RESET Note The message ALL RESET OK ESC always appears in English regardless of...

Page 8: ...Make sure that the power of both units is switched off 2 Remove the covers from the data communications jacks on the two NX units 3 Connect the two units using the SB 62 cable as shown in the figure below 4 Turn the power switch of slave units on 5 Reset the slave unit 6 The slave unit must be set the date of Feb 3rd 1901 into the memory under the calculator mode Operation ON AC 1 DATE 2 DATE 3 DA...

Page 9: ... data again according to the above procedure 9 Set up the customer s unit Turn the power switch off Press the RESET button with a thin pointed object while shorting the following pad Note Be careful not to reset the customer s unit If DIGITIZER is displayed turn the power switch off immediately and try again 10 Start the data communication slave unit Operation OK BOTTOM VIEW Short the pad Enlarge ...

Page 10: ...19A03 Forced off 2 3V Main battery Low battery 2 5V Back uo battery Low battery 2 6V Detector IC7 Detector IC6 Detector IC8 Communication Jack AD converter TC35093 TC74LCX240 TXR TXL TYU TYD Touch Panel LCD ROM MB834000CPF G 4EP RAM CXK581000AM ...

Page 11: ...cting change volume of current which flowed through panel by pushing panel Circuit Operation TXL and TYU of drive signals are sent through LS240 from CPU by X1 Y1 of touch panel when turn on power supply And TXR TYD signals are output through LS240 from touch panel to AIN terminal of A D converter TC35093 and convert the analog value into digital value and TC35093 outputs digital data DB0 DB7 of 8...

Page 12: ...8 CS7BO Check pad 49 CS6BO O Chip select signal 50 CSB5O O Chip select signal 51 CS4BO O Chip select signal 52 59 IO7 0 I O Data bus 60 61 OPT3 2 Check pad 62 OPT1 O Chip select signal 63 OPT0 Check pad 64 71 PORT7 0 I O I O port 72 VSS I GND 73 PI I Ceramic oscillation input 74 PO O Ceramic oscillation output 75 VLC Power terminal 76 XO O Crystal oscillation output 77 XI I Crystal oscillation inp...

Page 13: ...y Tap anywhere Orange color is displayed Tap anywhere Green color is displayed Tap anywhere Blue color is displayed Tap anywhere Checkers are displayed Tap anywhere Reverse checkers are displayed Tap anywhere Frame is displayed Tap anywhere Dots at the 4 corners are displayed Tap anywhere Vertical 4 colors are displayed Tap anywhere Horizontal 4 colors are displayed Tap anywhere TEST MENU 1 DISPLA...

Page 14: ...NX 6000 256kB Tap anywhere MEMORY 1 WRITE 1 2 READ 1 3 WRITE 2 4 READ 2 5 DUMP CHKSUM OS SUM XXXX Wiring check for ROM Memory Check Tap anywhere MEMORY 1 WRITE 1 2 READ 1 3 WRITE 2 4 READ 2 6 CHKSUM CHECK SUM TYPE CS5 SIZE 1024kB SUM XXXX EXOR XX Check SUM value Tap anywhere MEMORY 1 WRITE 1 2 READ 1 3 WRITE 2 4 READ 2 ESC TEST MENU 1 DISPLAY 2 MEMORY 3 TIME 4 BUZZER Time Check 3 TIME TIME 00 00 0...

Page 15: ... H 2 RECEIVE No display Display the received charactor 3 ASCII EXECUTING Send the ASCII code 4 LOOP EXECUTING Loop back check ESC I F 1 TRANS 7 2 RECEIVE N 3 ASCII 9 4 LOOP CONTRAST ADJ 6 CONTRAST TEST MENU 1 DISPLAY 2 MEMORY 3 TIME 4 BUZZER Contrast up Tap Contrast down Tap CONTRAST ORG BLU GRN Contrast adjustment Color up Tap Color down Tap CONTRAST ORG BLU GRN Adjust the color using cursor keys...

Page 16: ...ce the horizontal black line and then vertical black line ESC OK ESC touch TEST 1 ADJUST 2 TEST ESC TEST MENU 1 DISPLAY 2 MEMORY 3 TIME 4 BUZZER Reset 8 RESET MAIN MENU DIGITIZER TAP THE TIP OF THE PENCIL ICON DIGITIZER TAP THE TIP OF THE PENCIL ICON 5 I F 6 CONTRAST 7 TOUCH 8 RESET CONTRAST ADJUSTMENT 1 Enter the diagnostic program and tap 6 CONTRAST 2 Look the LCD from heading 3 Adjust the volum...

Page 17: ...g a password that does not match the one preset for the secret area Error during data communications Data communication has been inter rupted This message appears when this is the first time you ever turned on the NX Unit Data corrupted by strong impact electrostatic charge etc Action Change specification or cancel search Delete unnecessary data items from memory Set a different alarm time or chan...

Page 18: ... 17 SCHEMATIC DIAGRAMS Z850 1 PCB ASS Y MAIN BLOCK ...

Page 19: ... 18 Z850 1 PCB ASS Y A D BLOCK ...

Page 20: ... 19 Z850 1 PCB ASS Y DISPLAY BLOCK ...

Page 21: ... 20 Z850 1 PCB ASS Y MEMORY BLOCK ...

Page 22: ... 2105 5005 CMOS IC HD74HC04T EL 1 1 1 1 10 B N IC88 9 12 2114 4676 CMOS IC TC7W04FU TE12L 3 3 3 3 5 B IC89 2105 1827 CMOS IC TC7S02F TE85R 1 1 1 1 10 B J1 3501 6538 Mini jack HSJ1169 012010 1 1 1 1 5 C LSI2 6413 5320 COF3011 F1 sub ass y A340214 1 1 1 1 1 1 A N LSI3 4 2012 1659 LSI TC551001BFL 10V S 1 2 1 2 1 A N LSI5 2012 2380 LSI uPD27C4001GW 73202 1 1 1 1 1 A Q5 2254 0287 FET 2SK1133 T1B 1 1 1 ...

Page 23: ...CR03EZHJ823 5 5 5 5 R72 73 R84 R50 Chip resistor MCR03EZHJ184 1 1 1 1 R85 21 Chip resistor MCR03EZHJ000 3 2 3 2 32 R86 Chip resistor MCR03EZHJ300 1 1 1 1 R87 Chip resistor MCR03EZHJ104 1 1 1 1 R90 Chip resistor MCR03EZHJ333 1 1 1 1 COMPONENT N 1 6416 5860 Label Z850 C440972 1 1 1 1 1 20 X N 2 6415 9620 Hard cover Z853AE C140155 6 1 0 1 0 1 C N 2 6416 0990 Hard cover Z853EE C140155 8 0 1 0 1 1 C N ...

Page 24: ...5 8610 Battery plate M Z850AH C440623 1 1 1 1 1 20 C N 22 6415 9380 Battery cover Z853AE C340427 4 1 0 1 0 5 C N 22 6416 0940 Battery cover Z854EE C340427 5 0 1 0 1 5 C N 23 6416 0900 Touch panel ass y C340445 3 C 0 1 0 1 1 B N 23 6415 9320 Touch panel ass y C340445 2 C 1 0 1 0 1 B N 24 6415 8560 Tape S Z850AH C440618 1 2 2 2 2 20 X N 25 5610 8850 Heat seal S Z850AH C340412 1 1 1 1 1 10 B N 26 333...

Page 25: ... 24 EXPLODED VIEW 3 23 25 26 27 32 31 30 29 28 33 22 21 20 19 18 17 16 15 35 34 14 13 12 11 10 7 6 5 4 2 1 9 8 24 ...

Page 26: ...8 11 10 Nishi Shinjuku Shinjuku ku Tokyo 160 Japan Telephone 03 3347 4926 ...

Reviews: