background image

32

The operations described below can be password protected on the projector. You can have only one 
password assigned to the projector at any time, and the same password is used for operations.

z

Projector startup protection

The projector can be configured so a dialog box prompting input of the password is displayed 
whenever the projector is turned on. In this case, further operation of the projector is not possible 
unless the correct password is input. This protects against unauthorized use of the projector.

z

Custom logo capture protection

The projector can be configured so a dialog box prompting input of the password is displayed 
whenever someone attempts to perform the custom logo capture (page 30) operation. This protects 
against inadvertent and unauthorized changing of the custom logo.

Use the “Power On Password” and “Logo Password” settings to turn password protection for the 
above operations on or off individually.

Inputting a Password

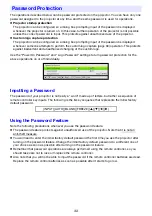
The password of your projector is not really a “word” made up of letters, but rather a sequence of 
remote controller key inputs. The following is the 8-key sequence that represents the initial factory 
default password.

Using the Password Feature

Note the following precautions whenever you use the password feature.

z

The password feature protects against unauthorized use of the projector. Note that it is not an 
anti-theft measure.

z

You will need to enter the initial factory default password the first time you use the projector after 
turning on the password feature. Change the initial factory default password to a different one of 
your choice as soon as possible after turning on the password feature.

z

Remember that password operations are always performed using the remote controller, so you 
should take care not to lose or misplace the remote controller.

z

Also note that you will not be able to input the password if the remote controller batteries are dead. 
Replace the remote control batteries as soon as possible after it starts to go low.

Password Protection

[INPUT] [AUTO] [BLANK] [FREEZE] [

S

] [

T

] [

W

] [

X

]

Summary of Contents for PRO LINE XJ-H2650

Page 1: ...ick Start Guide that comes with the Data Projector z Be sure to keep all user documentation handy for future reference z To obtain the latest version of this manual visit the website at the URL below http world casio com manual projector XJ H2600 XJ H2650 USB Port Models E ...

Page 2: ...or trademarks of their respective owners z Portions of this product are based in part on the work of the Independent JPEG Group z The contents of this User s Guide are subject to change without notice z Copying of this manual either in part or its entirety is forbidden You are allowed to use this manual for your own personal use Any other use is forbidden without the permission of CASIO COMPUTER C...

Page 3: ...ing to a Video Device 14 Connection to a composite video output or S video output 14 Connection to a component video output 15 Operation During Projection 16 Selecting the Input Source 16 To select a different input source 16 Resolution 16 3D Input Mode 17 Horizontal Flipping in the 3D Input Mode 18 Image Operations During Projection 19 Adjusting Image Brightness 19 To use manual keystone correcti...

Page 4: ...Using the Password Feature 32 Control Panel Lock 35 Restoring Projector Settings to Their Initial Factory Defaults 36 Setup Menu Contents 38 Image Adjustment 1 Main Menu 38 Image Adjustment 2 Main Menu 40 Volume Adjustment Main Menu 40 Screen Settings Main Menu 41 Input Settings Main Menu 43 Option Settings 1 Main Menu 44 Option Settings 2 Main Menu 46 Wired LAN Settings Main Menu USB Port Models ...

Page 5: ...n Size 59 Aspect Ratio Setting and Projection Image 60 Supported Signals 62 Using Wired LAN to Control the Projector XJ H1650 XJ H1750 XJ H2650 XJ ST145 XJ ST155 65 Supported External Devices 65 Controlling the Projector from a Computer 65 Projector RS 232C Control 70 Connecting the Projector to a Computer 70 Specifications 73 All of the operations in this manual are explained using the remote con...

Page 6: ...of a 3D image signal 60Hz 120Hz field sequential protocol via one of three input sources analog RGB composite video S video is supported z Pointer The remote controller can be used to select one of a variety of different pointers for use during projection z Direct Power On The projector can be configured to turn on automatically and start projecting as soon as it is plugged into a power outlet XJ ...

Page 7: ...r images Document camera capabilities allow projection of data without going through a computer z Graphic Scientific Function Calculator Connection 1 Certain CASIO graphic scientific calculator models can be connected directly to the projector s USB A port for projection of the calculator screen contents z Projection of Computer Screen Contents via Wireless LAN 2 The projector comes with a wireles...

Page 8: ...or Keys and Indicators Note You can configure the projector so operations of its keys are disabled and only remote controller operations are valid This helps to protect against accidental mis operation For details see Control Panel Lock page 35 Remote Controller and Projector Keys Remote control signal emitter CLASS 1 LED PRODUCT Cursor keys S T W X ENTER key STYLE key D ZOOM D ZOOM keys KEYSTONE ...

Page 9: ...inal bn AUDIO IN 2 terminal bo AUDIO IN L R terminals bp VIDEO terminal bq S VIDEO terminal br USB B port 2 XJ H1650 XJ H1750 XJ H2650 XJ ST145 XJ ST155 only Back Terminals 1 This terminal is for controlling the projector from an external device It normally is not used For information about using control commands and other details See Projector RS 232C Control page 70 2 This port is for USB connec...

Page 10: ...rojector can be configured for projection from the back of a screen For details see Projection Mode page 42 under Screen Settings Main Menu Loading Remote Controller Batteries Caution RISK OF EXPLOSION IF BATTERY IS REPLACED BY AN INCORRECT TYPE DISPOSE OF USED BATTERIES ACCORDING TO THE INSTRUCTIONS 1 Open the battery cover on the back of the remote controller 2 Load two new batteries into the ca...

Page 11: ... obstacles and other objects at least 30cm away from the projector s vents z Airflow from air conditioning equipment can blow the heat being exhausted from the area around the projector s lens in a way that causes heat ripples to appear in the projected image If this happens adjust the airflow of the air conditioning equipment or move the projector Setup Precautions Intake exhaust vents Intake exh...

Page 12: ...ctor and the computer before connecting them z Take care so the volume level of the computer is not set too high Connecting the Analog RGB Output of a Computer to the Projector Projector Computer Bundled mini D Sub cable Audio cable commercially available AUDIO IN 2 terminal To monitor terminal analog RGB output terminal COMPUTER IN 1 terminal To line output terminal AUDIO IN 1 terminal COMPUTER I...

Page 13: ...that matches the terminal of the output device on one end and a connector that matches the projector s HDMI port HDMI Type A Socket on the other end z For information about HDMI video signal supported by the projector see page 64 z The projector supports L PCM 32kHz 44 1kHz and 48kHz HDMI audio signals Connecting the HDMI Output of a Video Device or Computer to the Projector Projector HDMI port To...

Page 14: ...gardless of whether the image being projected is being input via the projector s S VIDEO terminal or VIDEO terminal the projector outputs audio that is input via the projector s AUDIO IN L R terminals Connecting to a Video Device To S video output terminal To video audio output terminal Yellow To VIDEO terminal To S VIDEO terminal Red To AUDIO IN R terminal White To AUDIO IN L terminal Projector V...

Page 15: ...d Cr Pr z Note that connection only to an analog component video output terminal is supported Connection to a digital output terminal is not supported Projector AUDIO IN 1 terminal COMPUTER IN 1 terminal Stereo mini plug Ù Pin plug type audio cable commercially available Component video cable commercially available To component video output terminals To audio output terminals Video device Red Whit...

Page 16: ... will be fixed at XGA 1024 768 pixels or WXGA 1280 800 pixels Images may appear coarse text and other figures may be difficult to read or a moire pattern may appear when the input signal from a computer does not match the projector s video resolution If this happens try doing the following z Change the computer s output resolution setting so it matches the projector s video resolution For informat...

Page 17: ...To 3D input mode and then press the ENTER key z This enters the 3D input mode and closes the input source selection screen Important z You cannot select HDMI or USB as the input source in the 3D input mode To use either of these input sources change the input source setting back to normal input mode z When Computer 1 or Computer 2 is selected as the input source in the 3D input mode a component vi...

Page 18: ...al input mode and closes the input source selection screen Horizontal Flipping in the 3D Input Mode In side by side 3D a full frame consists of two halves on the left and right for each eye In rare cases the left and right images may be reversed which causes a loss of 3D depth If this happens try using the following procedure to swap the left and right images with each other To swap the left and r...

Page 19: ... the input source is an external device connected to the USB A port 1 Press the BRIGHT key z This displays the brightness adjustment window 2 Use the W and X keys to adjust image brightness 3 To hide the window press the ESC key To use manual keystone correction The projector has a keystone correction feature that prevents distortion of the projected image when projecting from an angle The project...

Page 20: ...ve the highlighting to the color mode you want to select and then press the ENTER key z This will select the button next to the highlighted color mode name z For details on what each color mode does see Color Mode page 39 under Image Adjustment 1 Main Menu 3 To hide the window press the ESC key Zooming an Image 1 Press the D ZOOM key z This will enlarge the center of the projected image one step 2...

Page 21: ...r a custom logo screen For details see Blank Screen page 42 under Screen Settings Main Menu Freezing an Image Pressing the FREEZE key freezes the projected image To freeze the projected image 1 While an image is being projected from an input source press the FREEZE key z This will capture the image that is on the screen at the moment you press FREEZE and stores it in projector memory That image re...

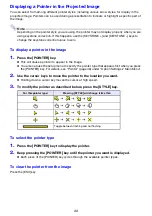
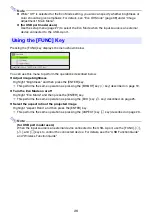
Page 22: ... in the image z You also can use the setup menu to specify the pointer type that appears first when you press the POINTER key For details see Pointer page 46 under Option Settings 2 Main Menu 2 Use the cursor keys to move the pointer to the location you want z Holding down a cursor key moves the cursor at high speed 3 To modify the pointer as described below press the STYLE key To select the point...

Page 23: ...w Note z For details about how the aspect ratio setting affects the projected image see Aspect Ratio Setting and Projection Image page 60 z You also can change the aspect ratio setting using the setup menu For details see Aspect Ratio page 41 under Screen Settings Main Menu Important Note that enlarging or reducing the size of an image using the ASPECT key for commercial purposes or public present...

Page 24: ...Press the X key to increase the volume or the W key to lower the volume 3 After the setting is the way you want press the ESC key z This causes the Volume screen to disappear Note You also can use the setup menu to adjust the volume level For details see Volume Adjustment Main Menu on page 40 To mute the audio 1 Press the VOLUME key 2 Press the ENTER key z This stops output from the speaker 3 To r...

Page 25: ...input mode 3D Input Mode page 17 or when On is selected for the Option Settings 2 J Interactive Pointer setting Because of this the Eco Mode setting cannot be changed z The On Auto setting cannot be selected for the Eco Mode while Rear is selected for Screen Settings J Projection Mode page 42 on the setup menu If the Projection Mode setting is changed to Rear while On Auto is selected for the Eco ...

Page 26: ...nd then press the ENTER key z Turn the Eco Mode on or off Highlight Eco Mode and then press the ENTER key z Select the aspect ratio of the projected image Highlight Aspect Ratio and then press the ENTER key Note for USB port model users When the input source is an external device connected to the USB A port use the FUNC O f and Z keys to control the connected device For details see the USB Functio...

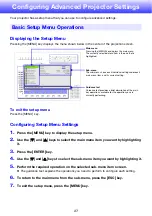
Page 27: ... sub menu item you want by highlighting it 5 Perform the required operation on the selected sub menu item screen z The guidance text explains the operations you need to perform to configure each setting 6 To return to the main menu from the sub menu press the ESC key 7 To exit the setup menu press the MENU key Basic Setup Menu Operations Main menu Pressing the MENU key displays the main menu The c...

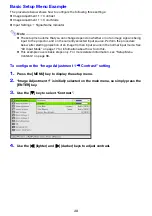
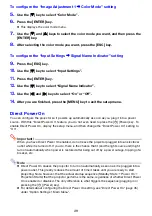
Page 28: ...rce Perform the procedure below after starting projection of an image from an input source in the normal input mode See 3D Input Mode on page 17 for information about how to do this z This example covers basic steps only For more detailed information see Setup Menu Contents on page 38 To configure the Image Adjustment 1 J Contrast setting 1 Press the MENU key to display the setup menu 2 Image Adju...

Page 29: ...o enable Direct Power On display the setup menu and then change the Direct Power On setting to On Important When you have Direct Power On enabled do not leave the projector plugged into an electrical outlet while it is turned off If you do there is the chance that it and the light source unit might turn on automatically when power is restored after being cut off by a power outage tripping of a bre...

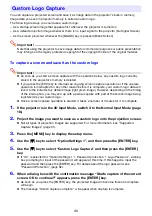
Page 30: ... depending on the timing of the interruption you may end up with a partial capture with part of the screen image being registered as your custom logo z Once a screen capture operation is started it takes a number of minutes for it to complete 1 If the projector is in the 3D Input Mode switch it to the Normal Input Mode page 18 2 Project the image you want to save as a custom logo onto the projecti...

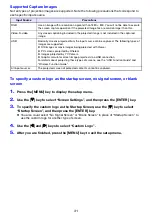
Page 31: ...you are finished press the MENU key to exit the setup menu Input Source Precautions RGB Use an image with a resolution no greater than 1280 800 You will not be able to execute the screen capture operation if the projected image has a resolution larger than this Video S video Any closed captioning included in the projected image is not included in the captured image USB Basically screens projected ...

Page 32: ...ally Inputting a Password The password of your projector is not really a word made up of letters but rather a sequence of remote controller key inputs The following is the 8 key sequence that represents the initial factory default password Using the Password Feature Note the following precautions whenever you use the password feature z The password feature protects against unauthorized use of the ...

Page 33: ...d 1 Press the MENU key to display the setup menu 2 Use the T key to select Option Settings 1 and then press the ENTER key 3 Use the T key to select Password protection and then press the ENTER key z This will display a dialog box prompting you to enter the current password 4 Enter the current password z If the projector is still protected by the factory default password perform the key operation s...

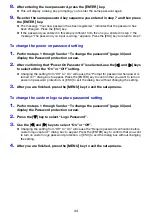
Page 34: ...select either the On or Off setting z Changing the setting from Off to On will cause the Prompt for password when power is turned on dialog box to appear Press the ENTER key to confirm that you want to turn on power on password protection or ESC to exit the dialog box without changing the setting 3 After you are finished press the MENU key to exit the setup menu To change the custom logo capture p...

Page 35: ...the ENTER key z This disables locks all projector keys except for the P Power key 6 After you are finished press the MENU key to exit the setup menu Note Even if the control panel is locked you can clear a warning message page 51 that appears on the projection screen by pressing the projector s ESC key To unlock the control panel Perform either of the following operations z On the projector hold d...

Page 36: ...t Screen Settings Input Settings Option Settings 1 or Option Settings 2 3 Press the ENTER key 4 Use the T key to select Restore Menu Defaults 5 Press the ENTER key z This will display a confirmation screen like the screen shown below 6 Use the S key to select Yes 7 To restore the settings of the main menu to their initial defaults press the ENTER key z To exit the operation without doing anything ...

Page 37: ...sking if you want to initialize all settings 4 Use the S key to select Yes 5 To restore all settings on the setup menu to their initial defaults press the ENTER key z This will restore all setup menu settings to their initial factory defaults except the following Language Light Time Unit Operating Time password set with Password protection custom logo registered with Custom Logo Capture z To exit ...

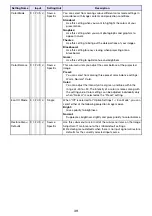
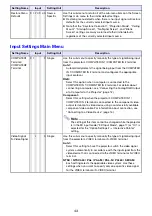
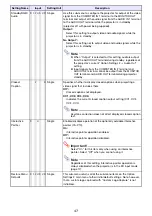
Page 38: ... is stored and applied regardless of the input source Description This column provides details about the setting item and how to select it The initial default setting is indicated by an asterisk Setting Name Input Setting Unit Description Brightness R C V H D U Source Specific Use this sub menu to adjust the brightness of the projected image A larger value produces a brighter image Contrast R C V ...

Page 39: ...ee preset color balance settings Warm Normal Cold Color You can adjust the intensity of red green and blue within the range of 50 to 50 The intensity of a color increases along with the setting value Color settings can be adjusted individually only when Normal is selected as the Preset setting Eco Off Mode R C V H D U Single When Off is selected for Option Settings 1 J Eco Mode you can select eith...

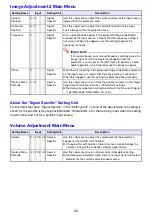
Page 40: ...ge input from the computer to disappear from the projection you can press the AUTO key to perform an auto adjust operation which should cause the image to appear Phase R Signal Specific When there is flickering in the projected image while RGB is selected as the input source it means that the phase setting is not correct When this happens use this setting to adjust the phase manually Restore Menu ...

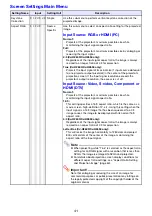
Page 41: ...s at the projector s maximum possible size while maintaining the input signal aspect ratio 16 9 This setting specifies a 16 9 aspect ratio which is the same as a movie screen high definition TV etc Using this setting when the input signal is a 16 9 image that has been squeezed to a 4 3 image causes the image to be displayed with its normal 16 9 aspect ratio 4 3 XJ H2600 XJ H2650 only Regardless of...

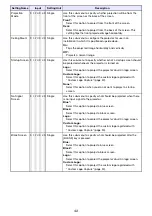
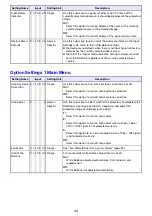
Page 42: ...ect this option to project the custom logo registered with Custom Logo Capture page 30 None Select this option when you do not want to project a startup screen No Signal Screen R C V H D U N Single Use this sub menu to specify what should be projected when there is no input signal to the projector Blue Select this option to project a blue screen Black Select this option to project a black screen L...

Page 43: ...ails about connecting a computer see Connecting the Analog RGB Output of a Computer to the Projector page 12 Component Select this setting when the projector s COMPUTER IN 1 COMPUTER IN 2 terminal is connected to the component video output terminal of a video device using a commercially available component video cable For information about connection see Connecting to a Video Device page 14 Note T...

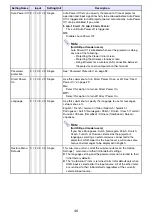
Page 44: ...t Description Auto Keystone Correction R C V H D U N Single Use this sub menu to turn auto keystone correction on or off On Select this option to turn on auto keystone correction Off Select this option to turn off auto keystone correction Auto Adjust R N Source Specific Use this sub menu to select whether the projector should detect the RGB input signal type resolution frequency and adjust the pro...

Page 45: ...is option to turn off Direct Power On Language R C V H D U N Single Use this sub menu to specify the language to use for messages setup menus etc English French German Italian Spanish Swedish Portuguese Dutch Norwegian Polish Finnish Czech Turkish Russian Chinese Simplified Chinese Traditional Korean Japanese Note for USB port model users If you have Portuguese Dutch Norwegian Polish Finnish Czech...

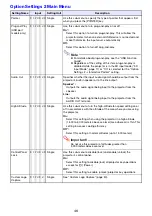
Page 46: ...e output from the projector s built in speaker or to the line output Speaker Outputs the audio signal being input to the projector from the speaker Line Outputs the audio signal being input to the projector from the AUDIO OUT terminal High Altitude R C V H D U N Single Use this sub menu to turn the high altitude fan speed setting on or off in accordance with the altitude of the area where you are ...

Page 47: ...during projector standby Closed Caption V N Single Specifies whether to display closed captions when projecting a video signal that includes them Off Closed captions not displayed CC1 CC2 CC3 CC4 Indicates the current closed caption output setting CC1 CC2 CC3 CC4 Note Keystone correction does not affect displayed closed caption text Interactive Pointer R H Single Enables disables operation of the ...

Page 48: ...e after initialization PJLink authentication R C V H D U N Single Enables and disables PJLink connection authentication Enable PJLink connection authentication enabled Disable PJLink connection authentication disabled Wired LAN info R C V H D U N Single Displays the following information Projector name Name currently assigned to the projector MAC Address Fixed MAC address assigned to each individu...

Page 49: ...vertical frequency of the input signal Scan System R C H D Source Specific This sub menu item appears only when RGB Component HDMI PC or HDMI DTV is the input signal and shows the scan system of the input signal The scan system is interlace or non interlace for an RGB or HDMI PC signal input and interlace or progressive for a component or HDMI DTV signal input Light Time R C V H D U N Single This ...

Page 50: ...enzene alcohol thinner or any other volatile agent for cleaning Carefully wipe the lens with a commercially available lens cloth or optical lens paper like those for eyeglasses or camera lenses When cleaning the lens do not apply undue force and take care to avoid damaging the lens Dust and dirt tend to collect around the vents Because of this you should use a vacuum cleaner to clean away accumula...

Page 51: ...it until the projector enters the standby state see below before trying to turn on power z z z Amber Amber Amber z c c Standby state The AC power cord is plugged in and the projector is in standby Amber z z Projector is warming up after being turned on Green Amber Amber z c c Projector is on and standing by for use Green c c Projector is performing internal power down processes Amber z z c On Auto...

Page 52: ...e to a system problem After confirming that the POWER STANDBY indicator is lit red without flashing disconnect the power cord from the projector and wait for all of the projector s indicators to go out Next reconnect the power cord and turn the projector back on If the error occurs again when you turn power back on contact your retailer or nearest authorized CASIO Service Center LIGHT TEMP Red ste...

Page 53: ... second interval TEMP Red flashing 0 5 second interval Message POWER Amber flashing J Red steady Power has turned off automatically due to a projector memory error Confirm that the POWER STANDBY indicator is lit red without flashing After checking the POWER STANDBY indicator disconnect the power cord from the projector and wait for all of the projector s indicators to go out Next reconnect the pow...

Page 54: ...On the setup menu select Auto for the Input Settings J COMPUTER1 Terminal or COMPUTER2 Terminal setting See page 43 I can t understand messages or menus because they are the wrong language Perform the following operation to select the language you want See page 45 1 Press the MENU key to display the setup menu 2 If the input signal is HDMI press T four times and then press the ENTER key If the inp...

Page 55: ...message Please input the password appears and further operation is not possible The Option Settings 1 J Password protection J Power On Password setting on the setup menu is turned on so the projector is password protected Input the correct password and then press the ENTER key See page 32 The remote controller does not work z The remote controller batteries may be dead Replace the batteries z The ...

Page 56: ... between the remote controller and the projector is less when there is a sharp angle between the remote controller and the remote control signal receiver Important To avoid running down the batteries store the remote control unit so its keys are not pressed inadvertently Remote Controller Signal Range Front 30 degrees max 5 meters 16 4 feet max 5 meters 16 4 feet max Back 5 meters 16 4 feet max 5 ...

Page 57: ...y RGB Audio page 47 under Option Settings 2 Main Menu Using the MONITOR OUT Terminal When this input source is selected The video input signal from this terminal is output to the MONITOR OUT terminal The audio input signal from this terminal is output to the speaker or AUDIO OUT terminal Computer 1 COMPUTER IN 1 AUDIO IN 1 Computer 2 COMPUTER IN 2 AUDIO IN 2 S video 2 AUDIO IN L R Video 2 AUDIO IN...

Page 58: ...o close to a fire protection device creates the risk of mis operation of the device due to warm air exhausted from the projector Also avoid locating the projector close to fluorescent lights or other strong light sources Bright light can shorten the operating range of the remote controller or even make remote control impossible When selecting a location for the projector be sure to test for proper...

Page 59: ...2 79 1 0 3 28 0 45 114 0 6 1 97 6 2 36 40 102 1 3 4 27 1 6 5 25 0 60 152 0 8 2 62 8 3 15 60 152 1 9 6 23 2 3 7 55 0 80 203 1 1 3 61 10 3 94 80 203 2 6 8 53 3 1 10 17 0 100 254 1 4 4 59 13 5 12 100 254 3 3 10 83 3 9 12 8 0 142 361 2 0 6 56 19 7 48 150 381 4 9 16 08 5 9 19 36 0 200 508 6 6 21 65 7 9 25 92 0 300 762 9 9 32 48 11 9 39 04 0 XJ H2600 XJ H2650 Projection Size Approximate Projection Dista...

Page 60: ...ector XJ H2600 XJ H2650 Input source RGB or HDMI PC Input source Video S video component or HDMI DTV Aspect Ratio Setting and Projection Image Input Signal Normal Full 4 3 True SVGA 800 600 XGA 1024 768 WXGA 1280 800 SXGA 1280 1024 Input Signal Normal 16 9 4 3 Letter Box 4 3 Aspect Image Squeezed Image Letter Box Image 16 9 Aspect Image ...

Page 61: ...T145 XJ ST155 Input source RGB or HDMI PC Input source Video S video component or HDMI DTV Input Signal Normal Full SVGA 800 600 XGA 1024 768 WXGA 1280 800 SXGA 1280 1024 Input Signal Normal 16 9 4 3 Aspect Image Squeezed Image Letter Box Image ...

Page 62: ... 1024 768 60 0 75 1024 768 85 1024 768 68 7 85 1152 864 75 1152 864 67 5 75 1280 768 60 1280 768 47 8 60 1280 800 60 1280 800 49 7 60 1280 960 60 1280 960 60 0 60 1280 960 85 1280 960 85 9 85 1280 1024 60 1280 1024 64 0 60 1280 1024 75 1280 1024 80 0 75 1280 1024 85 1280 1024 91 1 85 1360 768 60 1 1360 768 47 7 60 1366 768 60 2 1366 768 47 7 60 1400 1050 A 1 1400 1050 65 3 60 1440 900 60 1440 900 ...

Page 63: ...50 56 3 50 1080p 60 67 5 60 720p 50 37 5 50 720p 60 45 0 60 1080i 50 28 1 50 1080i 60 33 7 60 SDTV 576p 50 31 3 50 576i 50 16 6 50 480p 60 31 5 60 480i 60 15 7 60 Signal Name Horizontal Frequency kHz Vertical Frequency Hz NTSC 15 7 60 NTSC4 43 15 7 60 PAL 15 6 50 PAL M 15 7 60 PAL N 15 6 50 PAL60 15 7 60 SECAM 15 6 50 ...

Page 64: ... 60 SDTV 576p 31 25 50 HDTV 720p 50 37 5 50 HDTV 720p 60 45 60 HDTV 1080i 50 28 13 50 HDTV 1080i 60 33 75 60 HDTV 1080p 50 56 25 50 HDTV 1080p 60 67 5 60 Signal Name Horizontal Frequency kHz Vertical Frequency Hz RGB Signal 640 480 60 31 5 60 640 480 120 61 7 120 800 600 60 37 9 60 800 600 120 77 2 120 1024 768 60 48 4 60 1024 768 120 98 8 120 1280 768 60 47 8 60 1280 768 120 97 4 120 1280 800 60 ...

Page 65: ... on the CASIO website below as such information becomes available http www casio intl com support Controlling the Projector from a Computer When the projector is linked to a computer over a wired or wireless LAN connection you can use the computer s Web browser to access Network Projection Control to control the projector To establish a wired LAN connection between the projector and a computer 1 C...

Page 66: ...nvironment network Depending on the network environment being connected to there may be cases where you will need to assign a projector s IP address manually In such cases you will need to configure projector s network settings If you are unable to display the projector s System Admin page with your browser using the above procedure it may mean that there is some problem with your network settings...

Page 67: ...rojection Control screen Wired LAN Connection To establish a wired LAN connection between the projector and a computer page 65 Wireless LAN Connection Steps 1 and 2 under To log in to the projector s System Admin page of the Wireless Function Guide Group Item Description Refresh Button Click to refresh the screen with the latest information Status Projector status Shows the projector s current sta...

Page 68: ...g of the setup menu Input a value into the box and then click the Apply button This will change the projector s Brightness setting accordingly Contrast This corresponds to the Image Adjustment 1 J Contrast setting of the setup menu Input a value into the box and then click the Apply button This will change the projector s Contrast setting accordingly Eco Mode Switches the Eco mode z For details ab...

Page 69: ...actory Defaults items along the left side of the screen are mainly for accessing information and configuring settings related to projector wireless LAN connection You can access these items when connected over a wired LAN as well For details see System Admin Page Operations and Settings in the Wireless Function Guide ...

Page 70: ...ctor RS 232C Control Communication Protocol Configure your computer s serial port with the following settings Data Rate 19200bps Data Bit 8bit Parity None Stop Bit 1bit Flow Control None Read Command Send this command when you want information about the current setup of the data projector Send Format command name Receive Format applicable command setting range current setting Command Send Example ...

Page 71: ...source to the COMPUTER 1 terminal and changes the COMPUTER 1 terminal setting to RGB 1 Switches the input source to COMPUTER 1 terminal and changes the COMPUTER 1 terminal setting to component 2 Switches the input source to Video 3 Switches the input source to the COMPUTER 2 terminal and changes the COMPUTER 2 terminal setting to RGB 4 Switches the input source to COMPUTER 2 terminal and changes t...

Page 72: ...pect Ratio Specifies the aspect ratio ARZ RW 0 Normal 1 1 16 9 2 Normal 2 3 Letter Box 4 Full 5 True 6 4 3 Get Light Time Gets the light time from the projector LMP R 0 Unit Hours 1 Input source RGB or HDMI PC 2 Input source Video S video component or HDMI DTV Function Command Name RW Setting Range ...

Page 73: ...cal zoom manual focus Light Source Laser and LED Terminals COMPUTER IN RGB 15 pin mini D Sub 2 Also used as component signal input terminal MONITOR OUT RGB 15 pin mini D Sub 1 VIDEO RCA pin jack 1 S video 4 pin mini DIN 1 HDMI HDMI type A terminal 1 AUDIO IN 3 5 φ stereo mini jack 2 RCA pin jack 2 AUDIO OUT 3 5 φ stereo mini jack 1 SERIAL 9 pin D Sub 1 USB TYPE A terminal 1 TYPE B terminal 1 LAN R...

Page 74: ...MA1205 B ...
Reviews: