background image

1. 

Loose coals

- The ceramic coals supplied with this appliance can be replaced at service intervals depending

on their condition. If the coals do require replacement, the consumer can do so provided that the Ceramic
Component Layout Instructions (pages 13-14) are adhered to. Under no circumstances should additional/extra
coals be added. Only genuine Legend replacement parts should be used.
Order Ref: 

VLC06

2. 

Front Coal, and Fuel Bed, Side Cheeks and Rear Coal

- All these ceramic components can be replaced at

service intervals depending on their condition. If the coals do require replacement, the consumer can do so
provided that the Ceramic Component Layout Instructions (pages 13-14) are adhered to. Only genuine Legend
replacement parts should be used.
Order Ref: 

VFC02, VFM03, VCSC04, VCR05

3. 

Oxygen Depletion Sensing Pilot

- In the unlikely event of a pilot failure, the pilot assembly should only be

replaced by a 

GAS SAFE Registered Engineer

. The user must not carry out this work.

Order Ref: 

NG - LEG01, LPG - LEG26

4. 

Control Tap

- In the unlikely event of control tap failure, the assembly should only be replaced by a 

GAS SAFE Registered Engineer

. The user must not carry out this work.

Order Ref: 

NG - LEG02, LPG - LEG30

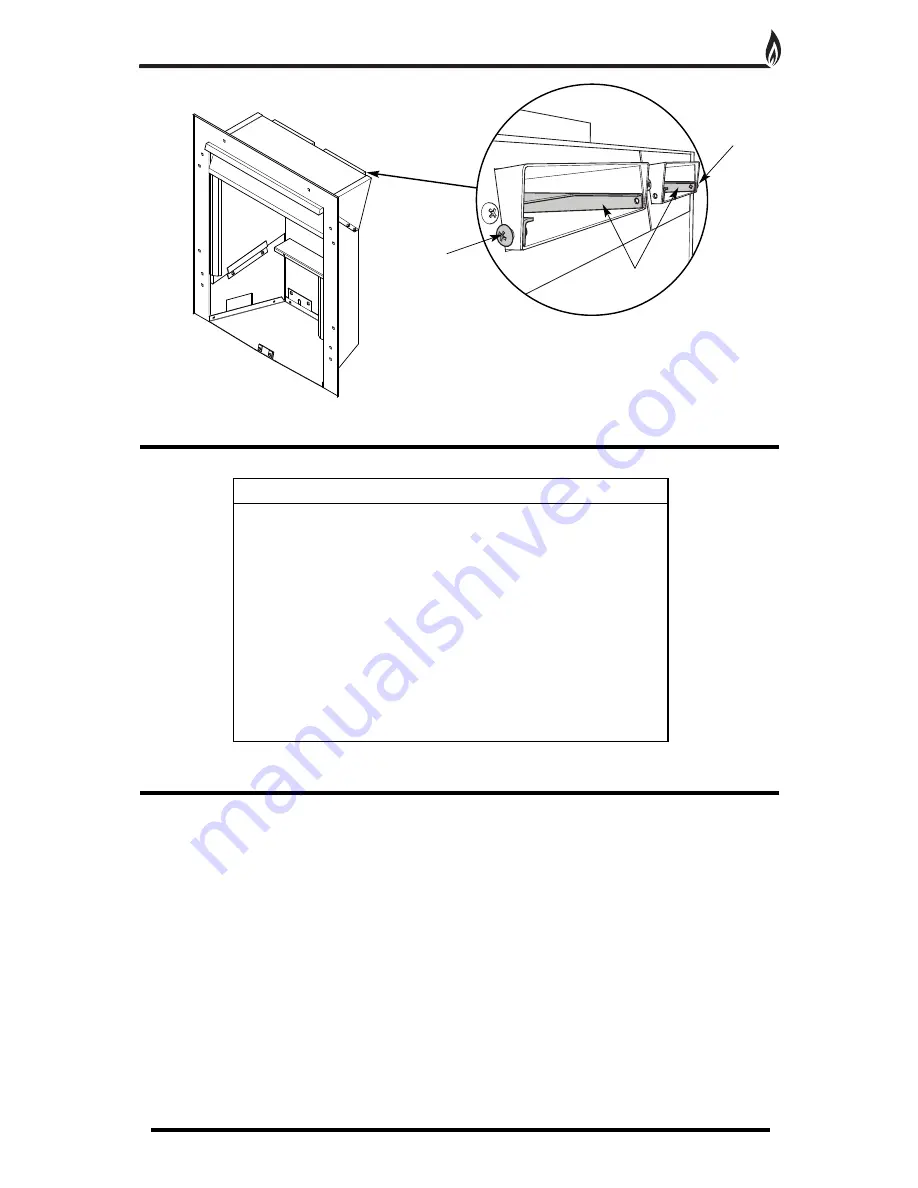
REMOVING THE BAFFLES

9

Gas Type

Natural Gas (G20) Cat 

I

2H

Gas Connection

8mm

Number of Injectors

One

Injector size

Stereomatic 074

Control Max Operating Temperature

80

o

c

Inlet Pressure Cold

20 mbar

Heat Input (Gross)

6.9 kW

Weight

10.4 kg

REPLACEMENT PARTS

TECHNICAL DATA

Securing Screw

Securing Screw

Baffles

It may be necessary to remove the two baffles from the outlet
ducts - see spillage section on page 5.
To remove the baffles, undo the two screws (one on each of the
ducts) and slide out the two baffles.

Fig. 9

Summary of Contents for Integra Convector Plus

Page 1: ...ld be handed to the end user when the installation is complete This is an official requirement and is the responsibility of the fitter of this appliance Having installed the appliance the installer sh...

Page 2: ......

Page 3: ...6 6 Installation Procedure Decorative Cast 8 Commissioning 8 Removing the Baffles 9 Technical Data 9 Replacement Parts 9 Trouble Shooting GAS SAFE Engineer Only 10 User Instructions 11 Cleaning and Ma...

Page 4: ...ht to ensure safe operation The installer must then establish that all the products of combustion are entering the flue within five minutes of lighting from cold This can be verified by traversing the...

Page 5: ...out using a suitable smoke pellet which the pellet manufacturer claims to generate 5m3 of smoke in 30 seconds burn time These gas fires should have the flue flow test carried out with the appliance in...

Page 6: ...n the front leg and two at the rear of the tray Remove the burner tray and place to one side Fig 3 6 When the burner tray has been removed decide which side of the appliance the gas supply will be ent...

Page 7: ...2 Before making the final connection thoroughly purge the supply pipe to clear any foreign matter i e masonry dust etc as this could lead to blockages in the control valve and or pilot assemblies 3 Fi...

Page 8: ...rative frame on to the studs and secure with the two nuts provided 6 Insert the two screws into the lower holes in the decorative frame and carefully tighten ensuring the fire box is securely clamped...

Page 9: ...f VFC02 VFM03 VCSC04 VCR05 3 Oxygen Depletion Sensing Pilot In the unlikely event of a pilot failure the pilot assembly should only be replaced by a GAS SAFE Registered Engineer The user must not carr...

Page 10: ...he coal set as per Ceramic Component Layout Instructions pages 13 14 5 The fire makes a roaring noise when lit Check That the front coal is seated correctly and the pilot hole is positioned correctly...

Page 11: ...and when ignited this can take two or three clicks it can be seen through the front coal set Keep the knob depressed for 10 15 seconds to allow the thermocouple to establish the pilot flame The knob c...

Page 12: ...only a soft brush to remove any soot deposits from the ceramic liners during cleaning as this is the only method that can be used to remove deposits The ceramic liners are very delicate and should be...

Page 13: ...ic liner Ensure that the lower part of the side cheeks sit on the front coal and are in front of the rear coal Fig 17 It is very important that all the coals are used and arranged as shown in order to...

Page 14: ...peaks of the fuel bed and are not placed in between This helps the flow of burnt gases and should give an even glowing fuel bed Fig 19 7 Lay another row of four coals on the next row up again making s...

Page 15: ...ht Remove the brass fret and check the pilot area for soot If soot is present remove all the loose coals and the front coal and thoroughly clean any debris in and around the pilot area If the fire wil...

Page 16: ...Unit 200 Glenfield Park Site 1 Philips Road Blackburn Lancashire BB1 5PF Tel 01254 695244 Fax 01254 695255 Web www legend fires com Email info legend fires com Issue B 13 9 11...

Reviews: