background image

Operator's Manual

HPS09 Pellet Stove

Check for parts online at 

www.castlestoves.com

 or call 800-345-6007 M-F 8-5 CST

19

end of season shut down

Make sure hopper and feed system are clear of all pellets.  
Vacuum the interior of the hopper and spray with a silicone 
protector to avoid any rusting in high humidity areas.  
Clean out all fly ash from the exhaust venting system.  
Vacuum stove interior and the ash pan.  Thoroughly clean 
the burn pot and lightly coat with a rust inhibitor such as 
silicone or oil to prevent rusting.  Remove exhaust motor 
and clean the fly ash out of the exhaust duct.  Clean the 
radial blades of the exhaust fan.

Take the venting apart and clean out the fly ash, rinse 
and let dry.  Clean the glass, doors and outer cabinet so 
that you are ready for the next heating season. Use of an 
ash vacuum makes cleaning easier and faster. 

troubleshooting & rePair

At Ardisam, we build quality and durability into the design 

of our products; but no amount of careful design by us, and 

careful maintenance by you, can guarantee a repair-free 

life for your stove. Most repairs will be minor, and easily 

fixed by following the suggestions in the troubleshooting 

guide in this section.
The guide will help you pinpoint the causes of common 

problems and identify remedies.
For more complicated repairs, you may want to rely on 

your retailer, an authorized service center or Ardisam, Inc. 

A parts catalog is included in this section.
We  will  always  be  glad  to  answer  any  questions  you 

have, or help you find suitable assistance. To order parts 

or inquire about warranty, call or write us at the address 

found below.

ordering rePlacement Parts

Parts can be obtained from the store where the stove was 

purchased or direct from the factory. To order from the 

factory- call, write or e-mail to:

ardisam, inc.

1160 eighth avenue,  

cumberland, wisconsin 54829

1-800-345-6007 

e-mail: info@ardisam.com

Please  include  the  following  information  with  your 

order:
1.  Model number and serial number 
2.  Part description
3.  Quantity
4.  Part numbers

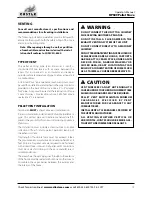
 Warning

w h e n   P e r f o r m i n g   a n y   i n t e r n a l 

maintenance. 
•   movIng  partS  InSIde  of the  cabInet 

may cause injury. do not oPerate unit 

with Panels removed or oPen. 

•  hot partS. do not operate the unIt 

with Panel oPen. 

•  rISK  of  electrIc  ShocK.  dISconnect 

Power before servicing unit. 

•  In the event of component faIlure, 

rePlace with the original factory 

equiPment.

 Caution

this is a minimum requirement for soot 

and fly ash removal. ashes should 

be Placed in a metal container with a 

tight fitting lid. the container should 

be Placed on a non-combustible 

floor, well away from combustible 

materials, Pending final disPosal. 

if ashes are disPosed of by burial in 

soil or otherwise locally disPersed, 

they should be retained in the closed 

container until all cinders are no 

thoroughly cool.

 Caution

do not oPerate stove with broken 

glass.
do not slam the door shut. 
do not strike glass. 
do not use abrasive cleaners. 
do not clean hot glass.
rePlace ceramic glass with factory 

authorized rePlacement Parts only.
the clinker will remain hot for several 

minutes after it is Pulled out of the 

fire Pot.

Summary of Contents for HPS09

Page 1: ...eater Failure to follow these in structions could result in property damage bodily injury or even death Caution Contact local building or fire officials about re strictions and installa tion inspection require ments for your area CAUTION Important operating and maintenance instruc tions included Save these instructions andLeavethismanualwith any party responsible for use and operation DO NOT DISCA...

Page 2: ...over firing Reduce feed rate Overfiring will void the warranty Complywithallminimumclearances to combustibles as specified Failure to comply may cause a house fire Caution Tested and approved for pellet fuel Burning any other type of fuel voids warranty Caution Check building codes priorto installa tion Contact the regulating author ity prior to installation to determine the need for a permit Inst...

Page 3: ...___________________________________________________________ _______________________________________________________________________________________________________ _______________________________________________________________________________________________________ _______________________________________________________________________________________________________ ____________________________...

Page 4: ...rotection Requirements 8 Clearance to Combustibles 9 Venting 10 Type of Vent 10 Pellet Vent Installation 10 Vent Termination Clearances 11 Venting Installation Examples 11 Outside Air Connection 12 Mobile Home 12 UNDERSTANDING YOUR STOVE 12 Operating Stove 13 Start Up Procedures 13 Shut Down Procedure 14 Maintenance 15 End of Season Shut Down 15 TROUBLESHOOTING REPAIR 16 Ordering Replacement Parts...

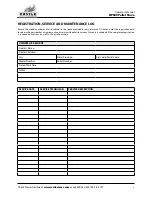
Page 5: ...easy reference Fill out and mail the registration card located in the parts packet or register online at www castlepelletstoves com Warranty is valid only if the completed registration is received by Ardisam Inc within 30 days of purchase OWNERSHIP RECORDS Dealer s Name Dealer s Address City State Province Zip Code Postal Code Model Number Serial Number Date of Purchase Notes SERVICE DATE SERVICE ...

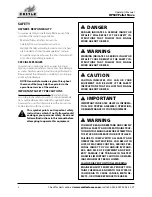
Page 6: ... and recommenda tions outlined here and inserted throughout the text Anyone who uses this tiller must read the instructions and be familiar with the controls This symbol points out important safety instructions which if not followed could endanger your personal safety Read and followallinstructionsinthismanualbefore attempting to operate this equipment Warning WARNING INDICATES a serious injury or...

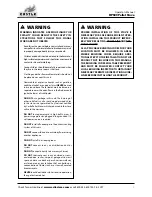
Page 7: ...let Stoves which are burned in this stove will void the warranty DO NOT route power cord in high traffic areas A power surge protector plugged into a grounded 110 volt power source is required DO NOT install a flue damper in the exhaust venting system of this unit DONOTconnectthisunittoachimneyflueservicing another appliance Do not install in a sleeping room DO NOT connect to any air distribution ...

Page 8: ...will result in a total loss of heat Do not leave hopper door open while unat tended caution Installation and repair of this pellet stove should be done by a qualified ser vice person The appliance should be in spected before use and at least once a year by a qualified service person It is imperative that the control compart ments fire box and the circulating air passageways ofthe stove be kept cle...

Page 9: ... periodically See Normal Care Maintenance section for cleaning procedure Due to the nature of pellet fuels this stove will require attention periodically Regular cleaning is an important part of burning pellet fuel PELLETS This pellet stove is designed and approved to burn wood pellets that comply with pellet fuels industry standards Minimum of 40 lbs density per cubic feet 1 4 to 5 16 in diameter...

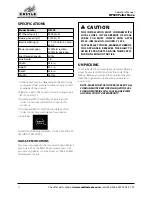
Page 10: ...es contact licensed installers for assistance Listing label Tested to the following standards UL1482 ASTM E1509 ULC ORD C1482 M1990 GLASS SPECIFICATIONS This stove is equipped with 5 mm ceramic glass Replace glass only with Castle Pellet Stoves ceramic glass Call your Servicing Dealer or Castle Stoves at 1 800 345 6007 for replacement parts UNPACKING Your Castle HPS09 will come fully assembled Rem...

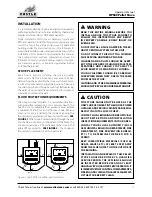
Page 11: ... When stove is vented straight through the wall and the clean out t vent is on the exterior of the home the minimum clearance is 3 from the back of the stove to the edge of floor protector See figure 2 The minimum floor protector material is 24 GA sheet metal Figure 1 Figure 2 6 6 6 6 4 4 4 4 2 3 Figures 1 and 2 Pellet stove floor pad clearnances Warning READ THIS ENTIRE MANUAL BEFORE YOU INSTALL ...

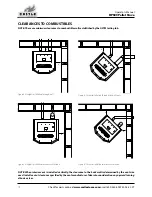
Page 12: ...en interior vent is installed vertically the clearance to the back wall is determined by the vent size used Install vent at clearance specified by the vent manufacturer Take into consideration any upward turning elbows or tees 5 5 Figure 3 Straight installation through wall Figure 4 Corner installation through the wall vents Figure 5 Straight installation interior vertical vents Figure 6 Corner in...

Page 13: ...appliance shutdown The installation must include a clean out tee to enable collection of fly ash and to permit periodic cleaning of the exhaust system Total length of horizontal vent must not exceed 10 feet The maximum recommended vertical venting height is 18 feet All joints for pellet vent are required to be fastened with at least three screws and all pellet vent connections must be sealed accor...

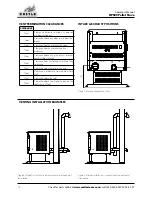
Page 14: ...t Clearance above any grass plants or other combustible materials 3 feet Clearance from any forced air intake of any appliance 2 feet Clearance below eaves or overhang 1 foot Clearance horizontally from combustible wall 3 feet Clearance above the roof 2 feet Clearance above the highest point on the roof within 10 feet VENTING INSTALLATION EXAMPLES Figure 9 Straight Installation inside vertical ris...

Page 15: ...codes may apply UNDERSTANDING YOUR STOVE Your Castle pellet stove utilizes a vertical auger fuel feed system that is operated by a microprocessor controlled digital circuit board The digital circuit board allows the vertical auger fuel system to run in a timer based non continuous cycle this cycling allows the auger to run for a predetermined amount of time The auger pushes pellets up a chute loca...

Page 16: ... fuel the auger will not be primed with pellets This may cause the automatic ignition to time out and the unit will shut down Pressing the button on the control pad again will restart the startup sequence and the stove should start properly Once a consistent flame has been established you can adjust the heat range to your desired setting low medium or high This is done by pressing the button on th...

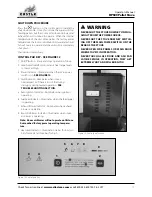
Page 17: ...uminates when the main power switch is on See figure 10 4 Fault Indicator Illuminates when stove is overtemped or if there is loss of fire during startup or during normal operation See troubleshooting section 5 Auto Ignition Indicator Illuminates when igniter is operating 6 Fuel Feed Indicator Illuminates when the feed auger is operating 7 Exhaust Blower Indicator Illuminates when exhaust blower i...

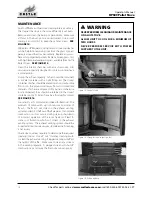
Page 18: ... materials If ashes are disposed of by burial or otherwise locally dispersed they should be retained in the closed container until all cinders have bee thoroughly cooled See figure 16 Soot and Fly ash Formation and Need for Removal The products of combustion will contain small particles of fly ash The fly ash will collect in the exhaust venting system and restrict the flow of the flue gases Incomp...

Page 19: ...ad to answer any questions you have or help you find suitable assistance To order parts or inquire about warranty call or write us at the address found below ORDERING REPLACEMENT PARTS Parts can be obtained from the store where the stove was purchased or direct from the factory To order from the factory call write or e mail to Ardisam Inc 1160 Eighth Avenue Cumberland Wisconsin 54829 1 800 345 600...

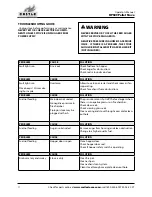
Page 20: ...le Overtemp Allow stove to cool restart and check room air fan is operating Check for exhaust fume obstructions Problem CAUSE Solution Fuel not feeding Main door not sealed No negative pressure in fire chamber Piping or stove may be plugged with ash The pressure sensor shuts off the feed auger when there is no negative pressure in fire chamber Check door seals Check viewing glass seals Clean venti...

Page 21: ..._____________________________________ _______________________________________________________________________________________________________ _______________________________________________________________________________________________________ _______________________________________________________________________________________________________ __________________________________________________...

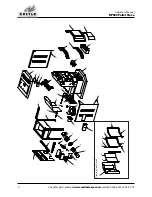
Page 22: ... for parts online at www castlestoves com or call 800 345 6007 M F 8 5 CST 22 1 2 3 4 5 6 7 8 9 10 11 12 13 14 15 16 17 18 19 20 21 22 23 24 25 26 27 28 29 30 31 33 34 35 36 37 38 Viewing Door Detail 39 41 42 43 44 48 45 47 46 40 49 32A 32 32B ...

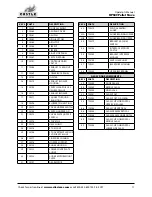
Page 23: ...heat shield 24 720276 rtd mount 25 720106 rtd overtemp sensor 92 degree Celsius 26 720277 side wire channel 27 720278 hopper support 28 720120 auger housing 29 720222 lower cover plate auger 30 720223 auger motor mount plate 31 720107 gearmotor KEY PART DESCRIPTION 32 720219 weld assembly auger 32a 720220 auger bearing lower 32b 720221 auger bearing upper 33 720279 bracket vacuum switch 34 720108 ...

Page 24: ...for parts online at www castlestoves com or call 800 345 6007 M F 8 5 Castle Stoves Division of Ardisam Inc 1160 8th Avenue PO Box 666 Cumberland WI 54829 800 345 6007 Fax 715 822 2223 Email info ardisam com ...

Reviews: