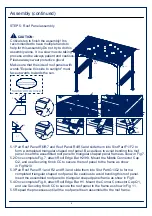
STEP 5: Roof Panel assembly
Assembly (continued)
5.1 Pair Roof Panel R6/R7 and Roof Panel R4/R5 and slide them into Slot Part F1/F2 to
form a completed triangular shaped roof panel. Be cautious to avoid bending this roof
panel. Insert the assembled roof panel to triangular shaped panel frame as show in Fig 7.
5.2 Once complete Fig.7, attach Roof Edge Bar H2/H3. Mount the Middle Connector Cap
Q2, and use Securing Knob CC to secure the roof panel to the frame as show
in Fig 9&10.
5.3 Pair Roof Panel R1 and R2 and R3 and slide them into Slot Part G1/G2 to form a
completed triangular shaped roof panel. Be cautious to avoid bending this roof panel.
Insert the assembled roof panel to triangular shaped panel frame as show in Fig 8.
5.4 Once complete Fig.8, attach Roof Edge Bar H1. Mount the Corner Connector Cap Q1,
and use Securing Knob CC to secure the roof panel to the frame as show in Fig 11.
5.5 Repeat the processes until all the roof panel been assembled to the roof frame.
8
Fig. 9
Fig. 11
Fig. 7
Fig. 8
Fig. 10
R5
R7
R6
R4
F1
F2
R5
R7
F2
R2
R3
G2
CC
Q1
H1
H2
D
E
CC
H2
H3
Q2
H3
E
R5
R5
Fig. 9
& 10
Fig. 11
R4
F1
R6
R5
R7
F2
CAUTION:
Critical step to finish the assembly! lt is
recommended to have multiple hands to
help for this assembly.Do not try to do this
assembly alone. It is a slow muscle taking
process and be always patient and cautious.
Please always wear protective glove!
Make sure that the side of roof panels with
words "Expose this side to sunlight" must
face upwards towards the sun.
R6
R7
Fig. 7 F1
R4
F2
R5
Fig. 8
R1
G1
R2
G2
R3


