background image

HU-26

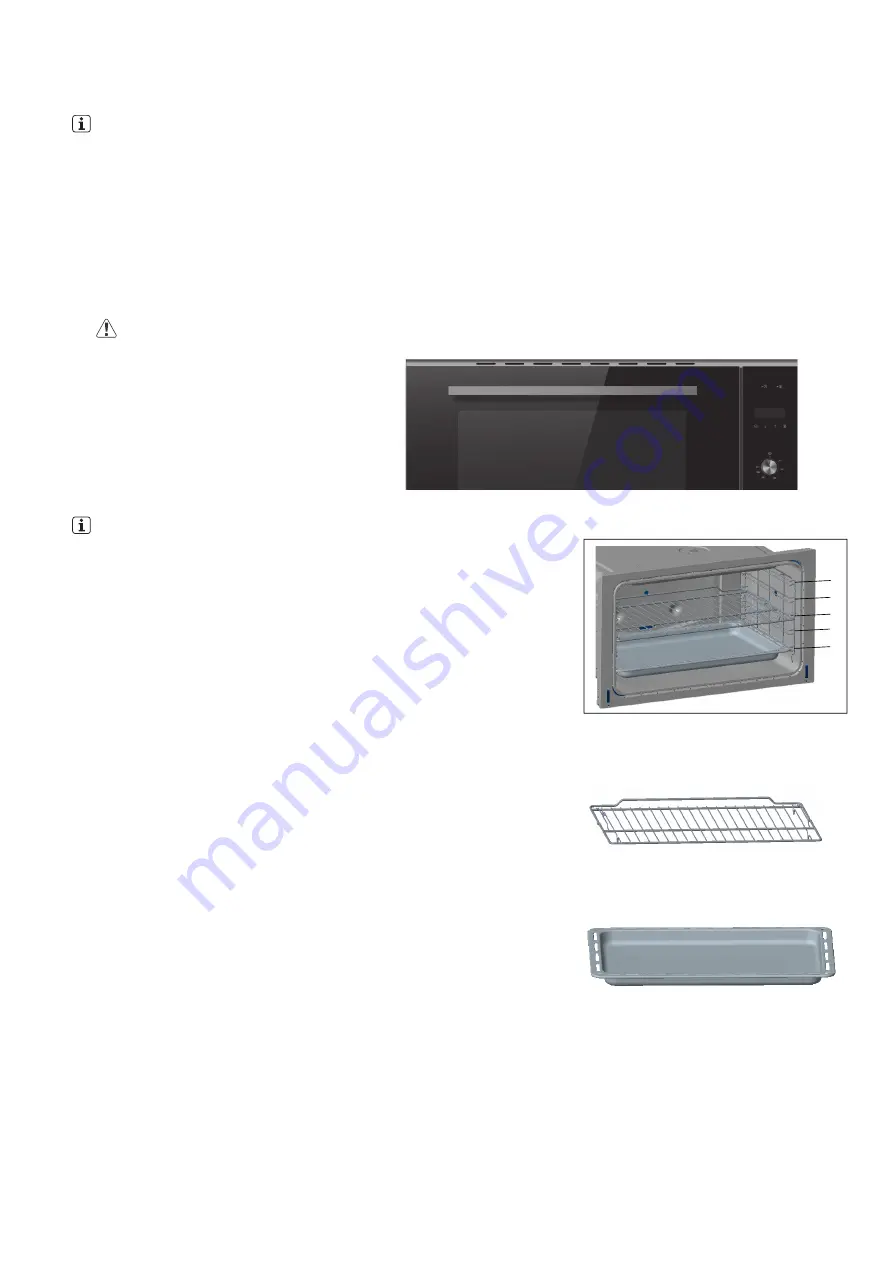
Cooking Chamber

In the cooking chamber there are the Oven Lamps that are on while the oven is working. By turning the 

functions selector onto this symbol you can light up the lamp when the oven is switched off too.

N.B. In ECO mode the oven lights are off; to switch them on, set the selector to the 3D Convection 

function, then turn the selector back onto the ECO function to continue low-energy cooking.

•   

A cooling fan switches on and off when needed.

•   

Hot air escapes through the special slots located above the oven door

CAUTION!

Do not cover the ventilation slots, 

otherwise the oven will overheat.

Ventilation Slots

Accessories

•   

The accessory can be inserted in the oven at 5 different levels.

•   

To ensure the wire rack operate safely, correct placement of the

wire rack between the side rail is imperative. Wire rack and the

pan only can be used between the first and the fifth layers.                                                                 

•   

The wire rack should use with the right direction, it will ensure                                                                 

that during careful removal of the wire rack and pan, hot food                                                               

items should not slide out.

•   

The cooking guide table gives the ideal position for each use

of the oven.

WIRE RACK:

It is used as a support for your baking pans, pastry tins, and

all the different containers starting from the dripping pans 

provided or for cooking mainly with the Grill and Fan Grill 

functions to grill meat and fish, toast bread, etc.

DRIPPING PAN:

It is normally used to collect the juices of grilled foods or

for cooking foods directly; if not used when cooking, the 

dripping pan must be taken out of the oven.

TELESCOPIC RAILS (optional: only for some models)

•    

The oven is equipped with telescopic rails for positioning either the wire Rack or the dripping pan

(Fig. a)

You can change the position of the rail and move it onto every level of the shelf support according to the 

type of food to be cooked (Fig. b)

5

4

3
2

1

EN-9

Summary of Contents for CMD 9208 BK

Page 1: ...CMD 9208 BK HU Haszn lati s kezel si utas t sok EN Use and handling instructions...

Page 2: ...HU 1...

Page 3: ...t ssel rendelkez szem lynek kell elv geznie a helyi p t si el r sok s ezen utas t sok szigor betart s val Figyelem Az ram t s elker l se rdek ben a l mpa cser je el tt gy z dj n meg arr l hogy a k sz...

Page 4: ...sa meg s ne koptassa les sz leken Tartsa t vol forr fel letekt l s ny lt l ngt l gy helyezze el a zsin rt hogy v letlen l ne h z djon meg s ne essen t rajta Tartsa a k sz l ket s annak vezet k t gyerm...

Page 5: ...arra hogy ne rintse meg a meleg t elemeket A 8 vesn l fiatalabb gyermekeket t vol kell tartani hacsak nincsenek folyamatosan fel gyelve A k sz l ket nem szabad dekorat v ajt m g telep teni a t lmeleg...

Page 6: ...adja t a j v beni tulajdonosoknak Kicsomagol s ut n ellen rizze hogy nem s r lt e meg Ha k ts gei vannak ne haszn lja a k sz l ket hanem vegye fel a kapcsolatot az gyf lszolg lattal A gy rt nem v lla...

Page 7: ...laszt k visszah zhat gombok Nyomja meg ket hogy kih zza s visszahelyezze ket Megjegyz s A s t m k d se k zben tan csos kint tartani a gombot Funkci v laszt A funkci v laszt val be ll thatja a f t s t...

Page 8: ...torral m k dik Nagy mennyis g h s grillez s re alkalmas Dupla grillez s A bels meleg t elem s a s t tetej n l v k ls meleg t elem m k dik Alkalmas nagy mennyis g grillez s hez Grill kicsi Ez a s t si...

Page 9: ...i id csak n velhet nem cs kkenthet A maxim lisan hozz adott id 23h 59m ut n lehet Ha a befejez si id hosszabb mint az id tartam az aktu lis id a befejez si id cs kkenthet a megnyom s val Cs kken am g...

Page 10: ...e az oldals nek k z tt Csak a dr t llv ny s a tepsi haszn lhat az els s az t dik r teg k z tt A dr t llv nyt a helyes ir nyban kell haszn lni ez biztos tja hogy a dr t llv ny s a tepsi elt vol t sa so...

Page 11: ...lat el tt tiszt tsa meg a k sz l ket Helyezze a tartoz kokat s a kivehet polctart kat kiindul helyzet kbe A zs rmaradv nyok el get s hez meleg tse fel az res k sz l ket 1 ll tsa be a funkci t s a max...

Page 12: ...a tiszt t spray k s v zk telen t k haszn lat val Azonnal t vol tsa el a marad k tiszt t szert S r l s vesz lye Az elektromos h ztart si k sz l kekb l sz rmaz g z el rheti az fesz lts g alatt l v alka...

Page 13: ...art s hoz haszn ljon nem s rol szivacsot meleg v zzel A t m t seknek puh nak s rugalmasnak kell lenni k Ne haszn lja a k sz l ket ha az ajt t m t se megs r lt Vegye fel a kapcsolatot egy hivatalos sze...

Page 14: ...elyezze vissza az ajt t megfelel en v gezze el a m veletet ford tott sorrendben Helyezze vissza az A kamp kat befel miel tt becsukn az ajt t 10 bra A A A B A C D A Fig 8 Fig 7 Fig 9 Fig 10 A S T AJT T...

Page 15: ...zerel se FIGYELEM A szervizel s el tt kapcsolja ki a k sz l k ramell t s t Az ramell t s lecsatlakoztat s nak elmulaszt sa szervizel skor ram t st vagy t zet okozhat 1 l p s Csavarh z val t vol tsa el...

Page 16: ...k sz l k m k dik s f z s k zben a lehet legjobban csukja be Haszn ljon f mt ny rokat az energiahat konys g jav t s hoz Ha lehets ges tegye az telt a s t be an lk l hogy felmeleg ten Ha 30 percn l hoss...

Page 17: ...s lev laszt st a III t lfesz lts g kateg ria felt telei k z tt Ellen rizze a k vetkez ket a A csatlakoz s aljzat 16 os ramra alkalmas b Mindkett k nnyen el rhet s elhelyezhet gy hogy egyetlen ramforr...

Page 18: ...eg t elem 1 80 kiloWatt s t id z t FONTOS INFORM CI K A J T LL SSAL KAPCSOLATBAN Minden elektromos h ztart si k sz l kre teljes j t ll s vonatkozik a k zik nyvben foglaltak szerint A j t ll s a hat ly...

Page 19: ...i 03 Sziv rv nyos pisztr ng 0 8 1 6 kg Ed ny fedetlen l a dr t llv nyra 15 3 170 60 Pizza 1 4 kg s t t lca 15 2 225 20 30 Keny r 0 8 1 kg s t pap r s t t lc n 20 3 200 210 30 40 Lapos keny r 0 5 1 kg...

Page 20: ...a suitably qualified person strictly following local building regulations and these instructions Warning Ensure that the appliance is switched off at the fused spur before replacing the lamp to avoid...

Page 21: ...ord do not squeeze bend or chafe it on sharp edges Keep it away from hot surfaces and open flames Lay out the cord in such a way that no unintentional pulling or tripping over it is possible Keep the...

Page 22: ...hing heating elements Children less than 8 years of age shall be kept away unless continuously supervised The appliance must not be installed behind a decorative door in order to avoid overheating INS...

Page 23: ...rence and pass it on to any future owners After unpacking the appliance please check that it is not damaged If in doubt do not use the appliance but contact Customer Services The manufacturer declines...

Page 24: ...selectors are retractable knobs Press them to extract them and reinsert them N B It is advisable to keep the knob out while the Oven is working Functions Selector With the functions selector you can s...

Page 25: ...nly The heat gets distributed evenlyfrom the top and bottom Bottom heater For baking cakes with a crispy bottom and for preserving foods The heat is distributed from the bottom 3D Convection For sweet...

Page 26: ...duration time before end time end time can only be added not decreased The max time added can be after 23h 59m When end time is longer than duration time current time end time can be decreased by pre...

Page 27: ...the pan only can be used between the first and the fifth layers The wire rack should use with the right direction it will ensure that during careful removal of the wire rack and pan hot food items sh...

Page 28: ...efore using it for the first time Place the accessories and removable shelf supports in their initial position Preheat the appliance with nothing inside it in order to burn off fat residues 1 Set the...

Page 29: ...alers Remove residual detergent immediately Danger of injury Steam from an electric household appliance could reach live parts and cause short circuiting Never use a steam appliance to clean the oven...

Page 30: ...ls clean use a non abrasive sponge with warm water The seals must be soft and elastic Do not operate the appliance if the door seal is damaged Contact an authorized Service Centre To clean the door se...

Page 31: ...cleaning fit the door back on properly by following the procedure in reverse order Reposition the hooks A inwards before closing the door Fig 10 CLEANING THE OVEN DOOR After removing the oven door fr...

Page 32: ...Turn off the electrical power supply to the appliance prior to servicing it Failure to disconnect the power supply during service may result in an electrical shock or fire hazard Step 1 Use a screwdri...

Page 33: ...roduct is disposed of correctly you will help prevent potential negative consequences for the environment and human health which could othenwise be caused by the inappropriate waste handling of this p...

Page 34: ...g in or unplugging c The plug can be inserted without difficulty d Once the plug has been inserted the oven does not rest on it when it is installed in the cabinet e The terminals of two appliances ar...

Page 35: ...ORMATION ABOUT WARRANTY Every electric household appliance is covered by full warranty in the terms covered in the handbook Warranty is granted for the period provided for by the current national legi...

Page 36: ...Jam tart 0 8 1 6 kg Cookware uncovered onto the wirerack 15 3 160 30 35 Short pastry 0 8 kg 1 6 kg Cookware uncovered onto the wirerack 15 3 160 170 40 60 Cream puffs 0 8 kg baking paper on baking tra...

Page 37: ...4 938 594 101 www cnagroup es cna cnagroup es Atenci n al Cliente 902 410 450 34 938 521 818 info cnagroup es SAT Central Portugal 351 214 349 771 service junis pt PN 16171100A30635 Import r MULTIKOMP...

Reviews: