background image

The following things should be checked before starting the dishwasher.

The content of this manual is very helpful to the users.

After installation, please make sure to keep this manual.

1

The dishwasher is level and fixed properly

2

The inlet valve is open

3

There is a leakage at the connections of the conducts

4

The wires are tightly connected

5

The power is switched on

6

The inlet and drain hoses are knotted

7

All packing materials and printings should be taken out from the dishwasher

Syphon Connection

Extension Hose

If you need a drain hose extension, make sure to use a similar drain hose.
It must be no longer than 4 metres; otherwise the cleaning effect of the dishwasher could be reduced.

Water Outlet

Connect the water drain hose. The drain hose must be correctly fitted to avoid water leaks.
Ensure that the water drain hose is not kinked or squashed.

The waste connection must be at a height of between 40 cm (minimum) and 100 cm (maximum)
from the bottom of the dish. The water drain hose should be fixed by a hose clip. The free end of
the hose must not be immersed in water.

If the sink is 1000 higher from the floor, the excess water in hoses cannot be drained directly
into the sink. It will be necessary to drain excess water from hoses into a bowl or suitable
container that is held outside and lower than the sink.

How to Drain Excess Water From Hoses

Summary of Contents for DW45M

Page 1: ...DW45M ...

Page 2: ...Technical information 22 Control Panel 3 To review the section on troubleshooting Tips will help you to solve some common problems by yourself If you can not solve the problems by yourself please ask for the help of professional technicians Dear Customer Please carefully read this manual before using the dishwasher it will help you to use and maintain the dishwasher properly Pass it on to any subs...

Page 3: ...ay with the appliance Cleaning and user maintenance shall not be made by children without supervision For EN60335 1 This appliance is not intended for use by persons including children with reduced physical sensory or mental capabilities or lack of experience and knowledge unless they have been given supervision or instruction concerning use of the appliance by a person responsible for their safet...

Page 4: ...ck with a qualified electrician or service representative if you are in doubt whether the appliance is properly grounded Do not modify the plug provided with the appliance If it does not fit the outlet Have a proper outlet installed by a qualified electrician Do not abuse sit on or stand on the door or dish rack of the dishwasher Do not operate your dishwasher unless all enclosure panels are prope...

Page 5: ...hwasher Children should be supervised to ensure that they do not play with the appliance The door should not be left open since this could increase the risk of tripping If the supply cord is damaged it must be replaced by the manufacturer or its service agent or a similarly qualified person in order to avoid a hazard During installation the power supply must not be excessively or dangerously bent ...

Page 6: ...e Therefore cut off the power supply cable and make the door closing device unusable Cardboard packaging is manufactured from recycled paper and should be disposed in the waste paper collection for recycling By ensuring this product is disposed of correctly you will help prevent potential negative consequences for the environment and human health which could otherwise be caused by inappropriate wa...

Page 7: ...le has finished the buzzer of the dishwasher will sound 8 times then stop Turn off the appliance using the ON OFF button If the appliance is switched off during a wash cycle Open the door carefully Hot steam may escape when the door is opened If the appliance is switched off during a wash cycle when switched on again please re select the washing cycle and operate the dishwasher according to the or...

Page 8: ...6 7 Washing Program Selector Turn the knob to select wash cycles 8 Start Reset Button Press this button to start or pause the dishwasher the one of the program lights will blink when starting Program indicator light when you select washing program the correspond light will display 1 ON OFF Button To turn ON OFF the power supply 2 Power Light To come on when the ON OFF Button is pressed down 3 Salt...

Page 9: ...d be made in accordance with the following scheme WATER SOFTENER The hardness of the water varies from place to place If hard water is used in the dishwasher deposits will form on the dishes and utensils The appliance is equipped with a special softener that uses a salt container specifically designed to eliminate lime and minerals from the water Contact your local water board for information on t...

Page 10: ...our dishes which can leave spots and streaks It also improves drying by allowing water to roll off the dishes Your dishwasher is designed to use liquid rinse aids The rinse aid dispenser is located inside the door next to the detergent dispenser To fill the dispenser open the cap and pour the rinse aid into the dispenser until the level indicator turns completely black The volume of the rinse aid ...

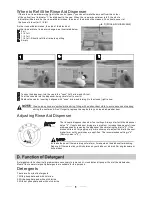
Page 11: ... the size of the black dot on the rinse aid level indicator changes as illustrated below Full 3 4 full 1 2 full 1 4 full Should refill to eliminate spotting Empty When to Refill the Rinse Aid Dispenser If there is no rinse aid warning light in the control panel you can estimate the amount from the colour of the optical level indicator C located next to the cap When the rinse aid container is full ...

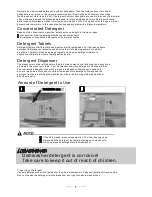
Page 12: ...ust before starting the dishwasher otherwise it could get damp and will not dissolve properly Concentrated Detergent Detergent Tablets Detergent Dispenser conventional alkaline detergents with caustic components low alkaline concentrated detergents with natural enzymes Normally new pulverised detergent is without phosphate Thus the water softener function of phosphate is not given In this case we ...

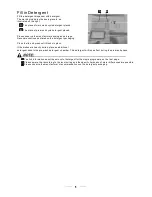
Page 13: ...lose the lid and press until it locks in place If the dishes are heavily soiled place an additional detergent dose in the pre wash detergent chamber This detergent will take effect during the pre wash phase A B Fill in Detergent You find information about the amount of detergent for the single programme on the last page Please aware that according to the level soiling and the specific hardness of ...

Page 14: ...ups glasses pans etc With the opening facing downwards so that water cannot collect in the container or a deep base Consider buying utensils which are identified as dishwasher proof Use a mild detergent that is described as kind to dishes If necessary seek further information from the detergent manufacturers For particular items select a program with as low a temperature as possible To prevent dam...

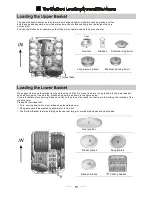
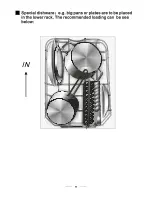
Page 15: ... dishes and bowls as shown in the figure below It is preferable to place serving dishes and lids on the side of the racks in order to avoid blocking the rotation of the top spray arm Pots serving bowls etc must always be placed top down Deep pots should be slanted to allow water to flow out Please be reminded that The Bottom Basket features folding spikes so that larger or more pots and pans can b...

Page 16: ......

Page 17: ...laced in the cutlery basket with the handles at the bottom If the rack has side baskets the spoons should be loaded separately into the appropriate slots especially long utensils should be placed in the horizontal position at the front of the upper basket as shown in the picture For personal safety and a top quality cleaning place the silverware in the basket making sure that They do not nest toge...

Page 18: ...F light will turn on Turn the knob to select a desired wash cycle press the Start Reset button the machine will work after 10 seconds 1 2 3 4 Pre wash 50 Wash 65 Rinse Rinse Rinse 55 Drying Pre wash 50 Wash 55 Rinse Rinse 65 Drying pre wash Wash 50 Rinse 60 Drying Wash 40 Rinse Rinse 40 15 g Rinse Rinse 50 Drying Wash 60 30 0 50 9 0 EN 50242 A shorter wash for lightly soiled loads and quick wash F...

Page 19: ...will mooing every minute unless you close the door After you close the door the machine will keep on working after 10 seconds during a wash cycle A forgotten dish can be added any time before the detergent cup opens Add forgotten dishes Close the door After the spray arms stop working you can open the door completely 2 3 1 4 5 Press the Start Reset button Press the Start Reset button the dishwashe...

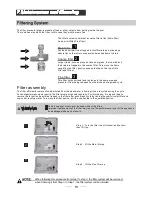
Page 20: ...ilter 2 Fine filter 3 Filter assembly The filter efficiently For best performance and results the filter must be cleaned regularly this reason it is a good idea to remove the larger food particles trapped in the filter after each wash cycle by rinsing the semicircular filter and cup under running water To remove the filter device pull the cup handle in the upward direction removes food particles f...

Page 21: ...ble the filter parts as shown in the figures on the last page and reinsert the entire assembly in the dishwasher positioning it in its seat and pressing downwards The entire filter assembly should be cleaned once a week When cleaning the filters don t knock on them Otherwise the filters could be contorted and the performance of the dishwasher could be decreased To clean the edge around the door yo...

Page 22: ...uit serving only this appliance Position the appliance in the desired location The back should rest against the wall behind it and the sides along the adjacent cabinets or walls The dishwasher is equipped with water supply and drain hoses that can be positioned either to the right or the left sides to facilitate proper installation Once the appliance is positioned for levelling the height of the d...

Page 23: ...he appliance Please close the hydrant after using PLEASE HANG UP THE DRAIN HOSE EITHER WAY OF A B C φ 40mm A B C Counter Front Drain pipe Drain hose hook Close the drain hose hook to the counter Insert the drain hose into a drain pipe with a minimum diameter of 4cm or let it run into the sink making sure to avoid bending or crimping it Use the special plastic support that comes with the appliance ...

Page 24: ...imilar drain hose It must be no longer than 4 metres otherwise the cleaning effect of the dishwasher could be reduced Water Outlet Connect the water drain hose The drain hose must be correctly fitted to avoid water leaks Ensure that the water drain hose is not kinked or squashed The waste connection must be at a height of between 40 cm minimum and 100 cm maximum from the bottom of the dish The wat...

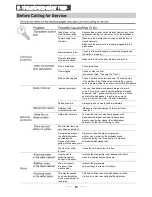
Page 25: ...ich are obstructing the sp ay arm r Interrupt the programme and rearrange the items of crockery This has no influence on the dishwasher function if in doubt contact a suitably qualified plumber Detergent with colourant was used Make sure that the detergent is the one without colourant Improper detergent Make sure the dishwasher is turned on and the door is closed securely Check that the water supp...

Page 26: ... with a long washing time Water drainage is more difficult with these items Cutlery or dishes of this type are not suitable for washing in the dishwasher The programme was not powerful enough Not enough detergent was dispensed Items are blocking the path of sp ay arms r The filter combination in the base of wash cabinet is not clean or is not correctly fitted This may cause the sp ay arm jets to g...

Page 27: ...Height 850mm Width 450 mm Depth 580mm Water pressure 0 04 1 0MPa Power supply see rating label Capacity 9 place settings ...

Page 28: ...on how the appliance is used Water consumption 2940 litres per year based on 280 standard cleaning cycles Actual water consumption will depend on how the appliance is used A highest efficiency to G lowest efficiency This program is suitable for cleaning soiled normally soiled tableware and that it is the most efficient programme in terms of its combined energy and water consumption for that type o...

Page 29: ...ng balance of the GAA guarantee will be valid and any further call outs during this prescribed period will be covered by GAA on the replacement appliance Should any person other than an authorized engineer modify or attempt to repair the appliance then the warranty will be invalid The guarantee applies to the UK mainland Ireland ROI and France but is not transferrable between EU countries This gua...

Page 30: ... such a manner that it cannot be removed it is the responsibility of the customer installer to remove and reinstall the appliance to facilitate the repair The guarantee is offered by GAA Ltd 1301 1303 Lu Plaza 2 Wing Yip St Kwun Tong Kowloon Hong Kong To arrange an in guarantee service call please contact customer services on the following numbers GAA 12 month parts and labour guarantee 20150326 m...

Reviews: