background image


688210 nl ma 2014

10

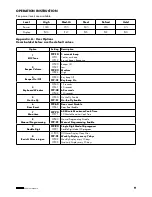
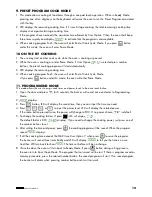
Appendix. B Default Cook Times

The oven shall ship with the following Preset Cook Times unless otherwise noted in the product  

specification.

Button

Display (Time)

Power

Cook Factors

1

0:10

100%

80%

2

0:20

100%

80%

3

0:30

100%

80%

4

0:45

100%

80%

5

1:00

100%

80%

6

1:30

100%

80%

7

2:00

100%

80%

8

3:00

100%

80%

9

4:00

100%

80%

0

5:00

100%

80%

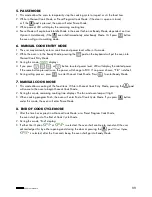
1. POWER UP

"

_— __

" displays when the oven is electrified for the first time. If 

 button pressed,  

the oven will change to idle mode.
Note: Under idle mode, no button can be pressed.

2. IDLE MODE

1.  Entry. The oven shall enter idle mode after a set of seconds have expired in Ready Mode without a 

 keyboard press or a door open and close. The number of seconds is determined by the keyboard 
 Timeout Window, set by User Option 4.

2. During idle mode, LED is blank. And there shall be no oven activity.
3. Opening and then closing the oven door, the oven will exit the idle mode and into ready mode.

3. READY MODE

1.  In this mode, the oven is ready to either begin a manual or preset cook cycle. 
2. Opening and closing the door while the oven is in Idle Mode will put the oven into Ready Mode. 
3. During Ready Mode, "

00:00

" displays.

4. From the Ready Mode, the oven can go to almost all of the other modes.

4. DOOR OPEN MODE

1.  While the door of the oven is open, the oven shall be in Door Open Mode. This shall also allow for 

entry into Programming Mode. Whenever the door is open, the oven shall enter this mode.

2. During this mode, LED is blank. And the fan and oven lamp work.
3. When the door is closed, if User Option  

op:60

  is selected and the oven was  running a manual or 

preset cook cycle, the oven shall enter Pause Mode. In all other cases, the oven shall return to Ready 
Mode with User Option  

op:61

, set, opening and closing the door will clear out any information about a 

Manual or Preset Program which was running.

Summary of Contents for *688.210

Page 1: ...UAL Read these instructions carefully before using your microwave oven and keep it carefully If you follow the instructions your oven will provide you with many years of good service Professional Supp...

Page 2: ...low soil or cleaner residue to accumulate on sealing surfaces 3 WARNING If the door or door seals are damaged the oven must not be operated until it has been repaired by a competent person ADDENDUM If...

Page 3: ...wave ovens since they may explode even after microwave heating has ended 15 Use this appliance only for its intended uses as described in manual Do not use corrosive chemicals or vapors in this applia...

Page 4: ...sks resulting from becoming entangled in or trip ping over a longer cord 2 If a long cord set or extension cord is used 1 The marked electrical rating of the cord set or extension cord should be at le...

Page 5: ...for reheating and absorbing fat Use with supervision for a short term cooking only Parchment paper Use as a cover to prevent splattering or a wrap for steaming Plastic Microwave safe only Follow the m...

Page 6: ...following accessories Instruction Manual Note 1 Don t press the ceramic board forcibly 2 Take and put the utensils gently during the operation in order to avoid damage to the ceramic board 3 After usi...

Page 7: ...g label WARNING Do not install oven over a range cooktop or other heat producing appliance If installed near or over a heat source the oven could be damaged and the warranty would be void CLEANING INS...

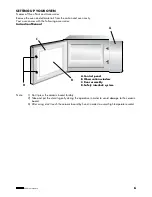
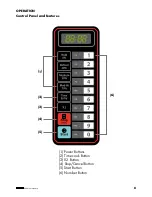
Page 8: ...688210 nl ma 2014 8 OPERATION Control Panel and Features 1 2 6 3 4 5 1 Power Buttons 2 Time cook Button 3 X2 Button 4 Stop Cancel Button 5 Start Button 6 Number Button...

Page 9: ...ey beep On 4 Keyboard Window OP 40 OP 41 OP 42 OP 43 15 seconds 30 seconds 60 seconds 120 seconds 5 On the Fly OP 50 OP 51 On the Fly Disable On the Fly Enable 6 Door Reset OP 60 OP 61 Door reset Disa...

Page 10: ...ven activity 3 Opening and then closing the oven door the oven will exit the idle mode and into ready mode 3 READY MODE 1 In this mode the oven is ready to either begin a manual or preset cook cycle 2...

Page 11: ...D will display the related power If the same button pressed twice the power will change to PL10 If no power chosen PL0 is default 5 During setting process press to enter Manual Cook Mode Press to ente...

Page 12: ...This mode allows the user to assign cook times and power levels to the once touch button 1 Open the door and press 1 for 5 seconds the buzzer will sound once and enter to Programming Mode 2 prog displ...

Page 13: ...s number buttons LED will display the quantity preset time For example number button 5 and its preset time is 1 minute Then press then time will change to 1 00 1 0 8 1 48 4 When cooking program finish...

Page 14: ...en Mode Close the door will enter Ready Mode 6 If button not pressed at the last step the program cannot be saved but stay at previous way 15 SERVICE MODE 1 Open the oven door and press 3 for 5 second...

Page 15: ...crowave oven were used b Food is not defrosted completely c Cooking time power level is not suitable d Food is not turned or stirred a Use microwave safe cookware only b Completely defrost food c Use...

Reviews: