background image

CC-RD430DW 

ENG


5

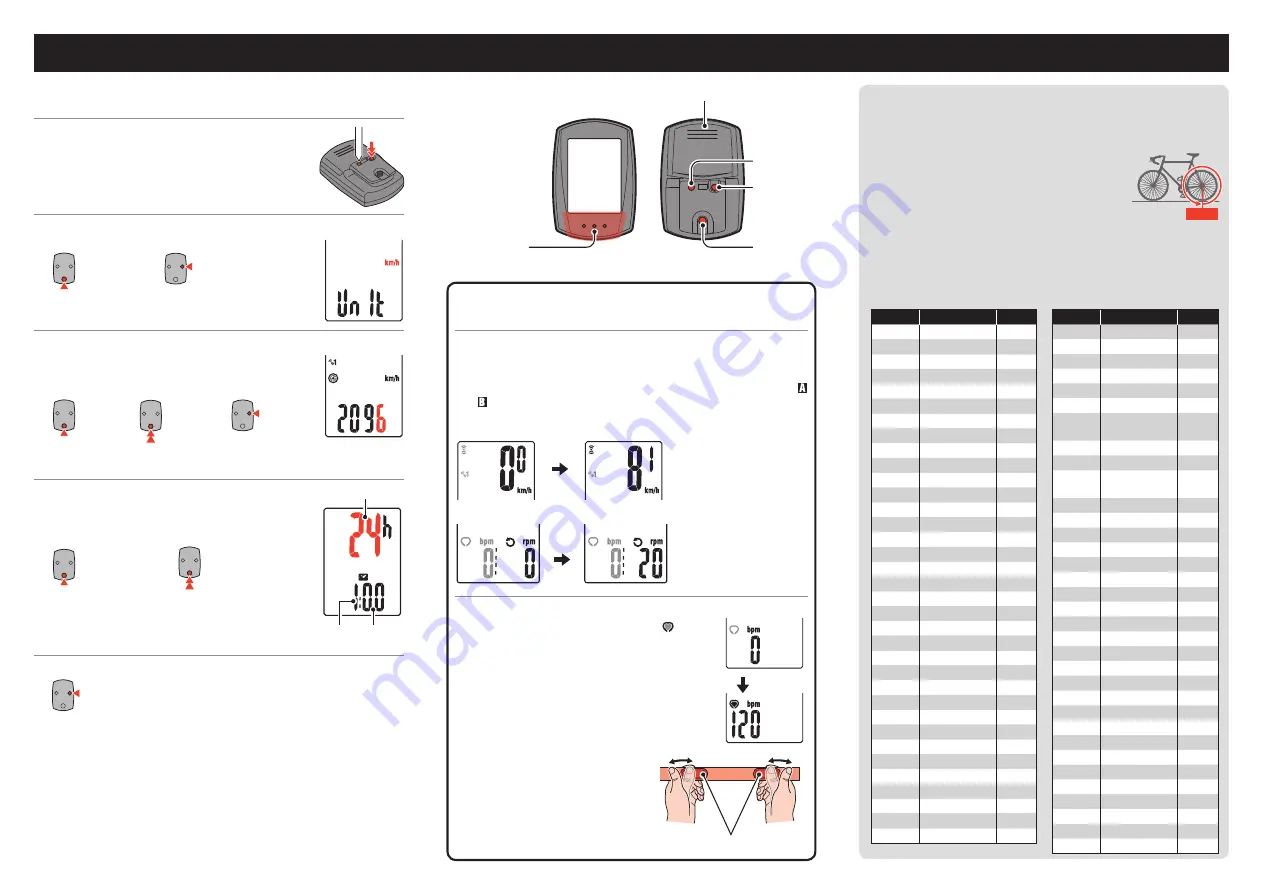
Operation test

Test the functioning of the speed sensor and the heart rate sensor.

Speed sensor

After installed, check that the speed is displayed when gently turning 

the rear wheel, whereas the cadence is displayed when turning the 

crank. When it is not displayed, check the installation conditions   

and   again (page 3).

Current speed

Cadence

Heart rate sensor

Press the MODE button to display   (heart 

rate).

It operates normally if the computer displays the 

heart rate after you wear the heart rate sensor.

* Even if the heart rate sensor is not 

worn, a heart rate signal is trans-

mitted by rubbing both electrode 

pads with your thumb. Use this as a 

simplified method.

Preparing the computer

Perform the following formatting operation, when you use the unit for the 

first time or restore the unit to the condition before shipment.

Format (initialize)

Press the MENU button on the back of the com-

puter and the AC button simultaneously.

Select the speed unit

Select “km/h” or “mph”.

MODE

km/h 

 mph

MENU

Register the 

setting

Enter the tire circumference

Enter the sensor-installed tire circumference in mm.

* Use “Tire circumference reference table” as a 

guide.

MODE

Increase 

the value

MODE

Move dig-

its (Press 

& hold)

MENU

Register 

the setting

Set the Clock

Pressing and holding the MODE button switches 

the display to “Displayed time”, “Hour”, and “Min-

ute” in order.

MODE

12h 

 24h 

or increase the 

value

MODE

Switch the 

screen or 

move digits

Press the MENU button to complete setting

MENU

Register the setting

(Finish)

AC

MENU

ETRTO

Tire size

L (mm)

47-203 12x1.75

935

54-203 12x1.95

940

40-254 14x1.50

1020

47-254 14x1.75

1055

40-305 16x1.50

1185

47-305 16x1.75

1195

54-305 16x2.00

1245

28-349 16x1-1/8

1290

37-349 16x1-3/8

1300

32-369 17x1-1/4 (369)

1340

40-355 18x1.50

1340

47-355 18x1.75

1350

32-406 20x1.25

1450

35-406 20x1.35

1460

40-406 20x1.50

1490

47-406 20x1.75

1515

50-406 20x1.95

1565

28-451 20x1-1/8

1545

37-451 20x1-3/8

1615

37-501 22x1-3/8

1770

40-501 22x1-1/2

1785

47-507 24x1.75

1890

50-507 24x2.00

1925

54-507 24x2.125

1965

25-520 24x1(520)

1753

24x3/4 Tubuler

1785

28-540 24x1-1/8

1795

32-540 24x1-1/4

1905

25-559 26x1(559)

1913

32-559 26x1.25

1950

37-559 26x1.40

2005

40-559 26x1.50

2010

47-559 26x1.75

2023

50-559 26x1.95

2050

54-559 26x2.10

2068

ETRTO

Tire size

L (mm)

57-559 26x2.125

2070

58-559 26x2.35

2083

75-559 26x3.00

2170

28-590 26x1-1/8

1970

37-590 26x1-3/8

2068

37-584 26x1-1/2

2100

650C Tubuler  

26x7/8

1920

20-571 650x20C

1938

23-571 650x23C

1944

25-571 650x25C 

26x1(571)

1952

40-590 650x38A

2125

40-584 650x38B

2105

25-630 27x1(630)

2145

28-630 27x1-1/8

2155

32-630 27x1-1/4

2161

37-630 27x1-3/8

2169

18-622 700x18C

2070

19-622 700x19C

2080

20-622 700x20C

2086

23-622 700x23C

2096

25-622 700x25C

2105

28-622 700x28C

2136

30-622 700x30C

2146

32-622 700x32C

2155

700C Tubuler

2130

35-622 700x35C

2168

38-622 700x38C

2180

40-622 700x40C

2200

42-622 700x42C

2224

44-622 700x44C

2235

45-622 700x45C

2242

47-622 700x47C

2268

54-622 29x2.1

2288

60-622 29x2.3

2326

Dot section

MODE

Electrode pad

Display format

Hour

Minute

Battery case cover

Tire circumference

You can find the tire circumference (L) of your tire size in the chart be-

low, or actually measure the tire circumference (L) of your bicycle.
•  How to measure the tire circumference (L)

For the most accurate measurement, do a wheel 

roll out. With the tires under proper pressure, 

place the valve stem at the bottom. Mark the 

spot on the floor and with the rider’s weight on 

the bike, roll exactly one wheel revolution in a 

straight line (until the valve comes around again to the bottom). Mark 

where the valve stem is and measure the distance.

* Measure the tire to which the sensor is installed.

•  Tire circumference reference table

* Generally, the tire size or ETRTO is indicated on the side of the tire.

L mm

MENU

AC

Summary of Contents for CC-RD430DW

Page 1: ...s own ID and the computer measures in syn chronization with the ID Two speed sensor IDs can be registered to one computer which can automatically identify two speed sensors once their IDs are registered in advance As a tire circumference is set to the speed sensor ID wheel selection by manual operation is no longer required which was necessary with conventional units The speed sensor currently rec...

Page 2: ...hand Tightening it strongly using a tool etc may damage the screw thread Remove Install the computer Bracket band Bracket band Bracket band Handlebar Click Dial Cut While supporting it by hand Push it out as if lifting the front up Stem Bracket Bracket Bracket Dial Bracket rubber pad Bracket rubber pad Bracket rubber pad When attaching the FlexTight bracket to the handlebar Caution Round off the c...

Page 3: ...llation conditions are satisfied When the sensor is not positioned appropriately in respect to the two magnets move the sensor back and forth so that it is posi tioned properly Sensor screw Loosen Speed sensor Cadence magnet Nylon ties Cadence magnet Pull securely Nylon ties Speed sensor Cadence magnet Adjust the position of the cadence magnet Wheel magnet Wheel magnet Adjust the position of the w...

Page 4: ...the heart rate sensor Adjust the HR strap length to fit your chest size underbust Fastening the strap too tightly may cause discomfort Ensure that the electrode pad is in direct contact with the body Wearing the heart rate sensor when your skin is dry or on top of your undershirt may produce measurement errors To avoid errors moisten the electrode pad The heart rate sensor consumes power when worn...

Page 5: ...2 406 20x1 25 1450 35 406 20x1 35 1460 40 406 20x1 50 1490 47 406 20x1 75 1515 50 406 20x1 95 1565 28 451 20x1 1 8 1545 37 451 20x1 3 8 1615 37 501 22x1 3 8 1770 40 501 22x1 1 2 1785 47 507 24x1 75 1890 50 507 24x2 00 1925 54 507 24x2 125 1965 25 520 24x1 520 1753 24x3 4 Tubuler 1785 28 540 24x1 1 8 1795 32 540 24x1 1 4 1905 25 559 26x1 559 1913 32 559 26x1 25 1950 37 559 26x1 40 2005 40 559 26x1 ...

Page 6: ...al icon It flashes in synch with a heart rate sensor signal The position changes according to the heart rate display position Elapsed Time 0 00 00 9 59 59 Clock 0 00 23 59 Heart rate 0 30 199 bpm Cadence 0 20 199 rpm Total Distance 0 99999 km mile Trip Distance 0 00 999 99 km mile Maximum Speed 0 0 4 0 105 9 km h 0 0 3 0 65 9 mph Trip Distance 2 0 00 999 99 km mile Average Speed 1 0 0 105 9 km h 0...

Page 7: ...ng for sensor ID Setting the clock Entering the total distance Selecting the measurement unit Setting the upper display Select the function for the upper display MODE MODE MODE To Searching for sensor ID MODE Setting the tire circumference Manually switch the speed sensor and enter the circumference size assigned to each sensor For the tire circumference see Tire circumference page 5 To change onl...

Page 8: ...h MODE MODE MODE MODE MODE MODE MODE RESET 12h 24h MODE km h mph MODE MODE MODE MODE MODE MODE MODE MODE MODE MODE To Setting the upper display To Entering the total distance From Setting the tire circumference From Setting the clock 0 23 1 12 00 59 00000 99999 Changing the settings Changing the settings Press hold Press hold Press hold In case of SP1 and SP2 In case of HR In case of cancel lation...

Page 9: ...over firmly COIN CR2032 After replacement check the position in respect to the magnet Reset the sensor by pressing RESET button when you replace the sen sor battery Close Close Open Open Battery case cover Display format Hour Minute Troubleshooting The current speed heart rate cannot be measured Check that the clearance between the sensor and magnet is not too large Clearance within 3 mm Check tha...

Page 10: ...ed CatEye cycle computers are warranted to be free of defects from materials and workman ship for a period of two years from original purchase If the product fails to work due to normal use CatEye will repair or replace the defect at no charge Service must be performed by CatEye or an authorized retailer To return the product pack it carefully and enclose the warranty certificate proof of purchase...

Reviews: