background image

e-Train Data™  

19

Zooming graph

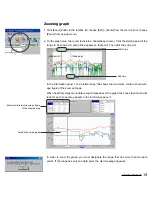
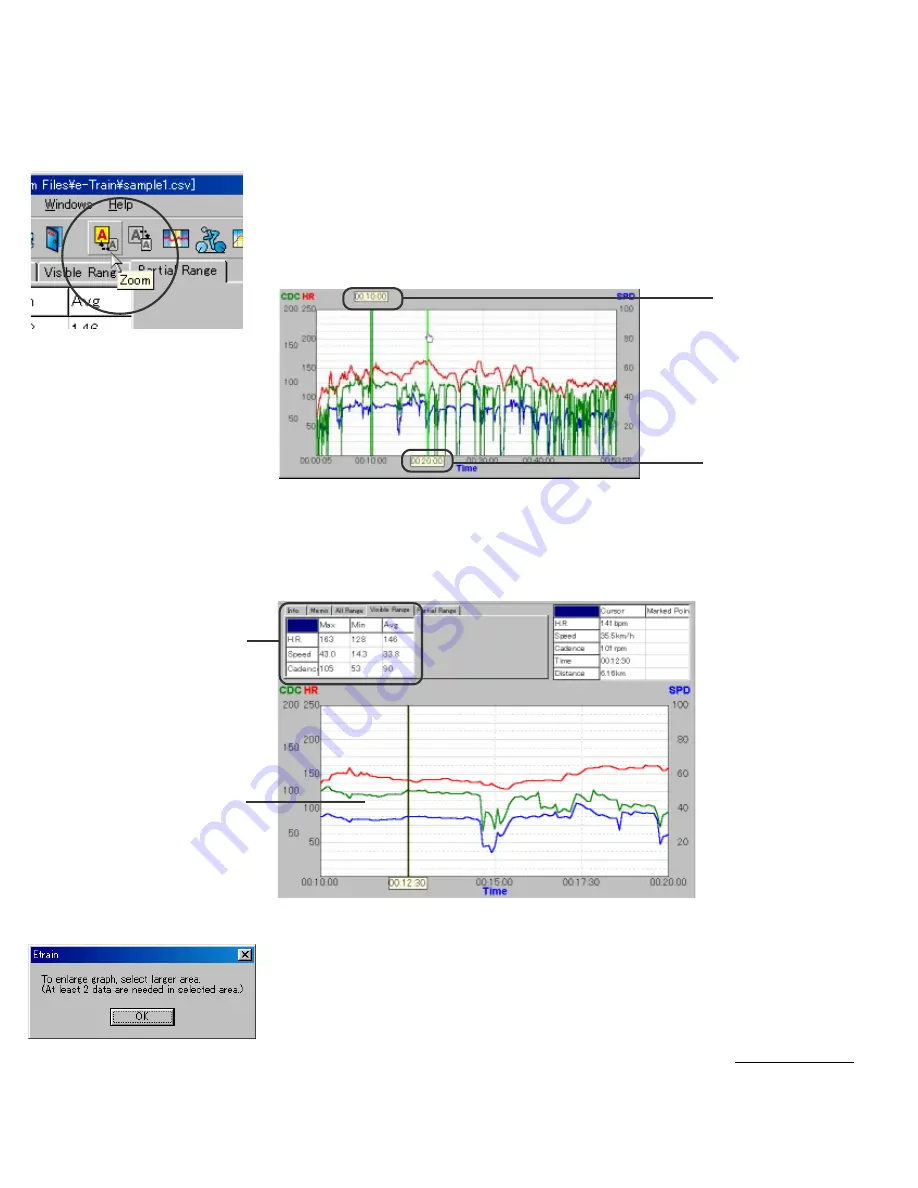
1. Click [Zoom] button in the toolbar. (Or choose [Edit] – [Zoom] from the menu bar; or choose

[Zoom] from pop-up menu.)

2. On the graph area, the cursor turns into a hand-shaped cursor. Click the starting point of the

range to be zoomed. A green line appears on that point. Then click the end point.

In the information panel 1, the “visible range” tab shows the maximum, minimum and aver-

age figure of the zoomed range.

When heart rate target zone data is superimposed over the graph, the zone stay time and its

ratio for each zone also appears in the information panel 1.

In order to zoom the graph, you must designate the range that has more than two data

points. If the range has only one data point, the alert message appears.

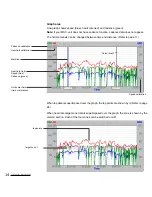
Start point

End point

Maximum/minimum/average figure

of the zoomed area

Start time

Laterally-zoomed graph

End time

Summary of Contents for E-TRAIN DATA

Page 1: ...hrough the manual store it in a safe place Important Always follow the cautions that are marked with Caution No part of this manual may be reproduced or transmitted without the prior written permissio...

Page 2: ...tems of dialog box For instance Select File Open means to click File in the menu bar and select Open from the pull down menu The following terms refer to the mouse techniques as follows Click To press...

Page 3: ...creen 10 Specifying range 18 Zooming graph 19 Reducing graph 20 Changing horizontal axis 21 Smoothing graph 22 Superimposing H R target zone data 23 Superimposing lap data 24 Viewing more than two fil...

Page 4: ...memory record data Multi Window More than two files can be displayed on the screen simultaneously Changeable Can change the horizontal axis between elapsed time and trip distance can also change the c...

Page 5: ...equipment To install and use e Train Data you need Computer Windows 95 98 or Windows 2000 RS232C serial port 9 pin to connect with the interface unit If you are using PC other than IBM or IBM PC AT y...

Page 6: ...and try again How to uninstall Double click My Computer Open Control Panel Add Remove programs Find e Train Data from the list and click it Click the Add Remove button Uninstallation is completed 1 St...

Page 7: ...tup dialogue box showing the install process 7 Select the directory where you will install the file and click Next A new folder is automati cally created 8 When installation is completed the following...

Page 8: ...unction you can analyze your data in detail Lap data alone can be displayed in the graphical form Heart rate target zone data alone cannot be displayed in the graphical form Instead it is shown in the...

Page 9: ...n in the toolbar Or choose Open from the File menu The following dialogue box appears 2 Choose the sample1 file and click Open The sample1 file memory record data appears 3 Click Close File button in...

Page 10: ...re common in memory record data lap data and heart rate target zone data Ineffective commands are shown in gray Screen of memory record data The screen consists of the tool bar information panel and g...

Page 11: ...unit The dialogue box opens Exit Exits e Train data Zoom Zooms the designated section of the graph Reduce Restores the zoomed graph to its previous state Specify Range The figures in the specified ra...

Page 12: ...splayed here Date and name is editable Memo tab Write any memo about the data here The maximum number of character is 30 000 All Range tab The maximum minimum and average figure in the whole range of...

Page 13: ...ate is being superimposed the zone stay time in each zone and its ratio is displayed in the All Range Visible Range and Partial Range tabs Information panel 2 The Cursor column shows the data where th...

Page 14: ...fer to page 11 Cadence calibration Heartrate calibration Speed calibration Markline Heartrate red Speed blue Cadence green When lap data is superimposed over the graph the lap points are shown by Refe...

Page 15: ...ched on off H R target zone Each zone listed in the sub menu can be switched on off Zoom In Z Zooms the designated section of the graph Reduce D Restores the zoomed graph to its previous state Specify...

Page 16: ...re the cursor now points Graph area The data of each lap point is shown speed blue heart rate red and cadence green Note If your MSC unit does not have cadence function cadence data does not appear Th...

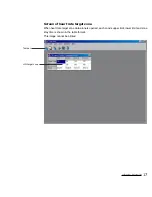
Page 17: ...reen of heart rate target zone When heart rate target zone data alone is opened each zone s upper limit lower limit and zone stay time is shown in the table format This image cannot be printed Tool ba...

Page 18: ...k the end of the range Another line appears on that point In the information panel 1 the partial range tab shows the maximum minimum and aver age figure of the specified range When heart rate target z...

Page 19: ...ation panel 1 the visible range tab shows the maximum minimum and aver age figure of the zoomed range When heart rate target zone data is superimposed over the graph the zone stay time and its ratio f...

Page 20: ...to its previous state Or choose Edit Reduce from the menu bar or choose Reduce from the pop up menu Reference This operation restores the graph to its previous state To return the graph to its origin...

Page 21: ...nge The Horizontal Axis button in the toolbar again It changes from Distance to Time Changing calibration in horizontal axis The setting of the horizontal axis can be changed 1 With a right click on t...

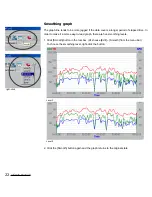
Page 22: ...time In order to make it a more easy to read graph there are five smoothing levels 1 Click Smooth button in the tool bar Or choose Edit Smooth from the menu bar To choose the smoothing level right cli...

Page 23: ...bar Or choose File Superim pose Training Zone from the menu bar A dialogue box appears 2 Choose the sample file sample1z csv and click Open The target zone 1 appears on the graph Reference More than...

Page 24: ...ears 2 Choose the sample file sample1l csv and click Open The lap data appears on the graph The lap points are shown by Reference Under normal conditions the information panel 2 shows the memory recor...

Page 25: ...more than two files on the screen You can open more than two files and view them at the same time on the screen 1 Click Windows in the menu bar and select the mode from Horizontal Vertical and Cas ca...

Page 26: ...26 e Train Data 2 In Cascade mode the clicked file comes up to the front Cascade...

Page 27: ...menu bar Select Monochrome or Color and click OK 2 Click Print button in the tool bar Or choose File Print from the menu bar 3 The dialogue box appears Change each setting as desired and click OK butt...

Page 28: ...28 e Train Data To exit e Train Data 1 Click the Exit button in the toolbar Or choose File Exit from the menu bar...

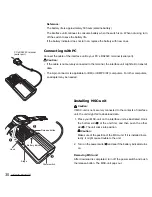
Page 29: ...s reach 1 Open the battery cover and select the port switch inside If you are using MSC 2Dx or MSC 3Dx select C port For models that transmit data by infrared ray select IR port 2 Install four AAA LR...

Page 30: ...AT computers For other computers an adapter may be needed Installing MSC unit Caution If MSC unit is not securely connected to the contacts of interface unit the unit might fail to download data 1 Pla...

Page 31: ...Start Windows 95 98 2000 2 Go to the Windows taskbar and click the Start button Select Program e Train Data e Train Data 3 Choose Edit Properties from the menu bar and select the communication port fr...

Page 32: ...not being able to download is that MSC unit is not securely connected to the contacts of interface unit Make sure that they are connected se curely If you fail to download many times press your MSC un...

Page 33: ...e the dialogue box appears Specify where you want to save the data name it and save Lap data heart rate target zone data When download finishes the dialogue box appears Specify where you want to save...

Page 34: ...ation port changes the setting of print ing mode View V Tool Bar T Show hides the toolbar Information Panel I Show hides the information area Record Memory A Show hides memory record data on the graph...

Page 35: ...n port correctly chosen Choose the correct communication port from Edit Properties of the menu bar Have you navigated your MSC unit to the readout screen Hold down Lap button of the MSC unit while it...

Page 36: ...use of production defect during normal use the unit is repaired or replaced free of charge Cat Eye must perform the service When returning the product for Cat Eye warranty service pack it carefully an...

Page 37: ...st as you would any other copyrighted material such as a book You shall agree not to modify adapt or translate the software You also agree not to reverse engineer decompile disassemble or otherwise at...

Reviews: