


13
OPERATING YOUR HG GRILL
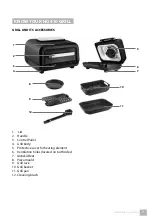
BASIC OPERATION
1. Place the grill on a flat, clean and heat-
resistant surface. Make sure it is folded
correctly.
2. Insert the mains cord plug into a power
socket. An audible warning sounds and
the control panel lights up briefly.
3. Press the On/Off button.
4. Select a programme and press the
START/PAUSE
button.
5. Wait for the grill to preheat.
6. When the
Add food
icon lights up, flip
the lid off and insert the food you want to
prepare and close the lid.
7. Check the condition of the food regularly
during preparation. Every time the lid is
opened, the grill is interrupted.
8. When the preparation is complete, an
audible warning will sound five times and
“END” will appear on the numeric display.
9. Remove the prepared food.
10. Unplug the power cord from the
mains socket and allow the grill to cool
completely before cleaning it.
11. Leave the lid ajar to allow the grill to cool
more quickly.
STARTING
1. Press the
On/Off
button. The numeric
display and control buttons light up. The
grill will automatically switch to standby
mode after 1 minute of inactivity.
2. If you press the on/off button while
the grill is running, food preparation is
cancelled, the grill stops heating and
switches to standby mode after 1 minute
of inactivity.
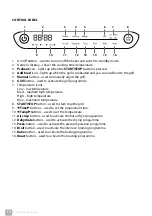
PROGRAMME SELECTION
1. Press the button for the selected
programme. Each has a preset
temperature and cooking time that can
be changed.
-
Grill
button – used to activate the grill
programme
-
Air crisp
button – used to activate the
hot air fryer programme.
-
Dehydrate
button – used to activate
the drying programme.
-
Pizza
button – used to activate the
pizza preparation programme.
-
Broil
button – used to activate the
intensive broiling programme.
-
Bake
button – used to activate the
baking programme.
-
Roast
button – used to activate the
roasting programme.
- Alternatively, press the
Manual
button
to set your own grill settings.
SETTING THE TEMPERATURE
To set the temperature, use the
Temp
button.
1. Select the desired programme.
2. Use the
Temp
buttons to adjust
the temperature. Each press increases/
decreases the temperature by 5 °C. Long
press to change the temperature in 10 °C
increments.
3. If you select the “Grill” programme, you
will use the buttons to select between the
temperatures: LOW – MED – HIGH – MAX.
4. If you need to adjust the temperature
while the grill is running, use the
Temp
buttons to do so.
SETTING THE COOKING TIME
The
Time
buttons are used to set the
preparation time.
1. Select the desired programme, adjust the
temperature as required.
2. Use the
Time
buttons to adjust the
cooking time. Each press increases/
decreases the cooking time by 1 minute.
Long press to change the cooking time in
5 minute increments.
3. If you need to adjust the cooking
time while the grill is running, use the
Time
buttons to do so.
REMARK:
TEMPERATURE AND COOKING TIME
ADJUSTMENTS DO NOT APPLY TO
PREHEATING.
Summary of Contents for HG 410
Page 2: ...HOT AIR GRILL...
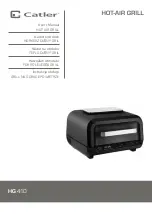
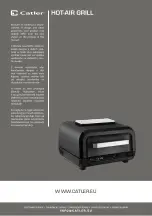
Page 4: ...4 CONGRATULATIONS Congratulations on the purchase of your new HG 410 hot air grill...
Page 19: ...19 NOTES...
Page 20: ...WWW CATLER EU...


