background image

14

OPERATING YOUR HG GRILL
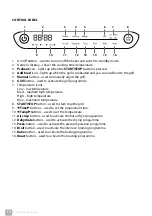
STARTING THE GRILL

1.  After selecting the programme, adjusting 

the temperature and cooking time, press 

the 

START/STOP

 button. The grill will 

start and preheat.

2.  If you press the 

START/STOP

 button 

while the grill is preheating/food 

preparation is in progress, the grill will 

stop running. Pressing the 

START/STOP


button again will restart the grill.

3.  If you need to change the cooking 

method, press the 

START/STOP

 button, 

select the new programme, adjust 

the temperature and cooking time as 

required, press the 

START/STOP

 button 

to confirm and the grill will resume 

operation at the new setting.

PREHEATING

•   When you press the 

START/STOP

 button, 

the grill preheating starts automatically. 

This function allows the interior of 

the grill to be heated to the required 

temperature.

•   Throughout the preheating process, the 

Preheat

 icon and the selected program 

icon will be lit. When the 

Add food


icon turns off and lights up, the grill is 

preheated to the desired temperature.

•   The preheating time usually takes 5 

minutes, depending on the preset 

or adjusted cooking time. Neither 

the preheat time nor the preheat 

temperature can be changed.

•   If you need to cancel the preheating 

process, press the button of the selected 

preset program while the 

Preheat

 icon 

is lit. The 

Preheat

 icon goes out and the 

preheating process is cancelled. The 

Add 

food

 icon will light up.

ADD FOOD – ADD FOOD ICON

•   Once the preheating process is complete, 

the 

Add food

 icon will automatically 

light up to indicate that food can be 

added to the grill.

•   Remove the lid, place the food in the 

grill and close the lid. The preparation 

process will start and the preset/adjusted 

preparation time will be counted down 

on the numeric display. The numeric 

display will alternately show the set 

cooking time and temperature.

•   If you do not open the lid and insert food, 

the grill will remain in preheat mode. If 

you do not insert food within 30 minutes 

of the preheating process, the grill will 

automatically shut down, stop heating 

and switch to standby mode.

INTERRUPTION OF OPERATION

•   Open the lid and the grill will 

automatically interrupt the programme 

in progress. The numeric display will 

show “

OPEN

”. After closing the lid, the 

grill starts again. It is not necessary to 

press the 

START/STOP

 button.

•   If the lid is left open for more than 4 

minutes, a warning will sound twice 

every 10 seconds. After 1 minute, the grill 

switches off.

REMARK:

WHILE THE GRILL IS RUNNING, THE 

FAN IS ALSO RUNNING. THIS IS 

NORMAL. THE FAN ENSURES PROPER 

AIR CIRCULATION AND PREVENTS 

THE INTERNAL COMPONENTS FROM 

OVERHEATING.

TURNING OFF

1.  When the preparation is complete, an 

audible warning will sound five times and 

“END” will appear on the numeric display. 

The control buttons go out except for the 

on/off button. The grill stops heating and 

only the fan remains running to cool the 

interior. It switches off after 1 minute, all 

buttons go out and the grill switches to 

standby mode.

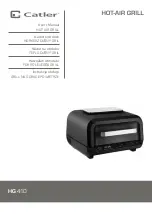
Summary of Contents for HG 410

Page 1: ...HG 410 User s Manual HOT AIR GRILL N vod k obsluze HORKOVZDU N GRIL N vod na obsluhu TEPLODU N GRIL Haszn lati tmutat FORR LEVEG S GRILL Instrukcja obs ugi GRILL NA GOR CE POWIETRZE...

Page 2: ...HOT AIR GRILL...

Page 3: ...0 grill 11 Before first use 11 Protective cover for heating element 12 Accessories and their use 13 Basic operation 13 Starting 13 Program selection 13 Setting the temperature 13 Setting the cooking t...

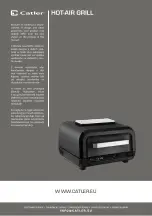
Page 4: ...4 CONGRATULATIONS Congratulations on the purchase of your new HG 410 hot air grill...

Page 5: ...e product in a safe manner and understand the potential dangers Children must not play with the appliance Cleaning and maintenance performed by the user must not be performed by children unless they a...

Page 6: ...appliance on an electric or gas stove or in its vicinity do not place it in the vicinity of an open fire or an appliance that is a source of heat Use the appliance with the accessories that came with...

Page 7: ...in an independent electrical circuit separated from other appliances Do not use adapter plugs or extension cords to connect the appliance to a power outlet To prevent electric shock do not submerge t...

Page 8: ...MENDS SAFETY FIRST PREPARE FOOD ONLY IN REMOVABLE CONTAINERS DO NOT POUR WATER OR PUT ANY FOOD IN UNTIL THE PAN IS IN PLACE CLEAN ONLY WITH A DAMP CLOTH AND THE APPLIANCE MUST BE DISCONNECTED FROM THE...

Page 9: ...ITS ACCESSORIES 1 2 3 4 5 6 7 8 9 12 10 11 1 Lid 2 Handle 3 Control Panel 4 Grill body 5 Protective cover for heating element 6 Ventilation holes located on both sides 7 Antiskid feet 8 Pizza mould 9...

Page 10: ...the grill programme 7 Temperature icons Low low temperature Med medium high temperature High high temperature Max maximum temperature 8 START STOP button used to start stop the grill 9 Time buttons us...

Page 11: ...tick to the heating element could burn cause unpleasant odours and even cause a fire It is therefore important that the protective cover is always fitted 1 Removing the protective cover Remove and cle...

Page 12: ...rill pan into the inner compartment of the grill The grill pan is a basic accessory that can be used to prepare food or used in combination with other accessories supplied 2 Grill rack place the grate...

Page 13: ...programme Each has a preset temperature and cooking time that can be changed Grill button used to activate the grill programme Air crisp button used to activate the hot air fryer programme Dehydrate b...

Page 14: ...ill light up ADD FOOD ADD FOOD ICON Once the preheating process is complete the Add food icon will automatically light up to indicate that food can be added to the grill Remove the lid place the food...

Page 15: ...Fish and seafood Kebab 2 Air Crisp programme hot air fryer Press the Air Crisp button to activate the hot air fryer programme The numeric display will alternate between the default cooking time of 00...

Page 16: ...broil programme The numeric display will alternate between the default cooking time of 00 10 and the temperature of 205 Use the Temp buttons to adjust the temperature between 50 C and 230 C Use the T...

Page 17: ...ive cover 2 Remove used accessories 3 Wash the grill pan grill rack basket pizza mould and protective cover in warm water with a little dishwashing liquid using a soft sponge Rinse in clean water and...

Page 18: ...disposal Ask your local authorities or collection facility for more details In accordance with national regulations penalties may be imposed for the incorrect disposal of this type of waste For busin...

Page 19: ...19 NOTES...

Page 20: ...WWW CATLER EU...

Reviews: