


15
OPERATING YOUR HG GRILL
2. If you need to turn the grill off before
the cooking time is up, press the on/
off button, the food will be cancelled,
the grill will stop heating and switch
to standby mode after 1 minute of
inactivity.
3. Remove the prepared food.
4. Unplug the power cord from the
mains socket and allow the grill to cool
completely before cleaning it.
5 Leave the lid ajar to allow the grill to cool
more quickly.
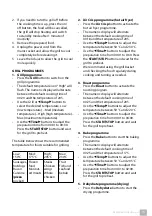
GRILL PROGRAMMES
1. Grill programme
• Press the
Grill
button to switch on the
grill programme.
• The default temperature icon “High” will
flash. The numeric display will alternate
between the default cooking time of
00:20 and the temperature of 205.
• Use the Grill or
Temp
buttons to
select the desired temperature: Low
(low temperature) – Med (medium
temperature) – High (high temperature) –
Max (maximum temperature).
• Use the
Time
buttons to adjust the
preparation time from 00:01 to 00:30.
Press the
START/STOP
button and wait
for the grill to preheat.
The table below shows the recommended
temperature for foods suitable for grilling.
Low:
150°C
Med:
175°C
High:
205°C
Max:
230°C
Sausages,
hotdogs
Bacon
Calzone
(
pizza
pocket)
Frozen
food
Marinat-
ed meats
Steaks
Chicken
wings
Whole
chicken
Fruit
Fish and
seafood
Kebab
2. Air Crisp programme (hot air fryer)
• Press the
Air Crisp
button to activate the
hot air fryer programme.
• The numeric display will alternate
between the default cooking time of
00:18 and the temperature of 205.
• Use the
Temp
buttons to adjust the
temperature between 50 °C and 230 °C.
• Use the
Time
buttons to adjust the
preparation time from 00:01 to 0:60. Press
the
START/STOP
button and wait for the
grill to preheat.
• We recommend using the grill basket
and checking the food regularly during
cooking and turning as needed.
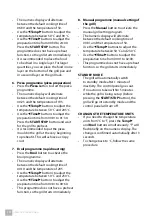
3. Roast programme
• Press the
Roast
button to activate the
roasting program.
• The numeric display will alternate
between the default cooking time of
00:25 and the temperature of 205.
• Use the
Temp
buttons to adjust the
temperature between 50 °C and 220 °C.
• Use the
Time
buttons to adjust the
preparation time from 00:01 to 04:00.
Press the
START/STOP
button and wait
for the grill to preheat.
4. Bake programme
• Press the
Bake
button to start the baking
programme.
• The numeric display will alternate
between the default cooking time of
00:25 and the temperature of 175.
• Use the
Temp
buttons to adjust the
temperature between 50 °C and 205 °C.
• Use the
Time
buttons to adjust the
preparation time from 00:01 to 02:00.
Press the
START/STOP
button and wait
for the grill to preheat.
5. Dehydrate programme (drying)
• Press the
Dehydrate
button to start the
drying programme.
Summary of Contents for HG 410
Page 2: ...HOT AIR GRILL...
Page 4: ...4 CONGRATULATIONS Congratulations on the purchase of your new HG 410 hot air grill...
Page 19: ...19 NOTES...
Page 20: ...WWW CATLER EU...


