background image

KM 

8012

Instruction Manual

STAND MIXER

Návod k obsluze

KUCHYŇSKÝ ROBOT

Návod na obsluhu

KUCHYNSKÝ ROBOT

Használati útmutató

KONYHAI ROBOTGÉP

Summary of Contents for KM 8012

Page 1: ...KM 8012 Instruction Manual STAND MIXER N vod k obsluze KUCHY SK ROBOT N vod na obsluhu KUCHYNSK ROBOT Haszn lati tmutat KONYHAI ROBOTG P...

Page 2: ...STAND MIXER...
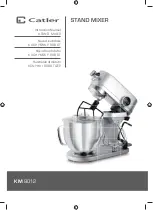
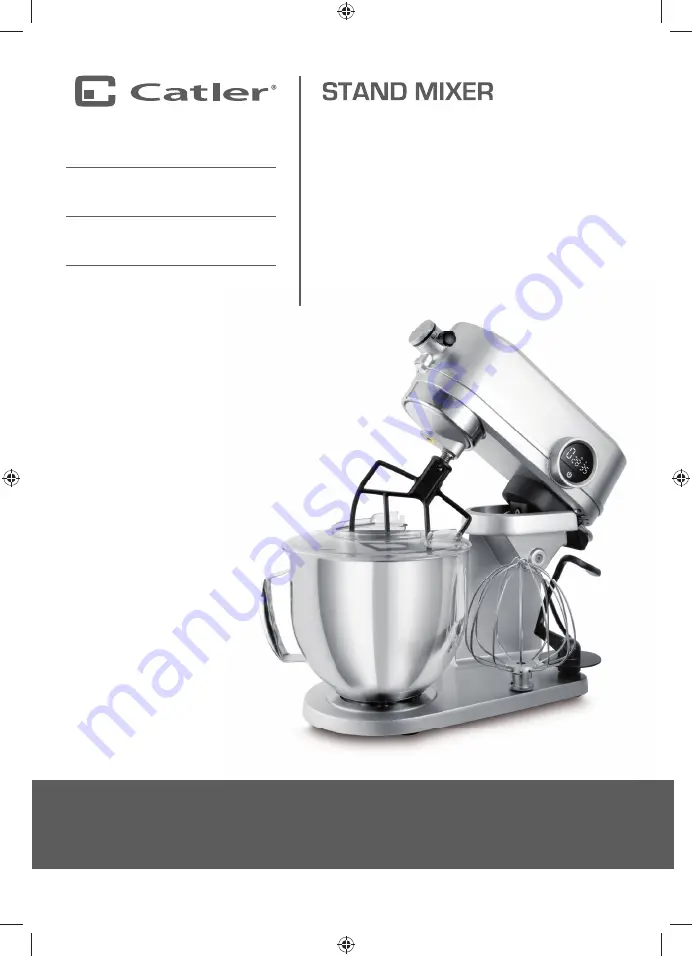
Page 3: ...ies 12 OPERATING YOUR STAND MIXER KM 8012 12 Before first use 12 Tilt back head 12 Turning on and off 12 Speed control 13 Using with the blending beaker 14 Using the meat grinder 16 Using the sausage...

Page 4: ...ies 12 OPERATING YOUR STAND MIXER KM 8012 12 Before first use 12 Tilt back head 12 Turning on and off 12 Speed control 13 Using with the blending beaker 14 Using the meat grinder 16 Using the sausage...

Page 5: ...en informed about how to use of the product in a safe manner and understand the potential dangers Children must not play with the appliance Cleaning and maintenance performed by the user must not be p...

Page 6: ...the accessories that comes into contact with food after each use according to the instructions in chapter Care and cleaning of these user s instructions Keep the appliance and its accessories clean a...

Page 7: ...resistant flat and dry surface away from the countertop edge Avoid placing the appliance on or in the vicinity of heat sources such as hot plates ovens or gas burners Vibrations during operation may c...

Page 8: ...peration under a heavy load for a period longer than 15 minutes Before turning it on again allow it to cool down for at least 10 minutes Do not lift the tilt back head or put your hands or items such...

Page 9: ...d the inside of the bowl Then you can continue processing To push the raw materials through the feed tube of meat grinder sausage attachment cookie attachment or cutting and grating attachment never u...

Page 10: ...the power cord For safety reasons we recommend to connect the appliance in an independent electrical circuit separated from other appliances Do not use adapter plugs or extension cords to connect the...

Page 11: ...current device standard safety switches in your power outlet to provide a higher level of protection when using the appliance We recommend to install a residual current device with a nominal residual...

Page 12: ...Locking screw 3 Front cover 4 Tilt back head 5 Speed control 6 Display 7 Lock button to lift and lower the tilt back head 8 Power On Off button 9 Stand mixer base 10 Spikes to store the accessories 11...

Page 13: ...hamber 2 Filling funnel 3 Screw shaft 4 Screw ring 5 Hopper 6 Grinding blade 7 Grinding discs 8 Plunger 9 Plunger cover 5 4 3 2 1 6 7 8 9 SAUSAGE ATTACHMENT 1 Wiener attachment 2 Sausage attachment 3...

Page 14: ...TTING AND GRATING ATTACHMENT 1 Grating attachment 2 Filling funnel 3 Plunger 4 Fine grater 5 Slicer 6 Coarse grater 1 2 3 6 5 4 PASTA ATTACHMENT 1 Pasta sheet roller attachment 2 Fettuccine pasta atta...

Page 15: ...ay will turn off To turn the appliance completely off unplug the power cord from the socket NOTE The appliance will automatically switch to stand by mode after about 5 minutes of inactivity Press the...

Page 16: ...ith your other hand 4 Insert the attachment on the shaft so that the tabs engage with the notches in the attachment Then turn the attachment clockwise This will fix the attachment on the shaft 5 Place...

Page 17: ...blade whisk Dough for pancakes bundt cakes whipping of cream egg whites etc ATTENTION If you are going to process solid mixtures such as bread doughs do not run the stand mixer for more than 10 minute...

Page 18: ...funnel and grind them WARNING To push meat through the filling funnel always use the supplied plunger Never use your fingers or other items 14 When all the raw materials have been processed set the s...

Page 19: ...into a power socket 11 Press the button A sound is made and 0 speed and 00 00 time will be shown 12 Put the wiener sausage making mixture in the hopper 13 Insert the casing natural or artificial on th...

Page 20: ...are and Cleaning chapter USING THE COOKIE ATTACHMENT 1 Put the stand mixer on clean firm and stable surface within easy reach of a mains socket 2 Insert the screw shaft in the grinding chamber Insert...

Page 21: ...put it on the countertop or in the sink Insert the front cover in the hole on the tilt back head and tighten the joining screw 17 Clean the attachment and the stand mixer according to the instructions...

Page 22: ...o push raw materials through the filling funnel always use the supplied plunger Never use your fingers or other items 11 When all the raw materials have been processed set the speed to 0 wait until th...

Page 23: ...Turn the speed control dial to set the required speed We recommend that you set the initial speed to 5 and adjust as needed 8 When all the raw materials have been processed set the speed to 0 wait un...

Page 24: ...d whisk Wash the blending beaker kneading hook beater blade and whisk immediately after use in warm water with a small amount of neutral washing up liquid Rinse in clean water properly and wipe dry Sh...

Page 25: ...the filling funnel you can also use a fine bottle brush DISASSEMBLING AND CLEANING THE CUTTING AND GRATING ATTACHMENT When the cutting and grating attachment has been removed from the stand mixer care...

Page 26: ...23 CARE AND CLEANING Remove the lid and insert all accessories step by step in the free space This will prevent possible injury by the grinding blade as well as the accessories from being lost...

Page 27: ...human health which could be caused as a result of improper liquidation of waste Please ask your local authorities or the nearest waste collection centre for further details The improper disposal of th...

Reviews: