01/2001, CATTRON
- THEIMEG
TM
Section 5, Page 9
Address digit #2 entry and report (CS controller only
), continued.
5. To increment the Address Digit #2 press and release button #1. Each depression will
increment the Address Digit by one, continuing from its present value until it reaches 15,
then will roll over to zero and start again (the unit will beep each time button #1 is
depressed).
6. Press button #4 to confirm your desired setting.
7. Once you have entered the desired Address Digit #2, set the ON/OFF switch on the PS
CS
controller to ‘OFF’ to permanently store Address Digit #2.
Address digit #3 entry and report (PSEZ and CS controllers).
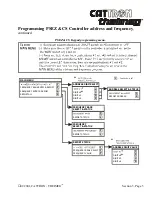
NOTES: (1) On the PSEZ Controller, address codes 00 and FF are not valid.
(2) On the PSEZ Controller, Digit #3 is the ‘High’ Digit and Digit #4
is the ‘Low’ Digit.
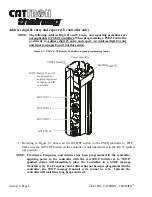
1. Referring to Figure 5-1 above, set the ON/OFF switch on the PS controller to ‘OFF’. Make
sure the red STOP Switch on the controller is unlatched and set to the ‘RUN’ (pulled up)
position.
NOTE: Provided a Frequency and Address has been programmed in the controller,
applying power to the controller with the red STOP Switch set to ‘STOP’
(pushed down) will immediately place the Controller in a STOP message
transmit cycle. If a Frequency and Address has not been pre-programmed in the
controller, the STOP message transmit cycle cannot be sent. Instead, the
controller will emit three long beeps and reset.
2. Press and hold down buttons #1 and #2 (see Figure 5-1 above) and set ON/OFF switch to
‘ON’. Pause approximately for one second or until the green LED illuminates, then release
buttons #1 and #2. The controller will emit one long ‘beep’, which means you are now in the
Main Menu
of the address and frequency program.
NOTE: The yellow LED will flash instead of the green LED when low battery voltage is
detected.
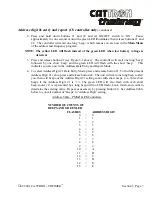
3. Press and release button #1. The controller will emit one long ‘beep’ followed by one short
‘beep’
and the green LED will flash with the short ‘beep’. This indicates you are now in the
Address Data Entry and Report Mode.
Summary of Contents for i-Key
Page 2: ......
Page 14: ...Page xii 01 2001 CATTRON THEIMEG TM EZ CS AT Rx Rx Tx Tx Tx Rx Rx Rx ...
Page 20: ...Section 1 Page 6 01 2001 CATTRON THEIMEG TM This page intentionally left blank ...
Page 44: ...Section 4 Page 4 01 2001 CATTRON THEIMEG TM ...
Page 52: ...Section 4 Page 12 01 2001 CATTRON THEIMEG TM This page intentionally left blank ...
Page 68: ...Section 5 Page 16 01 2001 CATTRON THEIMEG TM This page intentionally left blank ...
Page 75: ... 01 2001 CATTRON THEIMEG TM Section 6 Page 7 Item 7 Carrying strap shoulder Part 42C 0057 ...
Page 89: ......

