background image

EN-CAUG

2

Take enclosure out of box and remove plastic wrapper. Place the 

CAUG enclosure on your work-surface; plastic side down.

Turn your 2.5” SATA hard disk drive upside down, so that the 
metal side is facing the plastic enclosure.

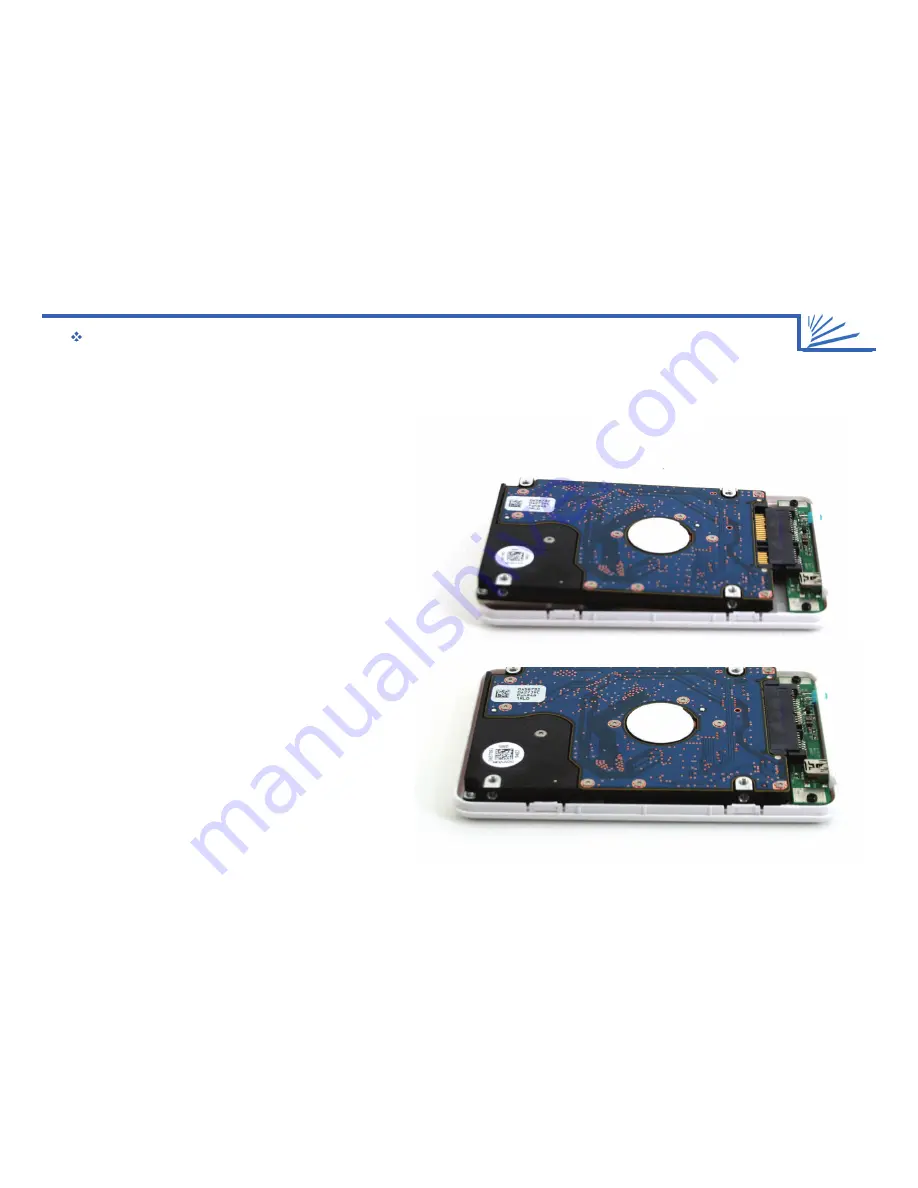
Insert your 2.5” notebook disk slowly, at a shallow angle, until it 
meets the SATA port inside the CAUG case. Lower the back-end 
of the 2.5” drive slowly towards the plastic case while 
simultaneously sliding it forward towards the SATA port. Once 
it’s connected, it will look like this:

ENCLOSURE

THE EN-CAUG ASSEMBLY GUIDE

1

STEP ONE

2

STEP TWO

3

STEP THREE

Your CAUG is designed to be rugged. In order to accomplish this, the CAUG enclosure will fasten to the 2.5” hard drive 

that you insert into it, permanently. As a result, you will need to format and test your 2.5” hard drive after connecting the 

drive to the first half of the enclosure (before closing the metal lid). See the instructions below:

Summary of Contents for EN-CAUG

Page 1: ...lows you to have maximum storage space maximum transfer speeds and portability without the hassle of using a bulky power supply The package contents include The CAUG enclosure The USB Y power data connector Quick Start Guide You will need not included One 2 5 SATA hard drive EN CAUG Enclosure Assembly Guide ...

Page 2: ... the 2 5 drive slowly towards the plastic case while simultaneously sliding it forward towards the SATA port Once it s connected it will look like this ENCLOSURE THE EN CAUG ASSEMBLY GUIDE 1 STEP ONE 2 STEP TWO 3 STEP THREE Your CAUG is designed to be rugged In order to accomplish this the CAUG enclosure will fasten to the 2 5 hard drive that you insert into it permanently As a result you will nee...

Page 3: ...t utility Now that you have verified your drive is working you can finish assembling First close any applications which might be accessing the drive and disconnect the USB 2 0 cable Warning Do not format the drive if you have pre existing data For detailed instructions on initializing and formatting your drive for Windows MAC operatin systems please go to our website at http www cavalrystorage com...

Page 4: ...turn your unit over reconnect the USB cable and check for the assigned drive letter within My Computer Enjoy your stylish new drive Place the metal cover over the plastic case Make sure that the front side of the metal lid is facing the same direction as the front side of the plastic case Carefully align the tabs along the edge of the metal cover with the channels along the edge of the plastic cov...

Reviews: