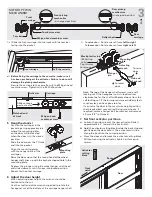
1 Activator positioning
Before mounting the track in the opening you will
need to insert the front and rear activators into the
track. Use the formula (right) to measure from the
notched end of the track to the center of the activator.
Only tighten one screw on the activator as this
is an approximate position. Final position will be
determined later.
If your door protrudes out of the pocket in the open
position you will need to take this distance away
from the rear activator formula.
(e.g. DW + 20¾” - 4”).
These instructions cover the preparation of doors to be
fitted into a pocket that has the CS SofStop Track fitted.
Read through the notes carefully before beginning as
different mounting plate positions and set-ups may be
required for different configurations.
Go to page
2
(overleaf)
IMPORTANT
The CS SofStop carriages require a clean track running
surface free of any contamination or damage.
After installation but before lining, clean the full length
of the inside running surface of the track with a soft
rag, then TAPE UP THE TRACK to ensure no dust or
debris enter the track during building works.
Make sure no dirt, grit or aluminum swarf gets into
the track. This could impair the smooth running of the
carriages.
1
PAGE
Installation
Instructions
Twin Action Soft Open & Close
Ensure rear activator is positioned correctly
in the track BEFORE lining the wall.
READ INSTRUCTIONS BEFORE INSTALL.
Activator
Slide activator
into track
Grub
screws
Notched end
of track
Opening
CL
With the door open, loosen the all four Activator grub screws until the activator slides freely in the track.
Roughly position the Activator in the centre of the door opening and tighten
one of the four grub screws to fix it in position.
Marked line
Activator
Positioning
Template
Gently close the door, it should stop before hitting the closing jamb. Open the door, the Sofstop Mechanism is now activated.
Open the door and loosen the grub screw to allow the Activator to slide freely in the track.
Open the door. Without moving the activator tighten one of the four grub screws.
Place the 'Activator Positioning Template' at the end closest to the cavity pocket and mark a line.
Remove the Template and loosen the grub screws. Slide the Activator up to the marked line.
Without moving the Activator tighten all four grub screws. The Activator is now positioned.
SETTING THE ACTIVATOR
Rear activator
Rear
activator
Rear
activator
Rear
activator
Front
activator
Front
activator
Front
activator
Front
activator
Track
notch
Track
notch
Track
notch
Track
notch
Door
Door
Door
Door
Track
stop
Track
stop
Track stop
Track stop
ACTIVATOR POSITIONING
A
- Rear track stop
DW + 20¾”
DW + 20¾”
DW + 22
7/8
”
DW + 22
7/8
”
11½”
11½”
13½”
13½”
C
- Front track stop
D
- Front & rear track stops
B
- No track stops
Note: if the activator position falls over a track mounting
hole, re-drill the mounting hole in a new position. Make
sure you blow out the swarf so it does not impact the
performance of the system.


