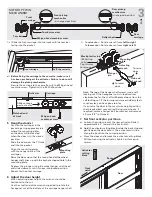
4 Install the SofStop mechanism
.
If the pocket frame has been supplied with head jambs
fitted, remove the jamb from one side to allow access to
carriages for mounting and vertical height adjustment.
Re-fix the head jamb once door has been mounted and
desired door clearance is achieved.
Screw fix pocket
header into lintel/
stud when using
heavy doors
Clearance 3/8”-13/16”
(adjustable)
1 3/8”
Lintel
Head
top
approx. 3/8” clearance
Timber
pelmet
block
Head
jamb
Head jamb
SofStop
cassette
2
1
Rear carriage
Notched
end of
track
The mechanism fits together as shown (top of page 3).
The activators should already be in the track. If they are
not, follow instruction 1 on Page 1.
To load the SofStop
mechanism into the track:
To load the SofStop mechanism into the track:
a) Insert the rear carriage in from the notched end of the
track. Note: Rear carriage does not have a tow bar.
b) Insert the cassette into the notched end of the track,
dolly wheel first, ensuring that the pickup mechanism is
facing up.
2
PAGE
PREPARING DOORS -
With Stops
Black
plastic
stop
Track
stop
150mm (6”) to
center of boss
hole
20-21mm
(13/16”)
5-5.5mm (1/4”)
SUGGESTED
T-GUIDE
PLACEMENT
Door
T-Guide
Casings
Pocket framing
Drill ø25mm (1”)
13mm (1/2”)
deep
PREPARING DOORS
- Without Stops
5-5.5mm (1/4”)
20-21mm (13/16”)
T-Guide
Drill ø25mm (1”)
13mm (1/2”)
deep
Mounting
plate
85mm (3-3/8”)
to center of
boss hole
Plunger pin
Fit screws
as shown
2 Prepare the door(s).
Drill holes in the positions as shown (below).
Screw both mounting plates to the door with
the plunger pins facing towards the edges of the
door. Make sure they are placed exactly in the
center of the door thickness.
3 Fix the T-Guide
.
Fix the T-Guide to the floor so that it is not visible when
the door is in the pocket. The front edge of the T-Guide
should sit flush with the final casings.
Fix after door
installation
At the bottom of the door, cut a groove to the
dimension and tolerance shown. Make it central
of the door thickness and absolutely straight.


