background image


15 

Setup 


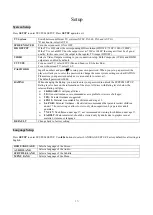
System Setup 

 
Press 

SETUP

 to enter SYSTEM SETUP. Press 

SETUP

 again to exit. 


TV System   


Switch between different TV systems (NTSC, PAL60, PAL and AUTO).   
*If not known, select AUTO. 

SCREEN SAVER


Turn the screen saver ON or OFF. 

HD OUTPUT


If the TV is HD, select the corresponding HD resolution (HD OFF / 720P / 1080i / 1080P). 
If the TV


is not a HDTV but the output is set at 720P or 1080P, the image will not be of good 

quality. In this case, reset the output to the regular TV image (HD OFF).


VIDEO


Select a Video Output according to your connection setup. Both Composite (CVBS) and HDMI 
outputs are enabled by default.   

TV TYPE


For a normal TV, select 4:3PS (Pan and Scan) or 4:3(Letter Box).   
For a wide-screen TV, select 16:9. 

PASSWORD


Input 4 numbers and press 


to setup your own password. When you set up a password, the 

player will ask you to enter the password to change the some system settings such as RATING. 
Please store your password safely as we are not able to retrieve it. 
The default password is 0000. 

RATING


When changing the Rating, you need to enter your password to unlock the SYSTEM SETUP. 
Rating level is base on the information of the discs. All discs with Rating levels below the 
selected Rating will play. 


1 KID SAFE:

 It will play all discs. 


2 G:

 General Audience; recommended as acceptable for viewers of all ages. 


3 PG:

 Parental Guidance suggested. 


4 PG13:

 Material is unsuitable for children under age 13. 


5-6 PG-R:

 Parental Guidance - Restricted; recommended that parents restrict children 

under 17 from viewing or allow to view only when supervised by a parent or adult 
guardian. 


7 NC-17:

 No children under age 17; not recommended viewing for children under age 17. 


8 ADULT:

 Mature material; should be viewed only by adults due to graphic sexual 

material, violence or language. 

DEFAULT


Change back to factory setting. 


Language Setup 


Press 

SETUP

 to enter SYSTEM SETUP. Use 

◀▶

 buttons to select LANGUAGE SETUP. Factory default for all settings is 

English.


OSD LANGUAGE


Select a language of the Screen. 

AUDIO LANG


Select a language of the Audio.


SUBTITLE LANG


Select a language of the Subtitle. 

MENU LANG


Select a language of the Menu. 


Summary of Contents for 205G USB

Page 1: ...1 Multi Format Karaoke Player CAVS 205G USB USER MANUAL ...

Page 2: ... IR Input 6 Connections Connecting to the Power Supply 7 Connecting the Audio Out to Amplifier 7 Connecting the Video Out to TV Monitor 7 Connecting with a Coin Machine 8 Connecting with a Flash Drive or Card 8 Basic Operation 9 Karaoke Operation 11 Setup System Setup 14 Language Setup 14 Audio Setup 15 Video Setup 15 Speaker Setup 15 Digital Setup 16 Trouble Shooting 17 Specification 18 ...

Page 3: ...E PARTS INSIDE REFER SERVICING TO QUALIFIED SERVICE PERSONNEL Thi symbol indicates that dangerous voltage which can cause electric shock is present inside this unit This symbol alerts you to important operating and maintenance instructions accompanying the unit WARNING To reduce the risk of fire or electric shock do not expose this appliance to rain or moisture CLASS 1 LASER PRODUCT KLASSE 1 LASER...

Page 4: ...ayer or disc have been stored in cold temperatures If transporting the player during the winter wait approximately 2 hours until the unit has reached room temperature before using The batteries used with this product contain chemicals that are harmful to the environment Do not dispose of batteries in the general household trash Handling discs Do not touch the playback bottom side of the disc Hold ...

Page 5: ...SE Open Close the Disc Tray 15 DISC TRAY 16 CARD INPUT 17 MICROPHONE 1 2 VOLUME Adjust the volume of Microphone 1 2 18 USB INPUT 19 MICROPHONE 1 2 INPUT Rear Panel 1 COMPOSITE CVBS VIDEO OUT 2 AUDIO LEFT OUT 3 AUDIO RIGHT OUT 4 COAXIAL OUT 5 COIN For use with a Coin machine connect a cable from Coin machine to this port 6 SCORE When microphones are connected to an external amplifier connect a cabl...

Page 6: ...Speed Fast forward at 2X 4X 8X 20X Normal Speed Skip to the Previous Song or Track Skip to the Next Song or Track MENU Create the song list of SCDG or MP3G files to USB or CARD as SONGLIST TXT file Move to the disc menu mode TITLE Enter the TITLE mode of Disc PBC CUE PASS Playback Control for Video CD Jump to the beginning of the Video RETURN Return to the previous step on the file list Navigate b...

Page 7: ...ception Performance connect an External IR Sensor to the IR INPUT Jack of the Player CAUTION Do not mix old and new batteries Never mix different types of batteries standard alkaline etc Do not expose batteries to heat or flame BUTTONS FUNCTION SLOW Play in slow forward reverse motion ZOOM Enlarge a particular area of the displayed image at 2X 3X 4X 1 2 1 3 1 4 OFF INFO Display the playback time a...

Page 8: ...raoke 2 Connect Coaxial Digital to the amplifier The audio output does not contain the microphone singing 3 SCORE INPUT When microphone is connected to the amplifier connect a cable between MIC OUTPUT of the amplifier and SCORE of the Player to generate the Score after singing 4 For digital amplifier connect HDMI to the amplifier When the player is connected with microphone the audio output contai...

Page 9: ...le and press ENTER or PLAY button to start playback NOTE Supported file Super CD G SCDG MP3 G AVI MPG and JPG Supported System FAT32 only NTFS is not supported Supported Capacity External HDD up to 2TB CARD up to 256GB Each folder in the HDD Flash Drive or Card can hold up to 32767 song files Use multiple folders when storing more than 32767 song files Be sure the External HDD has its own power co...

Page 10: ...once to play the file track desired and press again to pause the playback To return to playback press again STOP Press STOP to end the playback On DISC you can resume the playback by pressing the PLAY Press the STOP twice to stop the playback completely Press PREVIOUS or NEXT to skip to the previous or next track or file Press to change the playback speed Fast Reverse 2X 4X 8X 20X Normal Play Fast...

Page 11: ... Depending on discs this feature may not be available INFO Press INFO for the display of the playback time and the Disc information on the TV screen SUBTITLE Press SUBTITLE to select a different subtitle language Depending on the disc different language options for subtitle will be available GOTO TIME SEARCH Press GOTO button and select a chapter or input a time with NUMBER 0 9 buttons Press ENTER...

Page 12: ...MP3 G You can reserve up to 16 songs on the PROGRAM LIST Select a song using the SONG LIST or NUMBER INPUT mode Press RESERVE button to program the song in the PROGRAM LIST Repeat the steps above to program more songs That is go to SONG LIST or NUMBER INPUT select a song and press RESERVE button to program the song When done programming songs press the PLAY button in the PROGRAM LIST to start play...

Page 13: ...ghlight a MP3 G file in the SONG LIST and press RIPPING button When Do you want to copy it to USB CARD appears select ONE or ENTIRE to start copying the Disc or select Cancel to cancel the copying ONE Copy the selected song only ENTIRE Copy from the selected file to the last file in the folder Copied files are saved at DISC TO MP3G folder in FLASH DRIVE CARD Repeat the above steps to continue copy...

Page 14: ...y all SCDG MP3 G Songs on the Screen Press MENU button to create the list of all SCDG MP3 G files The resulting SONG LIST TXT file will be saved at the ROOT of the Flash Drive CARD Print the SONG LIST TXT file for paper songbooks REPEAT Press REPEAT to change the repeat mode of programmed song by ONE ALL and OFF ONE Repeat the currently playing song ALL Repeat all songs continuously OFF Repeat Off...

Page 15: ...eve it The default password is 0000 RATING When changing the Rating you need to enter your password to unlock the SYSTEM SETUP Rating level is base on the information of the discs All discs with Rating levels below the selected Rating will play 1 KID SAFE It will play all discs 2 G General Audience recommended as acceptable for viewers of all ages 3 PG Parental Guidance suggested 4 PG13 Material i...

Page 16: ...ge the Echo Level of microphone sound output OFF 2 4 6 8 MIC VOL Change the Volume of microphone sound output OFF 2 4 6 8 Video Setup Press SETUP to enter SYSTEM SETUP Use buttons to select VIDEO SETUP BRIGHTNESS Set the brightness of the video from range 0 12 CONTRAST Set the contrast of the video from range 0 12 HUE Set the hue of the video color to increase red color color to increase green col...

Page 17: ...mic range between OFF 1 8 2 8 7 8 1 DUAL MONO Set the Dual Mono modes from STEREO MONO L MONO R and MIX MONO STEREO The proper channel output through both right and left speakers MONO L the left side channel output through both right and left speakers MONO R the right side channel output through both right and left speakers MIX MONO the mixed two channel output through both right and left speakers...

Page 18: ...nect it On Screen Menu icons not displayed or only partially displayed on the TV Screen Select the appropriate TV Screen type by consulting the operating manual for the TV The player is not working normally When NO DISC message appears on the display of the main unit enter the SETUP mode select DEFAULT and all settings will return to the default values Press the POWER button to reboot the player O...

Page 19: ...C Multi System Video Output Composite HDMI VIDEO AUDIO Output Progressive Scan up to 720P 1080i 1080P Audio Output AUDIO L R Out For Karaoke HDMI VIDEO AUDIO Out For Karaoke COAXIAL Out Input Microphone Input 2EA Flash Drive 1EA Ver2 0 Card Input 1EA Others Power source DC 5V Adapter AC 100 240V 50 60Hz Power consumption 15W ...

Reviews: