background image

User Manual


2.3 Remote Control 


Mouse Operation 

You can use a mouse instead of front panel buttons or remote control. 

In menu lock mode, Enter into pop-up menu and clicking any sub menu to pop up Log-in 

window; on menu unlock mode,    enter into pop-up menu, and then clicking left key to 

enter into any sub menu directly.


After entering main menu, clicking left key could enter into any sub menu; On[Detailed 

file] menu mode, clicking left key could playback one recording file. 

Change the status of check box and motion detection area. 

Clicking combo box to access pull-down menu 

By clicking left key you can adjust Color control bar and volume control bar. 

By clicking left key you can select values in edit boxes or pull-down menu and supports 

Chinese word input, special symbol, numeric and character input, use instead of 

[Enter-    ] or [Backspace 

Click left key of 

Mouse 

In the [Detailed file] menu mode, clicking left key will playback one recording file. 

In live display mode, clicking right key will display pop-up menu (shown as Picture 5-1). 

Click right key of 

Mouse 

In Main menu or sub menu mode, clicking right key will exit current menu. 

Double-click Left 

key of Mouse 

In live display or playback mode, double-clicking left key will maximize the screen. 

Moving Mouse 

Select menu item 

Sliding Mouse 

On motion mode, sliding mouse will select motion area; On [Color set] menu mode, 

sliding mouse will adjust color control bar and volume control bar. 

List 2-3 

1-8 

Channel Select 1-8 ; Numeric key


9

Numeric Key   

ALL 

Preview all Channel 

Menu 

Enter/Exit Main Menu 


Up Key 


Down Key 


/


Left / Right Key 

SEL 

Select Key/ Edit Key 


Rewind key 

10 


Play Key, Enter to recording search menu 

11 


Forward Key 

12 


Manual Recording 

13 


Pause / Frame Play 

14 


Stop manual recording; Stop Playback 

15 

Audio 

Undefined 

16 

Mute 

Undefined 

Summary of Contents for 4CH

Page 1: ...User Manual ...

Page 2: ... Hard Drive Installation 8 3 2 Camera and Monitor Connection 8 3 3 Power Supply connection 8 Chapter 4 DVR Boot up 9 4 1 System Initialization 9 4 2 Main Interface 9 Chapter 5 DVR Menu 9 5 1 Main Menu Preview 10 5 2 Main Menu 10 5 2 1 Camera setup 11 5 2 2 Record setup 11 5 2 3 Network Set 12 5 2 4 Recording Search 14 5 2 5 Multi player 15 5 2 6 Device Management 16 5 2 6 1 HDD Management 17 5 2 6...

Page 3: ... 6 3 Main Interface of Net viewer 27 6 3 1 Menu column 27 6 3 1 1 Live 27 6 3 1 2 Replay 27 6 3 1 3 Setup 28 6 3 1 4 Log out 30 6 3 2 PTZ Control 30 6 3 3 Live Play Control 30 Chapter 7 Specifications 31 Chapter 8 Windows Vista User 32 Chapter 9 Appendix 34 9 1 Operation Function Table 34 9 2 Recording Alarm setting 35 9 3 Troubleshooting 35 9 4 Email server check list The below info only for your...

Page 4: ...contact an authorized dealer or service center 8 Do not attempt to remove the top cover Warning You may be subjected to severe electrical shock if you remove the cover of the DVR 9 Handle DVR box carefully If you accidentally drop your DVR on any hard surface it may cause a malfunction If the DVR doesn t work properly due to physical damage contact an authorized dealer for repair or exchange 10 Us...

Page 5: ...ouse operation for faster menu navigation PTZ Control Supports PTZ camera operations through RS 485 List 1 1 Other Features H 264 video compression format supports D1 HD1 CIF resolution ADPCM audio compression format Windows Graphical interface BNC and VGA video out ports Supports remote live viewing via 3G mobile networks Supports sending email alerts when motion is detected by system Triplex rec...

Page 6: ...icator flashes it means the hard drive is being read or written to 5 Channel Select CH1 CH2 CH3 CH4 Select Single Channel Display 6 QUAD Display all cameras in Live display or playback mode 7 REW Move Left Rewind 8 PAUSE Pause play frame by frame 9 PLAY Enter into pop up Menu Play 10 FWD Move Right Play Forward 11 STOP Stop Playback stop manual recording 12 REC Start Manual recording 13 MENU ESC E...

Page 7: ...3 FWD Play Forward Move Right 4 HDD HDD Indicator 14 STOP Stop Playback Stop manual Recording 5 SEARCH Recording Search 15 REC Manual Recording 6 MUTE Audio Mute key 16 MENU ESC Menu Escape 7 CH Switch to previous channel 17 UP Move Up 8 CH Switch to next channel 18 SEL EDIT Select Edit 9 ALL Preview all channels 19 DOWN Move Down 10 REW Rewind Move Left 20 PTZ Move to PTZ control mode ...

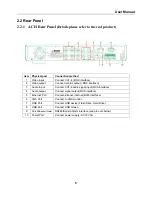
Page 8: ...NC interface 3 Audio inp ut Connect CH1 4 audio signal input RCA interface 4 Audio output Connect signal output RCA interface 5 Ethernet Port Connect intranet internet RJ45 interface 6 VGA Port Connect to VGA monitor 7 USB Port Connect USB device Flash Drive Hard Drive 8 USB Port Connect USB mouse 9 RS 485 Sensor Alarm RS485 Sensor Alarm interface see pin outs below 10 Power Port Connect power sup...

Page 9: ...t functions from left to right Pin 1 2 PTZ Control port Pin 1 RS 485A Pin 2 RS 485B Pin 3 4 Sensor 1 input Pin 5 6 Sensor 2 input Pin 7 8 Sensor 3 input Pin 9 10 Sensor 4 input Pin 11 12 Alarm Output 8 CH RS485 Sensor Alarm port functions from left to right Pin 1 2 PTZ Control port Pin 1 RS 485A Pin 2 RS 485B Pin 3 4 Sensor 1 input Pin 4 5 Sensor 2 input Pin 6 7 Sensor 3 input Pin 7 8 Sensor 4 inp...

Page 10: ...ut use instead of Enter or Backspace Click left key of Mouse In the Detailed file menu mode clicking left key will playback one recording file In live display mode clicking right key will display pop up menu shown as Picture 5 1 Click right key of Mouse In Main menu or sub menu mode clicking right key will exit current menu Double click Left key of Mouse In live display or playback mode double cli...

Page 11: ...urely 3 Put the upper cover back carefully re attach screws 3 2 Camera and Monitor Connection Connect camera cable to video input of DVR and from video output of DVR to Monitor via BNC connector Refer to section2 2 Rear Panel or If the camera is a PTZ speed dome you could connect RS485 A B to the according port of DVR respectively refer to system figuration on Chapter 8 3 3 Power Supply connection...

Page 12: ...ializing After finishing system initialization the system will enter into main interface Picture 4 2 is the main interface displayed by system which is showing no video input status Once there are video inputs the interface will display live images from the cameras In main interface mode if you use the mouse to double click the live image of any channel the image will be maximized to full screen b...

Page 13: ...ove in the menu and the SEL button to select the icon You use the ESC button to return to previous window In Main Menu mode you can control device management settings such as Camera Recording Network Recording search HDD Alarm PTZ Control Mobile Phone motion detection etc you can also set system function settings such as Time setting User password Picture 5 2 Main Menu Rec Search Search Playback F...

Page 14: ...each channel can be previewed or not under Live display and or Recording mode Please note that the name of each channel supports up to eight characters or four Chinese characters Click Main Menu Record to enter into Record Setup menu Shown as Picture 5 5 Functions 1 The Rec Mode button allows you to setup recording 24 hours on motion or on a set schedule 2 PACK time indicates maximum continuous ti...

Page 15: ...button You can also click on the Default button to use the system defaults The system default settings are Hr01 00 am 07 59 am No recording Hr08 00 am 18 59 pm Normal recording Hr 19 00 pm 00 59 pm Alarm recording Explanation Under the recording Set menu and recording search menu original color stands for no recording Red stands for alarm recording Green stands for normal recording and Blue stands...

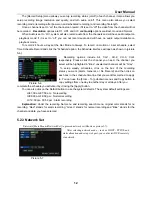
Page 16: ... net mask gateway and web port shown as picture 5 9 Picture 5 10 Picture 5 11 If you need to visit DVR via Internet you should setup the inflection of video port at the public Router located in the DVR shown as Picture 5 11 Host Port 9000 Web Port 8080 LAN IP address of DVR 192 168 1 101 Input http router IP 8080 192 168 1 101 8080 to you computer IE browser then you will visit your DVR freely If ...

Page 17: ...ents on the current page except those you have currently selected Recording File Backup If you want to backup one recording from the file list you just select the recording and click Backup button When the backup is completed you will be notified Please click OK button to save your backup shown as Picture 5 22 Explanation Backup file will be in H264 format you can convert it to AVI format using th...

Page 18: ...ill be played on the according channel 3 The Menu brief on the bottom of multimedia player Date recording date for the current backup file shown as right corner 24H recording time lie under Date menu Black number button stands for current recording playback is normal recording for the time line 0 60 Minute recording time quantum Green part on play processing bar stand for recording length for one ...

Page 19: ...ting parameter will be available after re starting multimedia player after Audio on set up Setting Audio channel setting Normal video Bar Select the channel you want to playback the audio Select the channel has audio files Apply OK After successfully setting the above when you playback the current channel you can open the channel s audio function at the same time as the video 5 2 6 Device Manageme...

Page 20: ...f When the function is on system will issue alarm sound and display video loss on the preview interface when the function is off system will have no alarm sound but the preview interface will display video loss ALARM MANAGE Alarm Output 0s 10s 20s 40s 60s Buzzer time 0s 10s 20 40s 60s and alarm duration time 0s 30s 1minute 2minute 5minute Click Main Menu Device HDD to enter HDD Management menu sho...

Page 21: ... Email Alarm Notification to send notice to email account when motion alarm is triggered Please set SSL to On via Gmail com server and set to Off via other mail server If your setting is still not right please contact the web site where you have applied for your email box to get SMTP server and SSL of mail box SMTP Port indicates sender port of SMTP server Generally the SMTP port value is 25 but C...

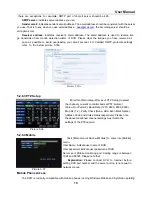
Page 22: ...TZ Setup 5 2 6 4 Mobile Mobile Phone Access The DVR is currently compatible with mobile phones running Windows Mobile and Symbian operating Enter into Main menu Device PTZ Setup to select the channel you want to control and set PTZ protocol Pelco D or Pelco P Baud Rate 1200 2400 4800 9600 Stop bit 1 2 Parity Check None Odd Even Mark Space Address Code and Cruise status respectively Please note the...

Page 23: ...u can do this by attaching the mobile phone to a computer and copying the file from the CD to the memory card on the phone or by copying the file from the computer to the phone s memory card through a memory card reader or through a Bluetooth connection 2 Click the windows mobile folder red box in Pic 1 and choose the file QQeye Select the file which will open the window in Pic 3 The file is gener...

Page 24: ...dd and deduct and Iris Add and deduct and Snap to capture screen image 8 Display mode You can convert normal display into full screen display by clicking the screen on the mobile phone displayed as Pic 9 When accessing from a mobile phone with Symbian operating system use the following procedure 1 First you need to copy the file with suffix QQeye CAB that is included on the CD disk to the mobile p...

Page 25: ... the DVR is attached to refer to section 5 2 3 Network Setup on page 14 of the product manual Server Port Web port Same as the web port setting on the DVR you need to forward this port from the Router to the DVR Setting range is between 1024 and 65535 the default setting is 18600 Note this port is in addition to the ports used for standard remote access User Name Same as user name setup in DVR und...

Page 26: ...io Video Setting Language select System Info and System Maintenance After entering into the System you can configure the system to meet your needs Click the Main menu System Date Time in turn to Enter into the time setup menu shown as Picture 5 41 to not only modify system date time date time format and time zone but also setup DST day saving time status and mode Picture 5 38 MD AREA This option a...

Page 27: ...his option allows you set the device ID for the DVR and set the system password if you want to use one The new passwords will be available after clicking APPLY button When you set Password Enabled to ON shown as Picture 5 43 you can setup a user password and administrator password respectively The password supports up to 6 characters Click Main Menu System VIDEO to setup Video here you can set Cam...

Page 28: ... software firmware and set system auto maintenance Click Main menu System Maintain to enter into the System Maintain menu shown as Picture 5 47 When opening auto maintain function you can setup system to restart regularly As a system safety feature you can click Menu Lock menu to lock menu when leaving the DVR If you want to login to the DVR you would input device code and password refer to the Me...

Page 29: ...t downloaded successfully please check if your browser s safety level or firewall setting is too advanced Also refer to section 5 2 3 Network Setup to make sure network configuration is correct ports are forwarded correctly and ActiveX is enabled 6 2 Log in to NetViewer After webcam installs plug ins please select log in language Chinese or English and enter password and click Log in button and no...

Page 30: ... Live After Logging in to system system will enter into Live display shown as Picture 6 3 6 3 1 2 Replay Play button Play Pause Stop button stop playing recording F F button fast forward playback recording This option allows you to playback recordings remotely First select the day channel and type and proceed searching and refreshing second select any event from search result list to playback Plea...

Page 31: ...ble The modification method to DVR via Net viewer is the same as local adjustment of DVR Record Alarm Click Alarm menu to enter into its sub menu shown as Picture 6 7 You can set I O alarm for every channel motion detection alarm motion recording motion trace motion sensitivity video loss alarm HDD not enough space alarm HDD not found alarm and alarm output time etc For details on setup method ple...

Page 32: ... methods are the same as local DVR setup Please refer to Section 5 2 3 Network Set Picture 6 10 Picture 6 11 Click setting menu to enter into the menu interface shown as Picture 6 11 Click button to preview net viewer recording saving path and screen capture saving path The menu also allows you to set a lower bandwidth for Internet video transmission set user password turn daylight saving time on ...

Page 33: ... to section 5 5 cruise set GOTO on the preview mode please input one presetting bit no and click GOTO button you could fix the presetting bit quickly Clean clean presetting bit setting Cruise control cruise status including on and off 6 3 3 Live Play Control On Off Live display When Live display status is On Clicking the button closes Live display When Off clicking the button opens the Live displa...

Page 34: ...sensor triggered Record Pack Time 15 30 45 60min Video backup USB flash disk removable HDD USB Burner Network backup to AVI File Format Playback Mode PLAY SLOW FWD Frame by Frame Alarm I O 4 CH alarm inputs 1 CH alarm output 8 CH alarm inputs 1 CH alarm output Alarm Type Motion sensor triggered Video loss HDD Space HDD Loss PTZ Control Built in RS 485 port supports PELCO P PELCO D USB 2 0 Port Sup...

Page 35: ... into Tool bar and select to appear the below picture 2 Second select icon and tick the settings of ActiveX controls and plug ins to Enable details as follows 3 4 Lastly after tick all the Enable please click to exit At this moment you could input IP address to run your programme ...

Page 36: ...ng as follows Click Start Set Control panel User account to set user access authority shown as below picture Remind If the widgets are not downloaded successfully please check if your browser s safety level or firewall setting is too advanced Open IE browser to enter into tool Internet Option Internet user defined level enable widgets Downloading and auto running install widgets need one minute pl...

Page 37: ...lecting CH and setting PTZ protocol baud rate and PTZ address for the CH 27 MP Monitor Setting user name password and server port Advanced Setting System Maintenance Setting system auto maintenance maintenance time regularly system upgrade ex factory default value recovery and manual restart system 22 Network Setting Network and Port setting Selecting network mode and setting net viewer port web p...

Page 38: ...a fan to help it dissipate heat while it is working Please place the DVR in a place where there is good air circulation and away from high temperatures to increase stability and life of the DVR 5 Q My remote control does not work when the DVR is in Live mode but the front panel buttons are working what is wrong A Make sure nothing is blocking the LED on the remote or the receiver on the DVR if bot...

Page 39: ...net www 163vip net smtp 163vip net pop 163vip net www tom com tom com smtp tom com pop tom com www 263 net 263 net smtp 263 net pop3 263 net x263 net smtp x263 net pop x263 net 263 net cn smtp 263 net cn pop 263 net cn www qq com qq com smtp qq com pop qq com www 139 com 139 com smtp 139 com pop 139 com www 21cn com smtp 21cn com pop 21cn com 21cn VIP mail vip 21cn com vip 21cn com etang com smtp ...

Page 40: ...User Manual 37 9 6 System connection Configuration 4 CH 8 CH ...

Page 41: ...guarantee is given as to the correctness of its contents We do not undertake any responsibility for the harms cause by using our product The model of the products in the user s manual only for recognition but these names also perhaps are belong to other company s registered trademark or the copyright The product picture may differ from the actual product only for your reference The accessories wil...

Reviews: