background image

Battery charging and power on.

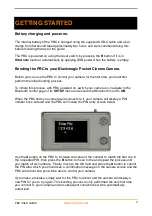
The internal battery of the PBC is charged using the supplied USB-C cable and a full 
charge from flat should take approximately two hours and we recommend doing this 
before following the rest of the guide.

The PBC is powered on using the reset switch, by pressing the 

B

 button if it is in 

Hibernate

 mode or automatically by applying USB power when the battery is empty.

Bonding the PBC to your Blackmagic Pocket Cinema Camera.

Before you can use the PBC to control your camera for the first time, you must first 
perform the initial bonding process. 

To initiate this process, with PBC powered on, switch your camera on, navigate to the 
Bluetooth control page of its 

SETUP

 menu and ensure that Bluetooth is set to 

ON

.

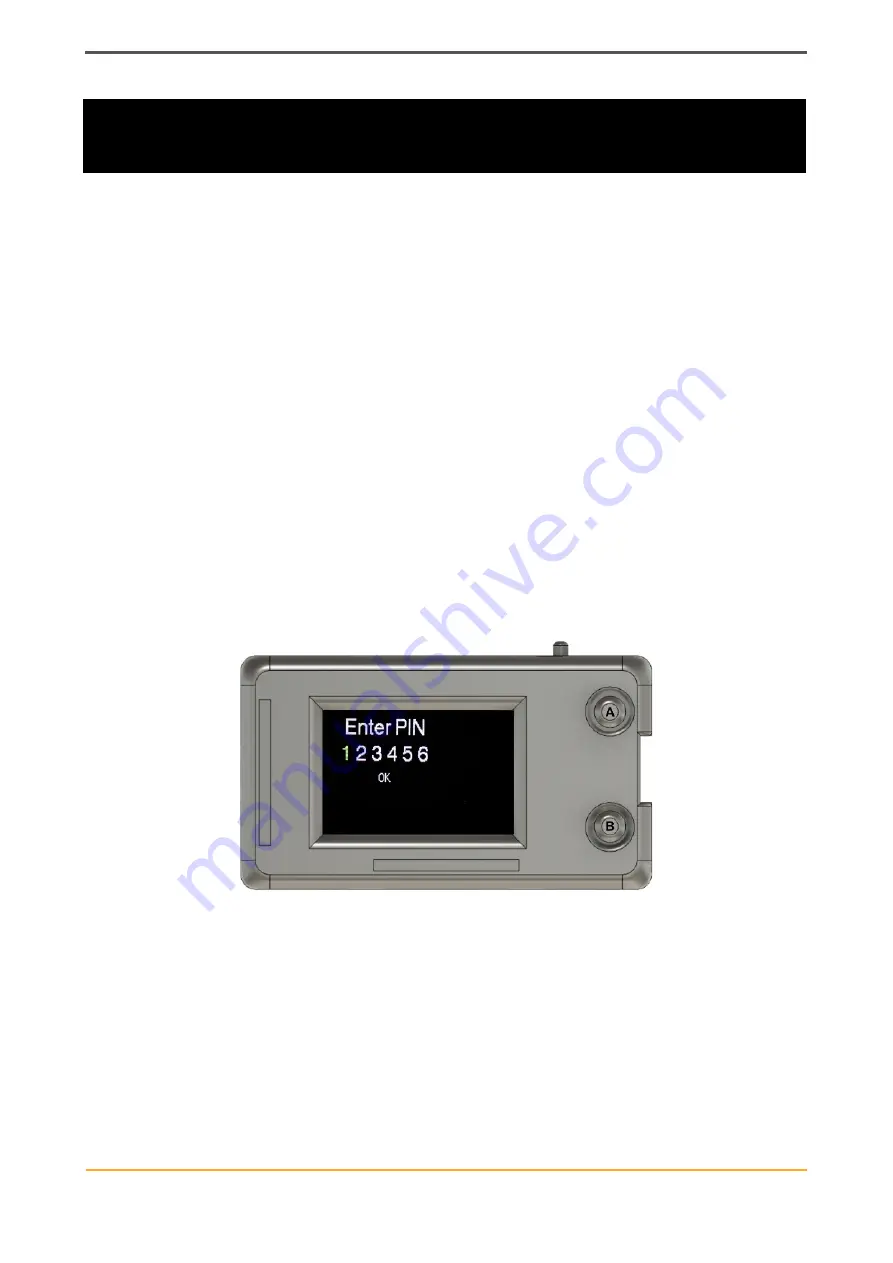
When the PBC finds you camera and connects to it, your camera will display a PIN 
number to be entered and the PBC will invoke the PIN entry screen below.

Use the 

A

 button on the PBC to increase the value of the number to match the first one in 

the requested PIN, then press the 

B

 button to move to the and repeat the process until 

you match all six numbers.  Finally, move to the OK field and press the 

A

 button to submit 

the PIN after which you should see a confirmation message on the camera screen and the 
PBC will reboot and you will be able to control your camera.

If you make a mistake, simply wait for the PBC to reboot and the camera will display a 
new PIN for you to try again. This bonding process is only performed the very first time 
you connect to your camera and all subsequent connections will be automatically 
authorised.

PBC USER GUIDE

WWW.CDATEK.COM

3

GETTING STARTED

Summary of Contents for PBC

Page 1: ...PBC USER GUIDE PBC USER GUIDE WWW CDATEK COM 1 ...

Page 2: ... your camera at any one time from a selection of sixteen possibilities The PBC is fitted with an internal high capacity battery that provides a continuous run time of up to five hours and is re charged from its USB C port using the supplied cable and can also be powered directly from this port whilst it is re charging In addition the PBC can also be used as an interface hub to allow wireless focus...

Page 3: ...re that Bluetooth is set to ON When the PBC finds you camera and connects to it your camera will display a PIN number to be entered and the PBC will invoke the PIN entry screen below Use the A button on the PBC to increase the value of the number to match the first one in the requested PIN then press the B button to move to the and repeat the process until you match all six numbers Finally move to...

Page 4: ...t Lens Aperture Top Right Shutter Angle Middle Left ISO Middle Right Control Layer only applicable when using focus controller Bottom Left Temperature Bottom Right Tint As this is a live status display any changes made by you using the PBC or on the camera itself will automatically be updated and will turn Red whenever the camera is in Record to give you a high visibility status confirmation PBC U...

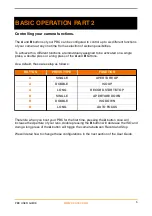
Page 5: ... are setup as follows Therefore when you boot your PBC for the first time pressing the A button once will increase the Aperture of your lens double pressing the B button will decrease the ISO and doing a long press of the A button will toggle the camera between Record and Stop We will detail how to change these configurations in the next section of the User Guide BUTTON PRESS TYPE FUNCTION A SINGL...

Page 6: ...the connection process to the camera automatically after a few seconds If you have pressed the A button then you will be presented with the main Setup Menu screen The menu is navigated using the B button to move to the next item and then pressing the A button will action that choice In the case of items with multiple options pressing the A button will activate the next option Navigating to Restart...

Page 7: ...cleus Nano or our upcoming PXP P4K Tilta If you are using a Pocket 4K with a Tilta Nucleus Nano P6K Tilta If you are using a Pocket 6K with a Tilta Nucleus Nano P4K PXP If you are using a Pocket 4K with our upcoming PXP P6K PXP If you are using a Pocket 6K with our upcoming PXP How to select your Display Scheme option With the Display Scheme option you can choose from any one of four different bac...

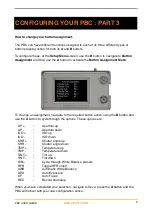
Page 8: ...the required button action using the B button and use the A button to cycle through the options These options are AP Aperture up AP Aperture down ISO ISO up ISO ISO down SHR Shutter angle up SHR Shutter angle down TMP Temperature up TMP Temperature down TINT Tint up TINT Tint down WB Cycle through White Balance presets HFR Toggle HFR on off AWB Automatic White Balance AEX Auto Exposure AF Auto Foc...

Page 9: ...abase The LENS DATABASE option enables you to delete any number of the stored calibrations to enable you to re calibrate them when you next connect it to the camera and is accessed by navigating in the main Setup Menu to Lens Database and pressing the A button With the LENS CALIBRATIONS screen open navigate to Lens using the B button and then select the required lens for deletion using the A butto...

Page 10: ...o clear all Bluetooth bonding information from the PBC to your Pocket Cinema Camera This function is only required you have used the CLEAR ALL option either intentionally or accidentally in your camera Setup to delete all bonded devices If you use the Clear Bonds function then you must also use the CLEAR ALL function in the camera Setup before attempting to connect again and bond again The final o...

Page 11: ...e the PBC features and additional two automatic methods for entering Hibernate mode The first method happens during the Scanning process where if the PBC cannot find an available camera to connect to it will switch to Hibernate mode When the PBC is connected to the camera the second automatic method is invoked if the camera breaks communication for a period of 20 seconds This second method provide...

Page 12: ...ype below The PBC case has two sets of integral channel slots on the front and back to accommodate the adapter to enable you to have the flexibility of connecting it to any standard 1 4 20 mount from either below or from the side The adapter is connected by loosening the screw and placing the grips into the required channel slots on the PBC and then tightening the screw again PBC USER GUIDE WWW CD...

Page 13: ...ng down the UP triangle on the wheel to enter the configuration menu followed by navigating to the BLUETOOTH entry double pressing the UP triangle again and then pressing the DOWN triangle to toggle it to ON As the Nucleus Nano wheel does not store the Bluetooth mode setting on power off you must switch it to ON prior to using it with the PBC again if you have powered the wheel down in the meantim...

Page 14: ...the current focus position as the FAR position With these focus points stored a LONG PRESS of the B button toggles in and out of FOCUS LOCK mode indicated by LK on the display When you are in FOCUS LOCK mode the Nucleus Nano wheel will only affect the focus when it is positioned within the range of the two stored NEAR and FAR positions When you are in the secondary Control Layer the functions assi...

Page 15: ...igate to Calibrate and press the A button to begin The PBC will then automatically move the lens focus position step by step towards the infinity focus position and when it reaches that point you must press B to stop it Once you have done this navigate to Save with the B button press A to complete and the lens will be added to the LENS DATABASE and its individual calibration will automatically be ...

Reviews: