background image

12

C. Timer

The timer can be set to a maximum of 60 minutes. Turn the dial clockwise to the maxi-
mum setting of 60 minutes then turn it anti-clockwise until it reaches the desired time.
When the set time expires the timer bell will sound.

NOTE: 

The oven will not switch itself off at the end of the timed period.

Safety devices

For safety reasons, it is not allowed to use the oven burner and the electric grill togeth-
er, at the same time.

The electric grill only operates when the oven thermostat control knob is on
position 

(out),

as:

– when the oven burner is alight a safety device stops the ignition of the electric grill.

– if the electric grill is on, the same safety device cuts off the element if the oven ther-

mostat control knob is turned on.

1 - Max

Grill with the door closed.

Set the temperature to the desired setting

which can be varied between 1 and max. Before using the grill, pre-heat

for about 5 minutes.
Position the grill pan on the highest shelf position and check continually
as food could easily burn. The indicator light will cycle with the grill ele-
ment.

Grill with the knob set to 

Max

position for maximum 15 minutes, then

to position 

4

for maximum 15 minutes.

Caution: the oven door becomes very hot during operation. 
Keep children well out of reach.

B. Grill and Light Selector

The light will switch on automatically while grilling and can be selected
when using the oven.

Summary of Contents for CD 307

Page 1: ...Before operating this oven please read these instructions carefully Users Operating Instructions Gas Ovens CD 307 GB...

Page 2: ...nd fully how to operate your appliance Please keep the booklet handy You may wish to refer to it at a later date CDA IMPORTANT INFORMATION FOR CORRECT DISPOSAL OF THE PRODUCT IN ACCORDANCE WITH EC DIR...

Page 3: ...Blue Neutral Brown Live As the colours of the wires in the mains lead for the appliance may not correspond with the coloured markings identifying the terminals in your spur box proceed as follows 1 T...

Page 4: ...put of the appliance as specified under installation 1 The appliance flexible connector should not be subject to undue forces either in normal use whilst being connected or disconnected 2 The applianc...

Page 5: ...of a gas hob but if there are other fuel burning appliances in the same room BS5440 1976 should be consulted to determine the necessary air vent requirements The oven is designed to fit into a cabine...

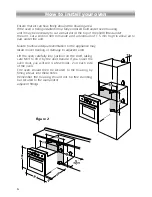
Page 6: ...the unit Failure to allow adequate ventilation to the appliance may result in over heating or damage to adjacent units 560 591 594 594 540 20 555 m in 550 560 50 585 Figure 2 Lift the oven carefully...

Page 7: ...ubstitute the oven burner injector as follows Open the oven door completely Remove the burner cover Fig 3 Remove the burner by unscrewing the two front screws Fig 4 Unscrew the oven burner injector Fi...

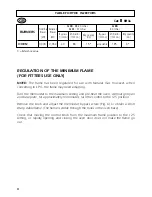
Page 8: ...on Remove the knob and adjust the thermostat by pass screw Fig 6 to obtain a short sharp stable flame The flame is visible through the holes in the oven base Check that moving the control knob from th...

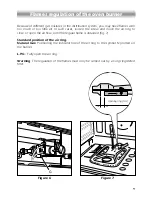
Page 9: ...open the air flow until the regular flame is obtained fig 7 Standard position of the air ring Natural Gas Positioning the indicator line of the air ring to the symbol N printed on the burner L P G Ful...

Page 10: ...ps it sliding out faces the inside of the oven Fig 9 Before using the oven for the first time we recommend that you clean it with soapy water rinse carefully and heat for 30 minutes at maximum tempera...

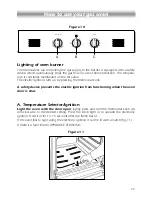
Page 11: ...the electronic ignition it can be lit with a match fig 11 If there is a fault refer to APPLIANCE SERVICING Figure 10 Figure 11 Lighting of oven burner The thermostatic tap controlling the gas supply...

Page 12: ...ition of the electric grill if the electric grill is on the same safety device cuts off the element if the oven ther mostat control knob is turned on 1 Max Grill with the door closed Set the temperatu...

Page 13: ...liance which forces cool air over the fascia panel when the oven reaches a set temperature to prevent it from becoming too hot The fan will continue to operate after the oven has been switched off unt...

Page 14: ...its rich plain cakes 325 F slow oven i e Madeira Low temp roasting 4 180 C Warm Plain cakes Victoria 350 F oven sandwich raised meat pies 5 190 C Moderate Small cakes savoury flans 375 F oven fish 6 2...

Page 15: ...s clean and wipe fre quently with hot soapy water Rub gently so as not to damage the surface Never use abrasive cleaning products Do not leave acid or alkaline residues lemon juice vinegar salt tomato...

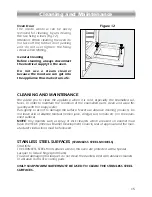
Page 16: ...or rough edges that may cause injury ENAMELLED PARTS All the enamelled parts must be cleaned with a sponge and soapy water only or other non abrasive products It is advisable to use a Chamois leather...

Page 17: ...oven selector to 0 Switch off and isolate the power 2 When the oven is cool reach back and upwards inside the oven the bulb is in the top left corner 3 Unscrew the light glass cover replace the bulb...

Page 18: ...n available when booking a service call 1 Model type make and model see the front of this manual 2 Evidence of installation purchase date 3 Retailer where appliance was purchased 4 Clear and concise d...

Page 19: ...ate must be produced before a service call will be booked The appliance must be used for domestic purposes only Appliances used for commer cial or professional purposes are not covered by the guarante...

Page 20: ...s booklet are given as simply indicative The manufacturer reserves the right considering the characteristics of the models described here at any time and without notice to make eventual necessary modi...

Reviews: