background image

6

Using your extractor

For best performance, you should switch on the extractor 15 minutes 
before starting to cook and leave it to run for approximately 15 
minutes after the end of cooking (you can use the timer function, 
detailed on page 7, for this).

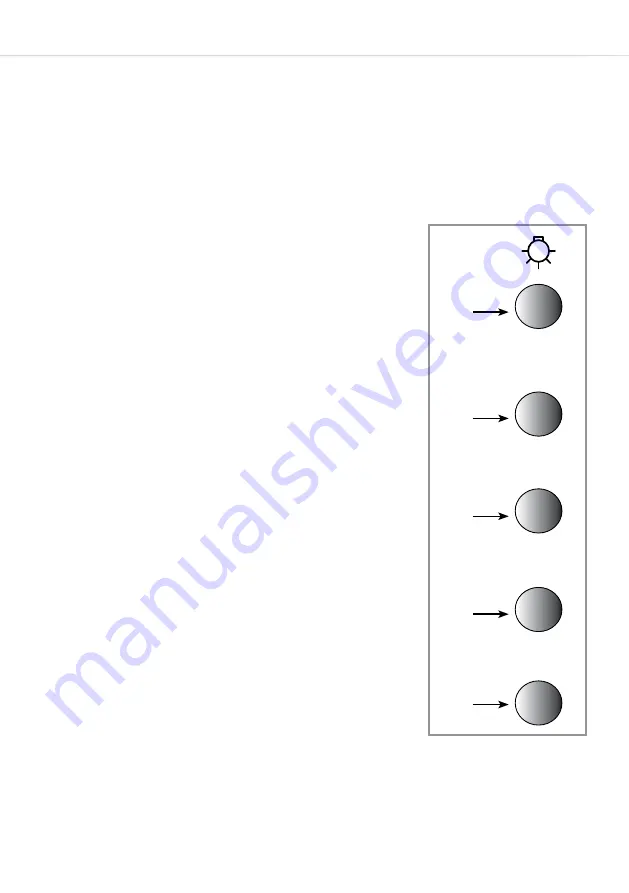
Control Panel (Fig. 1)

A - Light button 


B - Intensive speed button     
C - Speed 3 button    
D - Speed 2 button    


E - On (speed 1) and off button

To switch the extractor lights on or off 

•  

Press the light button (A).

To switch on the extractor and change the 
speed

•   

Press button ‘E’ to switch the unit on. Adjust 
the speed using buttons ‘B’, ‘C’ & ‘D’. 

•   

You may notice that the intensive speed 
(speed 4) indicator flashes when it is 
selected. This is not a fault (see page 18 for 
more information).

4

0/1

3

2

A

Fig. 1

B

C

D

E

Summary of Contents for EVC41

Page 1: ...www cda eu EVC41 Cylinder Extractor Installation use and maintenance...

Page 2: ...intenance 8 Removing the grease filter 9 Changing fitting the charcoal filter s 10 Changing the light 11 15 Installation 11 Installation preparation height 13 Ducting and ventilation 14 Mounting the e...

Page 3: ...edge about it unless they have had supervision or instructions on how to use the appliance by someone who is responsible for their safety Under no circumstances should any external covers be removed f...

Page 4: ...esources As a reminder of the need to dispose of household appliances separately the product is marked with a crossed out wheeled dustbin Please note Under no circumstances should the extractor be con...

Page 5: ...f less than 36m3 Steam cleaners must not be used when cleaning this appliance The performance of your extractor will vary depending on a number of factors These include type of extraction length of du...

Page 6: ...Fig 1 A Light button B Intensive speed button C Speed 3 button D Speed 2 button E On speed 1 and off button To switch the extractor lights on or off Press the light button A To switch on the extractor...

Page 7: ...ion This extractor is equipped with a clean air function that runs the motor for 10 minutes every hour to help keep the air in the kitchen refreshed To activate the clean air function touch and hold b...

Page 8: ...he extractor such as a hob with clean dry towels or similar cushioning items before carrying out any cleaning or maintenance in case of falling parts items Removing and cleaning the grease filter The...

Page 9: ...lace the grease filter repeat the steps in reverse Changing the charcoal filter re circulating only Fig 2 To ensure best performance of your extractor you should replace the charcoal filter every four...

Page 10: ...se contact CDA Customer Care using the contact details below to arrange a service visit Contact CDA Customer Care A Customer Care Department The CDA Group Ltd Harby Road Langar Nottinghamshire NG13 9H...

Page 11: ...dge of the extractor and hob must exceed 750mm If the instructions provided with your gas hob state that the required distance between the hob and extractor must be greater than our measurement then t...

Page 12: ...the advice regarding installation height as per page 11 roughly mark the screw hole positions A and B shown in Fig 4 for the extractor We advise you seek the aid of the person s helping you to support...

Page 13: ...be You may wish at this stage to fit the chimney piece fixing bracket Fig 5 If a flush fit to the ceiling is desired then this bracket should be fitted as close to the ceiling as possible whilst bear...

Page 14: ...ust marked out as per page 12 Use fixings e g wall plugs suitable for the surface to which the extractor is to be mounted Insert screws into the upper holes and tighten them most of the way With the a...

Page 15: ...the chimney piece Fig 7 Please note when preparing for connecting the extractor to the mains power supply that the electrical connection to the extractor should not be located inside the boundaries o...

Page 16: ...ordance with the following code BLUE NEUTRAL BROWN LIVE GREEN YELLOW EARTH As the colours of the wires in the mains lead for the appliance may not correspond with the coloured markings identifying the...

Page 17: ...rical voltage 220 240Vac Total rated power consumption 278W Troubleshooting If your extractor is not working 1 Check that the mains supply has not been switched off 2 Check that the fuse in the spur h...

Page 18: ...minutes of operation If the light button is flashing This is not a fault After 30 hours of usage the light button will flash to signal that the grease filter needs to be cleaned Press and hold the lig...

Page 19: ...t Best WBEP 150 3 206 W Nominal lighting power WL W Average illumination of the lighting system on the cooking surface EMiddle Lux Measured power consumption in standby PS 0 45 W mode PO 0 W Sound pow...

Page 20: ...9HY T 01949 862 012 F 01949 862 003 E customer care cda eu For service or queries relating to your product please contact The Customer Care Department on 01949 862 012 or email customer care cda eu Fo...

Reviews: