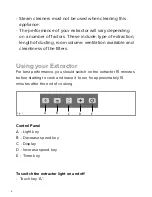
background image

5

To switch on the extractor

•   

Touch either key “B” or “D”.  The appliance will switch on at the first 
speed.  

•  

To increase the speed touch key “D”.  

•   

To switch the extractor off, touch and hold key “B” for two seconds 
when the extractor is working at higher speeds, or touch key “B” at 
speed one.

The intensive function

•   

The extractor is equipped with an intensive function which runs for 
ten minutes before returning to the previous selected speed.  To 
activate the intensive function, touch key “D” at speed three.  The 
display will blink whilst the intensive function is on.

The timer

•   

The extractor is equipped with a timer that allows the extractor to 
run for 15 minutes before switching off automatically.  

•   

To activate the timer, touch key “E”.  The display will flash a decimal 
point when the timer is on.  

Please note

:  The timer cannot be 

activated when the intensive function is on.

The clean air function

•   

The extractor is equipped with a clean air function that switches on 
the motor for ten minutes every hour at speed one.  

•   

To activate the clean air function, touch key “E” for two seconds 
when the appliance is off.  To return to normal function, touch 
either key “B” or “D”.  To switch off the clean air function, touch 
key “E”.  The display “C” will light up in sections whilst the motor is 
running, and will show the letter “C” during the fifty minutes when 
the motor is not running.

Summary of Contents for EVP101

Page 1: ...1949 862 012 F 01949 862 003 E customer care cda eu W www cda eu Customer Care Department The Group Ltd Harby Road Langar Nottinghamshire NG13 9HY T 01949 862 012 F 01949 862 003 E customer care cda e...

Page 2: ...ren with reduced physical sensorial or mental capacity or who lack experience or knowledge about it unless they have had supervision or instructions on how to use the appliance by someone who is respo...

Page 3: ...and health It also enables the constituent materials to be recovered saving both energy and resources As a reminder of the need to dispose of household appliances separately the product is marked with...

Page 4: ...me ventilation available and cleanliness of the filters Using your Extractor For best performance you should switch on the extractor 15 minutes before starting to cook and leave it to run for approxim...

Page 5: ...ctor is equipped with a timer that allows the extractor to run for 15 minutes before switching off automatically To activate the timer touch key E The display will flash a decimal point when the timer...

Page 6: ...ning the grease filter The grease filters should be kept clean to minimise the risk of fire When the display flashes alternating the speed selected with the letter A or at least once a month you shoul...

Page 7: ...coal filter re circulating only When the display flashes alternating the speed selected with the letter F the charcoal filters must be replaced After the charcoal filter has been replaced the electron...

Page 8: ...lb cover Do not touch bulbs or adjacent areas during or straight after prolonged use of the lights The light is designed for use during cooking and not for general room illumination Extended use of th...

Page 9: ...ill comply with the I E T and local regulations The wires in the mains lead of this appliance are coloured in accordance with the following code BLUE NEUTRAL BROWN LIVE As the colours of the wires in...

Page 10: ...isolate the extractor from the mains electrical supply after installation This appliance is intended to be connected to the mains electrical supply by means of an isolation switch and fused spur and i...

Page 11: ...extractor must be greater than 700mm then that is the distance that should be observed this is a legal requirement and may lead to your hob being disconnected from the gas supply and the installation...

Page 12: ...d Ventilation For best performance and lowest noise output we recommend the use of 125mm or 150mm ducting You can also use 100mm ducting but this will reduce performance and increase the noise from yo...

Page 13: ...um height specified in the instructions 2 Fit 4 wall plugs appropriate for the wall type into the drilled holes and fix two screws to the wall at positions A and leave approximately 5mm protruding 3 H...

Page 14: ...ze of your extractor and mark 2 points on the wall 20mm down from the ceiling for the fixings fig 7 2 Drill and insert 2 plugs suitable for use with the wall type into the holes and fix the bracket wi...

Page 15: ...650 m3 h Measured electric power at Best Efficiency Point WBEP 146 3 186 7 W Nominal lighting power WL 40 40 W Average illumination of the lighting system on the cooking surface EMiddle 200 200 Lux Me...

Page 16: ...12 F 01949 862 003 E customer care cda eu W www cda eu www cda eu Please contact our Customer Care Department for Service on the details below Customer Care Department The Group Ltd Harby Road Langar...

Reviews: