background image

17

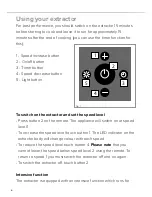
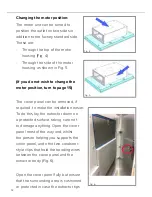
Mounting the extractor

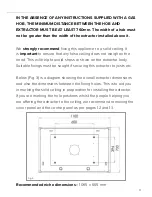
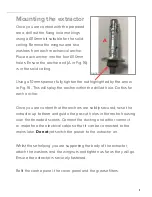
Once you are content with the prepared 
area, drill out the fixing hole markings 
using a Ø10mm bit suitable for the solid 
ceiling. Remove the wingnut and two 
washers from each mechanical anchor. 
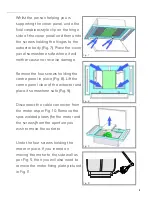
Place each anchor into the four Ø10mm 
holes. Ensure the anchor end (A in Fig. 16) 
is in the solid ceiling. 

Using a 10mm spanner, fully tighten the nut highlighted by the arrow 
in Fig. 16. This will splay the anchor within the drilled hole. Do this for 
each anchor. 

Once you are content that the anchors are solidly secured, raise the 
extractor up to them and guide the pre-cut holes in the motor housing 
over the threaded screws. Connect the ducting and either connect 
or make free the electrical cable so that it can be connected to the 
mains later. 

Do not

 yet switch the power to the extractor on.

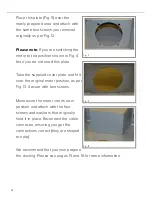
Whilst those helping you are supporting the body of the extractor, 
attach the washers and the wingnuts and tighten as far as they will go.  
Ensure the extractor is securely fastened. 

Refit the centre panel, the cover panel and the grease filters.

Fig. 16

A

Summary of Contents for EVX110

Page 1: ...mer Care Department The Group Ltd Harby Road Langar Nottinghamshire NG13 9HY T 01949 862 012 F 01949 862 003 E customer care cda eu W www cda eu www cda eu EVX110 Extractor Installation use and mainte...

Page 2: ...filters 9 Changing fitting the charcoal filter s 10 17 Installation 10 Installation preparation height 12 Changing the motor position 15 Ducting 16 Ducting for recirculation mode 17 Mounting the extra...

Page 3: ...rial or mental capacity or who lack experience or knowledge about it unless they have had supervision or instructions on how to use the appliance by someone who is responsible for their safety Under n...

Page 4: ...RECTIVE 2012 19 EU At the end of its working life the product must be taken to a special local authority waste collection centre or to a dealer providing appliance recycling services Disposing of a ho...

Page 5: ...extractor from the mains electrical supply after installation This extractor has been designed to be used in a room with a volume of less than 36m3 Steam cleaners must not be used when cleaning this...

Page 6: ...d set the speed level Press button 2 on the remote The appliance will switch on at speed level 1 To increase the speed level touch button 1 The LED indicator on the extractor body will change colour w...

Page 7: ...d hold button 5 for a maximum of approximately 5 seconds or until the desired intensity is achieved After approximately 5 seconds the lights will be at 20 intensity Please note that the lights will be...

Page 8: ...drying to a shine with a clean cloth IMPORTANT Always protect surfaces immediately beneath the extractor such as a hob with clean dry towels or similar cushioning items before carrying out any cleanin...

Page 9: ...ig 2 To attach a new charcoal filter first open the cover panel and remove the grease filters as described above and any old charcoal filter s Then offer up the charcoal filter to the aperture Repeat...

Page 10: ...facing side of the extractor When the extractor is to be installed above an electric hob the minimum distance between the hob and the downwards facing side of extractor must exceed 650mm When the ext...

Page 11: ...help to avoid stress or strain on the extractor body Suitable fixings must be sought if securing this extractor to joists etc Below Fig 3 is a diagram showing the overall extractor dimensions and als...

Page 12: ...e cover panel can be removed if required to make the installation easier To do this lay the extractor down on a protected surface taking care not to damage anything Open the cover panel most of the wa...

Page 13: ...screws holding the centre panel in place Fig 8 Lift the centre panel clear of the extractor and place it somewhere safe Fig 9 Disconnect the cable connector from the motor as per Fig 10 Remove the sp...

Page 14: ...ke the supplied cover plate and fit it over the original motor position as per Fig 13 Secure with two screws Manoeuvre the motor into its new position and attach with the four screws and washers that...

Page 15: ...ever possible utilise rigid circular pipe which has a smooth interior rather than the expanding concertina type ducting The lengths of the ducting without performance being affected are as follows 4 m...

Page 16: ...from the extractor to prevent the cleansed air being drawn back into the extractor Fit the charcoal filters to the body of the motor as shown on page 9 Note that the duct pipe should be secured and se...

Page 17: ...hin the drilled hole Do this for each anchor Once you are content that the anchors are solidly secured raise the extractor up to them and guide the pre cut holes in the motor housing over the threaded...

Page 18: ...re coloured in accordance with the following code Green Yellow Earth Blue Neutral Brown Live As the colours of the wires in the mains lead for the appliance may not correspond with the coloured markin...

Page 19: ...itch is located within 2m of the appliance where practical This appliance is intended to be connected to the mains electrical supply by means of an isolation switch and fused spur and is intended to b...

Page 20: ...he red power switch on the panel next to the motor has not been turned off Fig 18 If your lights are not working 1 Check that the mains supply has not been switched off 2 Check whether the extractor s...

Page 21: ...he remote control is temporarily responding incorrectly or not at all If the power supply to the extractor is cut and then restored the appliance will run an approximately 15 second diagnostic program...

Page 22: ...22 NOTES...

Page 23: ...increase factor f y FDEHood 35 3 A x EEIHood 49 2 A Point QBEP 368 5 m3 h Point PBEP 484 Pa Maximum airflow QMAX 765 m3 h Measured electric power at Best WBEP 140 5 21 373 W Nominal lighting power WL...

Page 24: ...partment The Group Ltd Harby Road Langar Nottinghamshire NG13 9HY T 01949 862 012 F 01949 862 003 E customer care cda eu W www cda eu www cda eu Please contact our Customer Care Department for Service...

Reviews: