background image

Important

The  CDA  Group  Ltd  cannot  be  held  responsible  for  injuries  or  losses  caused  by  incorrect  use  or  installation  of  this 
product. Please note that CDA reserve the right to invalidate the guarantee supplied with this product following incorrect 
installation or misuse of the appliance.

Under no circumstances should any external covers be removed for servicing or maintenance except by suitably  
qualified personnel.

Appliance information:

Please enter the details on the appliance rating plate below for reference, to assist CDA Customer Care in the event of a 
fault with your appliance and to register your appliance for guarantee purposes.

  Appliance Model 

  Serial Number 

CE Declarations of Conformity:

This  appliance  has  been  designed,  constructed  and  marketed  in  compliance  with  safety  requirements  of  EEC  Directive 
2006/95/EEC (Low voltage) and requirements of EMC Directive 2004/108/EEC.

This appliance has been manufactured to the strictest standards and complies with all applicable legislation, including 
Electrical safety (LVD) and Electromagnetic interference compatibility (EMC). Parts intended to come into contact with 
food conform to EEC/89/109.4

IMPORTANT  INFORMATION  FOR  CORRECT  DISPOSAL  OF  THE  PRODUCT  IN  ACCORDANCE  WITH  EC 
DIRECTIVE 2002/96/EC.

At the end of its working life, the product must not be disposed of as urban waste. It must be taken to a special local 
authority differentiated waste collection centre or to a dealer providing this service.

Disposing of a household appliance separately avoids possible negative consequences for the environment and health 
deriving from inappropriate disposal and enables the constituent materials to be recovered to obtain significant savings 
in energy and resources. As a reminder of the need to dispose of household appliances separately, the product is marked 
with a crossed-out wheeled dustbin.

Summary of Contents for FF850

Page 1: ...Group Ltd Harby Road Langar Nottinghamshire NG13 9HY T 01949 862 012 F 01949 862 003 E service cda eu W www cda eu Passionate about style FF850 freestanding combination fridge freezer Manual for Inst...

Page 2: ...EEC Low voltage and requirements of EMC Directive 2004 108 EEC This appliance has been manufactured to the strictest standards and complies with all applicable legislation including Electrical safety...

Page 3: ...quired level recommended between 2 4 and switch off the fast freeze function Please note The appliance will work continuously until it comes down to the correct temperature If the appliance is switche...

Page 4: ...freeze function should be switched off when not required If the ambient temperature is less than 10 then the fast freeze function can be used continuously to improve the performance of the appliance...

Page 5: ...lean cloth Use The freezer compartments are designed to store only frozen food Never put hot or warm foods in the freezer allow them to cool fully before putting them into the freezer Follow the instr...

Page 6: ...ng CDA Customer Care to prevent unnecessary service calls and potential cost If the appliance is not working Check there is power to the appliance The green light on the control panel is lit The house...

Page 7: ...S 1363 should be used As the colours of the wires in the mains lead of this appliance may not correspond with the coloured markings identifying the terminals in your plug proceed as follows The wire w...

Page 8: ...roup Ltd Harby Road Langar Nottinghamshire NG13 9HY T 01949 862 012 F 01949 862 003 E service cda eu W www cda eu Passionate about style To contact our Customer Care Department or for Service please c...

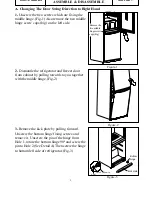
Page 9: ...nscrew the bottom hinge fixing screws and remove it Unscrew the pin of the hinge from Hole 1 rotate the bottom hinge 900 and screw the pin to Hole 2 See Detail A Then screw the hinge to bottom left si...

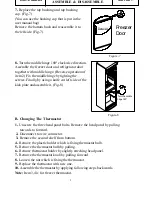
Page 10: ...Unscrew the pin of the top hinge Fig 5 Detail A and screw it to the left hinge Fig 5 Detail B Refrigerator Door Left catcher Right catcher 6 Replace the top bushing and top bushing cap Fig 6 Remove th...

Page 11: ...r which is fixing thermostat bulb 5 Remove the thermostat bulb by pulling 6 Remove thermostat holder by slightly streching head panel 7 Remove the thermostat knob by pulling forward 8 Loosen the nut w...

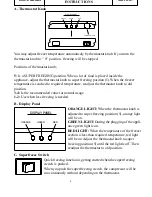
Page 12: ...4 Is the recommended value for normal usage 1 2 Use when less freezing is needed GREEN DISPLAYPANEL RED ORANGE ORANGE LIGHT When the thermostat knob is adjusted to super freezing position 5 orange lig...

Reviews: